A free watermark remover can clean an image or video without changing its aspect ratio, but “free” should include the final export, not just the upload and preview. For the shortest route, confirm your editing rights, match the tool to image or video, mark the smallest possible area, and inspect the exported file.
The familiar trap is a polished result that becomes payable only at download. I use one practical rule for this category: a tool is not meaningfully free if it withholds the usable file. This guide starts with a three-step workflow, then shows how moving video marks, privacy, file size, and platform-specific layouts change the decision. It also explains where an AI watermark remover free tier is enough and where a desktop or credit-based workflow makes more sense.
How to Remove a Watermark for Free in 3 Steps
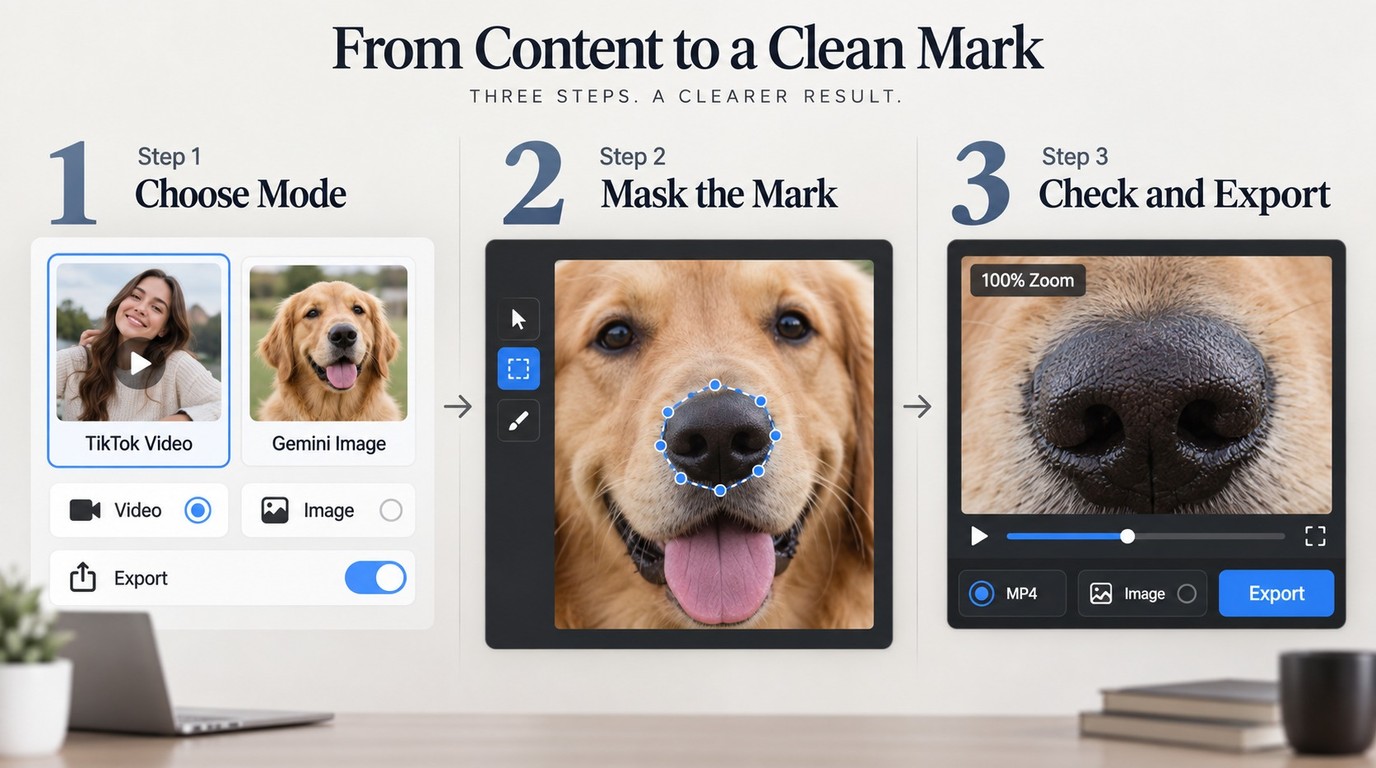
The fastest reliable method is to check export access before processing, use the correct image or video mode, and review the finished file at full size. Work through these steps in order:
- Confirm your right to edit the file and choose image or video mode.
- Mark the watermark with the smallest complete selection.
- Preview the result, verify export access, and save the final file.
Rights reminder: Remove a watermark only from content you own, created, licensed, or have permission to edit. Do not use removal to hide authorship, misrepresent a source, or redistribute someone else's work.
Step 1: Confirm You Can Edit the File and Choose Image or Video
Start with permission, then file type. A logo on your own product photo, a timestamp from your camera, or a mark on a video you produced is different from a photographer's proof image or a reposted creator clip. If the license does not let you alter the work, stop before uploading it anywhere.
For an image, choose a tool with a brush, lasso, or automatic object-selection mode. For video, choose a free video watermark remover that can process a region across time. A still-image editor sees one frame; video software must rebuild the covered pixels repeatedly as the background changes.
Check the exit before you enter. Look for the allowed file type, size limit, resolution cap, sign-in requirement, and whether the clean export is included. As one Reddit user in r/software put it, “I've gone through a few pages on my search engine, and everyone starts off as free and then wants to charge me once it completes the process.” That is why export access belongs in step one, not step three.
Step 2: Mark the Watermark and Run the Removal
Use the smallest selection that fully covers the letters, logo, timestamp, or overlay. A wide mask gives the model more background to invent, which raises the chance of smeared texture, bent lines, or missing detail. For a solid corner background, a tight rectangle may be enough. For hair, fabric, foliage, or a face, trace the shape more carefully.
Automatic detection is useful when contrast is clear, but it is not a reason to skip the mask review. Zoom in and check whether the selection cuts through a nearby object. If it does, redraw the boundary before processing. My editorial judgment is simple: a careful mask usually matters more than an impressive “one-click” label.
Step 3: Inspect the Result Before You Export
Review at 100% zoom. Check straight edges, repeating patterns, skin texture, text, and the border where the repaired patch meets the original image. A result that looks clean in a small preview can show obvious cloning or softness at full resolution.
For video, watch more than the opening frame. Inspect the start, middle, and end, plus any moment when the logo moves or the camera cuts. Then compare the export settings with the source. Keep the original resolution when possible, use a practical delivery format, and avoid an unnecessary second compression pass. A free watermark remover is useful only when the saved result preserves the detail you need.
How to Remove a Watermark from Video Without Blur
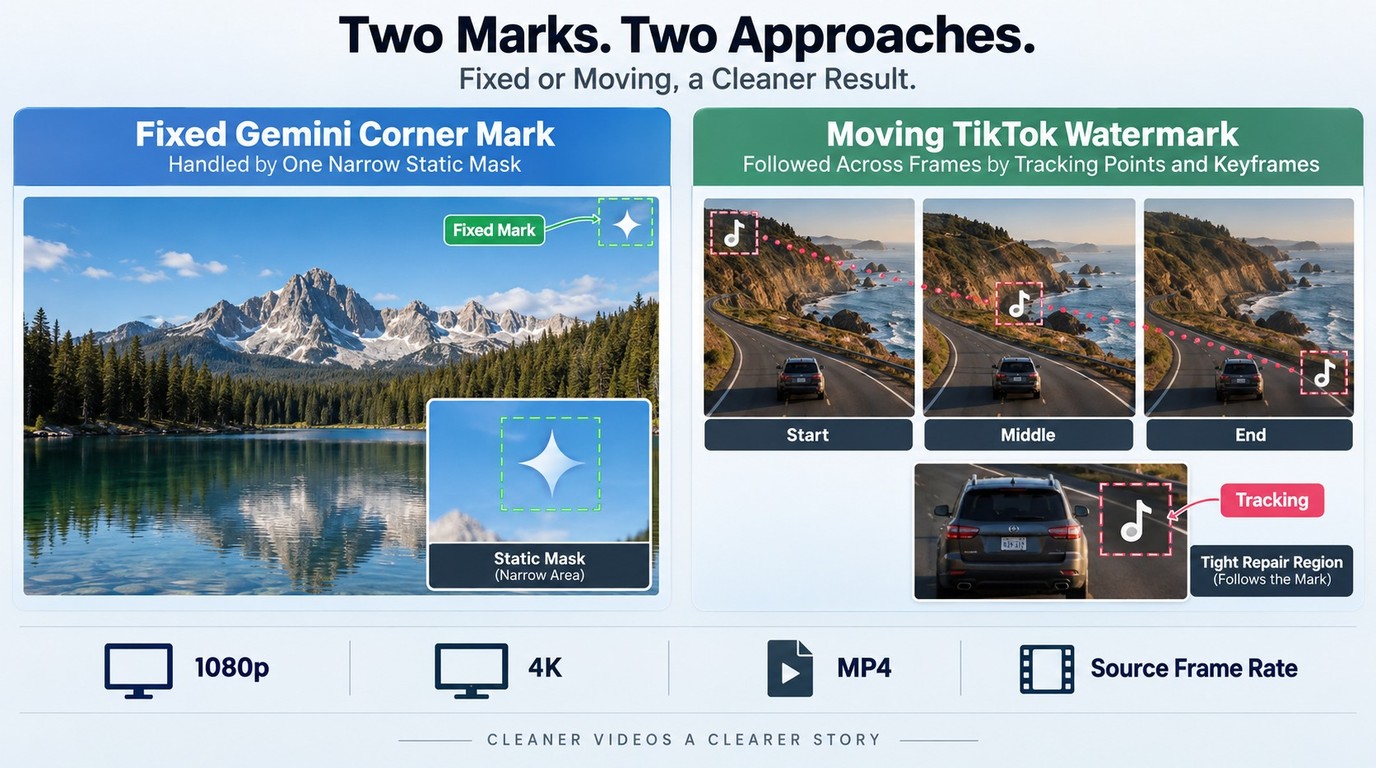
To remove a watermark from video with less blur, track the mark across frames, keep the repair area tight, and preview several points on the timeline before export. No method can promise a perfect reconstruction when a large mark covers a moving face, fine text, or a detailed background; the realistic goal is to reduce blur, flicker, and visible residue.
Identify Whether the Watermark Is Fixed or Moving
A fixed watermark stays in one screen position while the scene changes behind it. That case can often use a stationary mask for the whole clip. A moving watermark changes position, scale, or opacity, so it needs tracking or separate keyframes. Applying one fixed rectangle to a moving logo leaves uncovered frames and may erase unrelated parts of the picture.
This distinction explains many “works at first, fails later” results. As one Reddit user in r/SoraAi wrote, “All the ones I've seen have spotty removal with it still visible especially at the start of the video.” The practical response is not a larger blur box. It is better temporal coverage: place tracking points before the first visible frame, after cuts, and wherever the mark changes direction.
Select the Smallest Area That Covers Every Frame
The right mask is complete but narrow. Include the watermark's outer glow, shadow, and antialiased edge, yet avoid pulling in more of the background than necessary. If a logo crosses a person's sleeve, a road sign, or subtitles, split the job into shorter segments. One mask rarely describes all of those backgrounds equally well.
Cropping is a valid option when the mark sits near an edge and composition can spare the pixels. It is a poor default when the crop changes the intended framing. A Reddit user in r/StableDiffusion captured the tradeoff directly: “I don't want to crop the watermarks out as that would mess with the aspect ratio.” In that situation, a tight tracked repair preserves the canvas better than cutting the entire frame.
Preview the Start, Middle, and End of the Clip
Previewing one frame is not quality control for video. Check at least the first appearance, a midpoint with different background detail, and the last appearance. Add checks around scene cuts, camera pans, and moments when a subject passes behind the mark. Look for four defects: a remaining logo edge, a soft patch, repeating texture, and frame-to-frame flicker.
If one section fails, shorten the range and adjust only that segment. A second mask can follow a new motion path without disturbing the part that already looks natural. For difficult footage, several short tracked repairs are safer than one oversized region across the full timeline. The governing principle is frame stability, not how quickly the first preview finishes.
Export at the Right Resolution and Format
Match the source resolution unless you have a separate reason to resize. Exporting a 4K source at 1080p discards detail; enlarging a 1080p source to 4K does not restore detail hidden by the watermark. Also keep the frame rate aligned with the source so motion does not gain judder during a removal job.
MP4 is the broad compatibility choice for sharing and editing. MKV is useful when the workflow needs a flexible container, but some mobile and social apps handle MP4 more predictably. Save a short sample first, compare it with the original, and then process the full clip. That small checkpoint catches compression damage before a long export consumes time or credits.
Free Online or Desktop: Choose by Cost, Privacy, and File Size
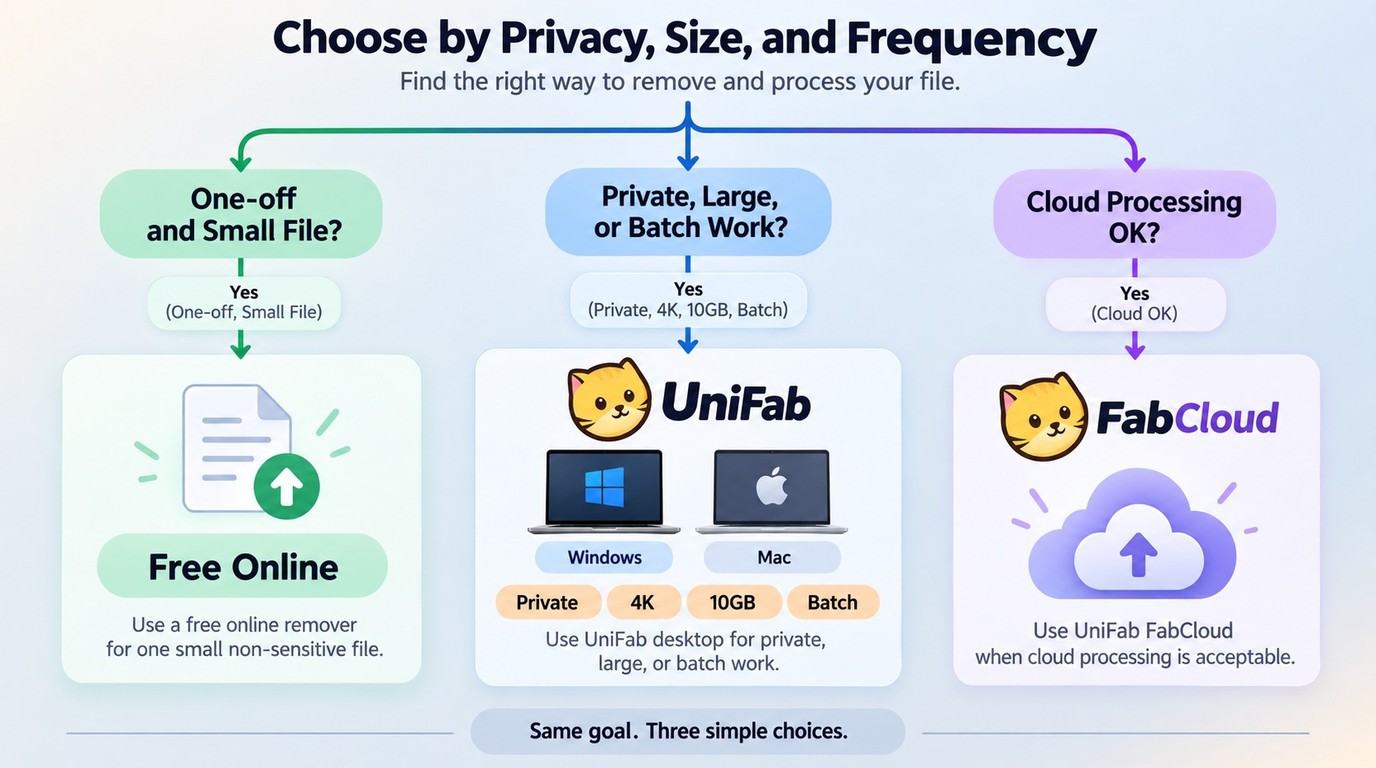
A free online watermark remover fits a one-off, non-sensitive image or short clip when the clean export is available. A desktop workflow is the stronger fit for confidential files, repeated jobs, large video, or projects that need predictable resolution and format support.
A Scenario-to-Tool Decision Table
| Scenario | Recommended route | Cost or access | Processing | Selection note |
| One non-sensitive image | Free online image remover | $0 or limited tier | Cloud upload | Confirm clean export first |
| Short non-sensitive video | Free online video remover | Export charge possible | Cloud upload | Preview several frames |
| Private, large, or batch video | UniFab desktop workflow | Desktop access | Local Windows/Mac processing | 4K; 10GB; MP4/MKV; batch |
| Large video via cloud | UniFab FabCloud route | $20/month; $199.99/year; 30 starter credits | Cloud credits | Confirm credit use before batch |
Source: UniFab's official Watermark Remover AI and FabCloud pricing pages, as of September 2026.
The table separates two routes that are often blurred together. Windows or Mac support describes the local desktop workflow; FabCloud credits describe cloud-service access. Confidential footage belongs in the explicitly local route, while cloud pricing applies to jobs processed through FabCloud.
File sensitivity can outweigh convenience. One Reddit user in r/Piracy asked, “Do you know any solution that I can remove watermark locally? I am unable to put the photo online thus needing local solution.” For a public meme image, cloud upload may be acceptable. For client footage, unreleased campaigns, IDs, or family media, use a confirmed local route and keep the source under your control.
For cost, judge the whole job rather than the landing page. A single image favors a no-cost online export. A short video requires a frame preview before payment. Repeated 4K or batch work favors a tool with stated file, format, and resolution limits because those constraints determine whether the job can finish at all.
TikTok, Gemini, and CapCut: What Changes
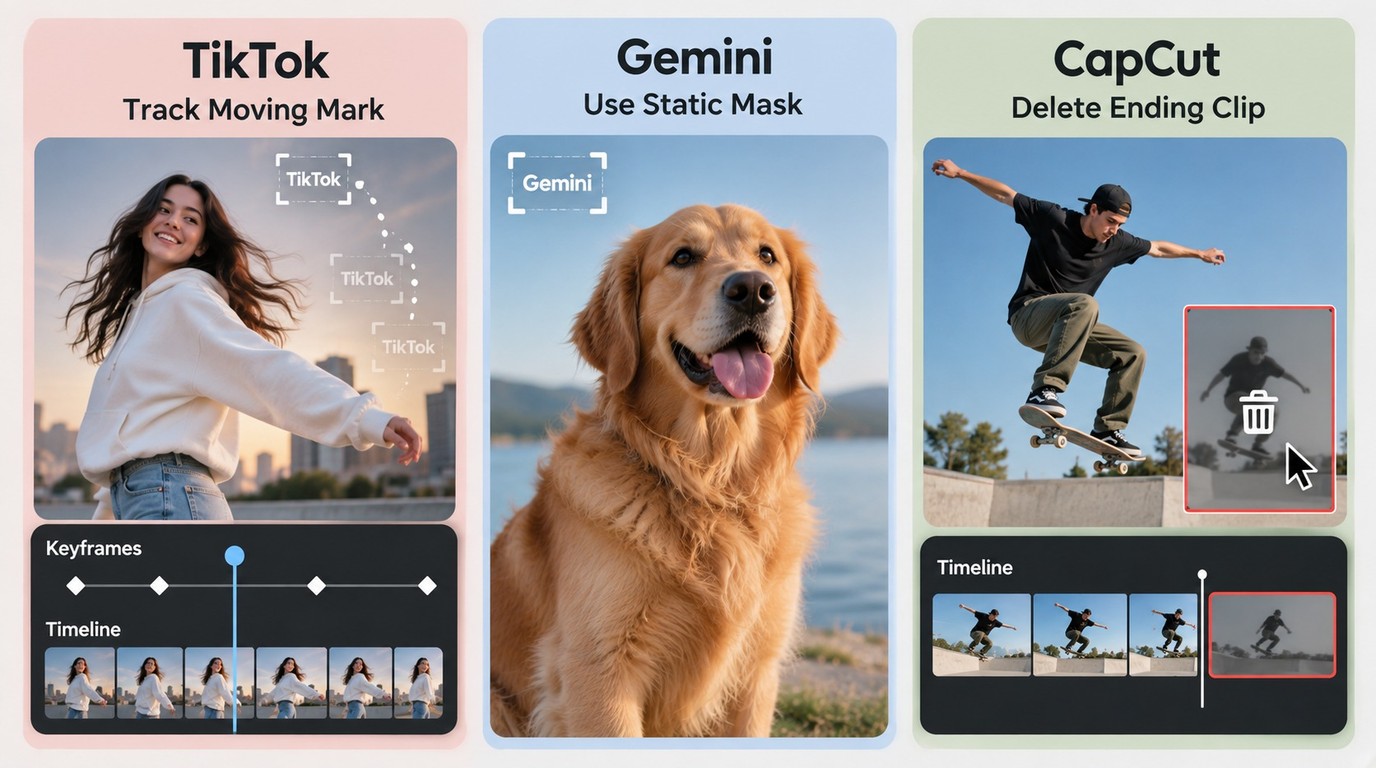
TikTok, Gemini, and CapCut do not require three unrelated removal systems. Choose by the mark's behavior: track a moving logo, use a tight static repair for a small corner mark, and remove a separate template ending on the timeline instead of rebuilding pixels that are not part of the main clip.
Use boundary: Apply these methods only to material you created, own, or have clear permission to edit. Follow the relevant platform terms, preserve required attribution, and do not present another creator's work as your own.
TikTok: Moving Logos and Reposted Clips
For your own TikTok video, the most direct route is the original camera file or editing project. That avoids reconstructing pixels and preserves the full frame. If you have permission to edit a copy with a moving logo, use a tracker or keyframed mask that follows each position rather than a fixed crop.
A TikTok watermark remover should be judged on motion coverage, not the first clean frame. Check every position the logo occupies and split the clip at scene changes. If the mark crosses a face, caption, or product detail, a repair may remain visible; returning to the authorized source file is better than widening the mask. The platform name attracts the search, but the logo's movement determines the method.
Gemini: Remove Small Logos Without Damaging Detail
A small Gemini mark near a quiet corner usually calls for a narrow static selection. Include its complete edge and shadow, then inspect nearby gradients, hair, fingers, typography, or repeating patterns. These areas expose copied texture quickly.
For a still image, compare inpainting with a content-aware manual patch. For a Gemini video you are authorized to edit, treat the mark as a video object: if it stays fixed, use one region; if it shifts with the layout, track it. A Gemini watermark remover cannot recover information that was fully covered, so a simpler background gives the repair more credible visual context.
CapCut: Separate Template Endings from Embedded Watermarks
CapCut projects can present two different tasks. If your own project contains a separate branded ending clip, remove that timeline segment and review the transition. If text or a logo is already baked into the picture, trimming the ending does nothing; use a mask, crop, overlay, or tracked repair based on its position.
The same distinction matters when learning how to remove a Filmora watermark: reopening the licensed source project is different from repairing a mark embedded in an exported frame. When you use CapCut on an authorized TikTok clip, inspect the full motion path and final aspect ratio rather than assuming a crop will fit every post format.
Do not turn the CapCut timeline into a stack of large blur panels. A solid overlay is reasonable when it matches the design; a tracked reconstruction is better when the background must remain visible. If the mark covers a subject for most of the clip, the original project or a new edit is the more credible route.
UniFab Watermark Remover AI for Sora and Large 4K Video
UniFab Watermark Remover AI fits authorized Sora or other AI-generated video when the file is large, the target export is 4K, or several MP4/MKV files need the same workflow. Sora is a file scenario here, not a claim of a dedicated Sora model or platform partnership.
Compare Verified Specs, Current Pricing, and Tradeoffs
Our UniFab Watermark Remover AI supports Windows and Mac, video up to 4K, files up to 10GB, MP4 and MKV output, and batch processing. Those limits make it relevant when an online remover rejects a large upload, lowers the export resolution, or forces one-file-at-a-time work. My editorial take is that the generator name matters less than the file size, watermark motion, and required export.
UniFab's desktop and FabCloud routes should be kept distinct. Windows/Mac compatibility describes the desktop environment, while the 600-credit and 1,000-credit plans describe FabCloud access. Local processing is the privacy-oriented desktop path; FabCloud jobs consume cloud credits. This distinction prevents a cloud price from being mistaken for a desktop license.
There are real tradeoffs. UniFab requires a Windows or Mac workflow, while a browser tool is quicker for one small image on a phone. FabCloud credits also add a measurable cost for repeated jobs, and the listed video outputs are MP4 and MKV rather than every container. The 30 starter credits provide a practical way to confirm that the selected route, file, and export settings fit before committing a large batch.
This is the better fit for recurring 4K, 10GB, or batch video work. It is not the efficient choice for a single non-sensitive corner logo that a free online image tool can export cleanly in one pass.
Free Watermark Remover FAQ: HitPaw, Safety, and Cost
Before trusting a free watermark remover, verify the usable export, file-handling model, supported size, and ownership of the content. A familiar product name or a free upload button does not answer those four questions.
Is HitPaw Watermark Remover Free, and What Does It Cost?
Answer: HitPaw Watermark Remover labeled “online” or “free” does not by itself establish that the final unwatermarked export costs $0. Use a disposable sample first and continue only if the download screen shows the resolution and access you need. For a one-time job, the practical cost is whatever plan or credits the export requires; if payment appears after processing, compare that cost with a local editor or another tool that states its export limit up front.
Is It Safe and Legal to Remove a Watermark?
Answer: Safety and legality are separate. Safety concerns where the file is processed, how long it is retained, and whether you trust the installer or upload service. Legal use turns on ownership, permission, license terms, platform rules, and local law. Editing your own marked export is different from removing a photographer's proof watermark or concealing the source of a repost. Keep the result for the authorized purpose and do not redistribute work you do not control.
Why Is a HitPaw Watermark Remover Crack a Risky Shortcut?
Answer: A cracked build removes the normal update and installer trust chain, which creates avoidable malware, credential, and file-corruption risk. It may also stop working after an operating-system or application update. Do not install it. Use the official release, a legitimate no-cost export, or a manual crop, patch, or overlay on content you are allowed to edit.
Bottom Line: Match the Tool to the File
Choose a free online remover for one non-sensitive image, a tracked video workflow for moving marks, and a desktop or clearly specified service for large, private, 4K, or batch files. The decisive checks are editing rights, clean-export access, frame stability, privacy, and final format. A smaller, well-matched repair is more reliable than the tool with the loudest “free” claim.