If your converter offers AAC but no M4A preset, it may be showing the codec rather than the container. To convert WAV to M4A, choose AAC for smaller files or ALAC for lossless audio, then export through an online converter or a compatible desktop app.
That label mismatch is where many simple jobs go sideways: a Reddit creator looking for .m4a found AAC instead and assumed it was the wrong option. The codec is the real decision, because the .m4a extension alone does not tell you whether the audio is lossy. This guide starts with a three-step WAV to M4A online route, then explains how to convert WAV to M4A on Mac and Windows without uploading private files. It also covers lossless output, repeatable batch work, and reverse conversion.
How to Convert WAV to M4A Online in 3 Steps
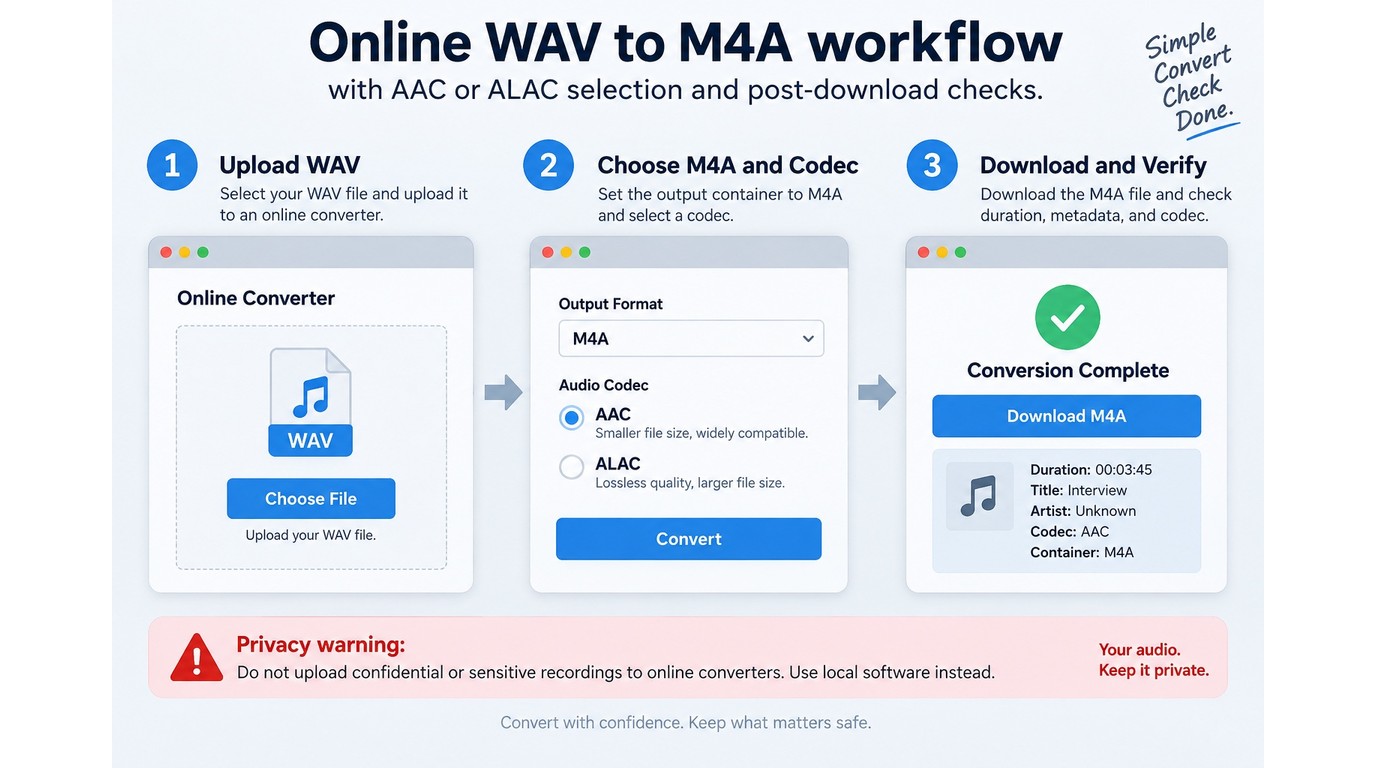
A common browser route is to upload the WAV, choose M4A, set AAC or ALAC if the service exposes that choice, and download the result. It suits a one-off, non-sensitive file; private recordings and large collections belong in a local workflow.
Before uploading: Convert only files you own or are authorized to use. Read the service's terms plus its file-retention and deletion policy, especially for client audio, unreleased music, or private recordings.
Step 1: Upload the WAV File and Select M4A
Start with the source and the destination, not the quality slider. A WAV to M4A free tool should accept the complete file, show its duration, and provide M4A as an output container. Before uploading, check four prerequisites:
- Keep an untouched backup of the WAV.
- Confirm the site's file-size limit accepts the source.
- Use local software for confidential or unreleased audio.
- Make sure the destination app accepts M4A.
That last point prevents a technically successful conversion from failing at playback. The same privacy tradeoff appears across broader video format converter workflows: browser processing is convenient, while local processing keeps the source on your drive.
Step 2: Set the Codec and Quality Controls
Choose the codec deliberately. AAC compresses the audio and produces a smaller file. ALAC preserves lossless audio inside an M4A container, but many online tools offer AAC alone even when the output button says M4A.
Keep the sample rate and channel count aligned with the WAV unless your delivery target requires a change. Bitrate matters for AAC because it controls how much data the encoder keeps per second. A higher setting does not improve the original recording, but an unnecessarily low setting can make cymbals, ambience, and sharp transients sound brittle. Use AAC for listening and sharing, and choose ALAC when the next stage is editing or archiving.
Step 3: Convert, Download, and Verify the Result
Run the conversion, download the file, and test the result before deleting or moving the WAV. Check the output in the app or device that will actually use it, not just in the browser preview.
- Compare the full duration with the WAV.
- Play the beginning, middle, and end.
- Check the title, artist, artwork, and track order.
- Confirm the codec is AAC or ALAC as intended.
AAC output should be smaller than the WAV; ALAC will usually remain much larger than AAC. If the duration is short, the metadata is blank, or the codec differs from your selection, keep the source and change the export settings before trying again.
WAV vs. M4A Quality: AAC, ALAC, and Lossless Limits
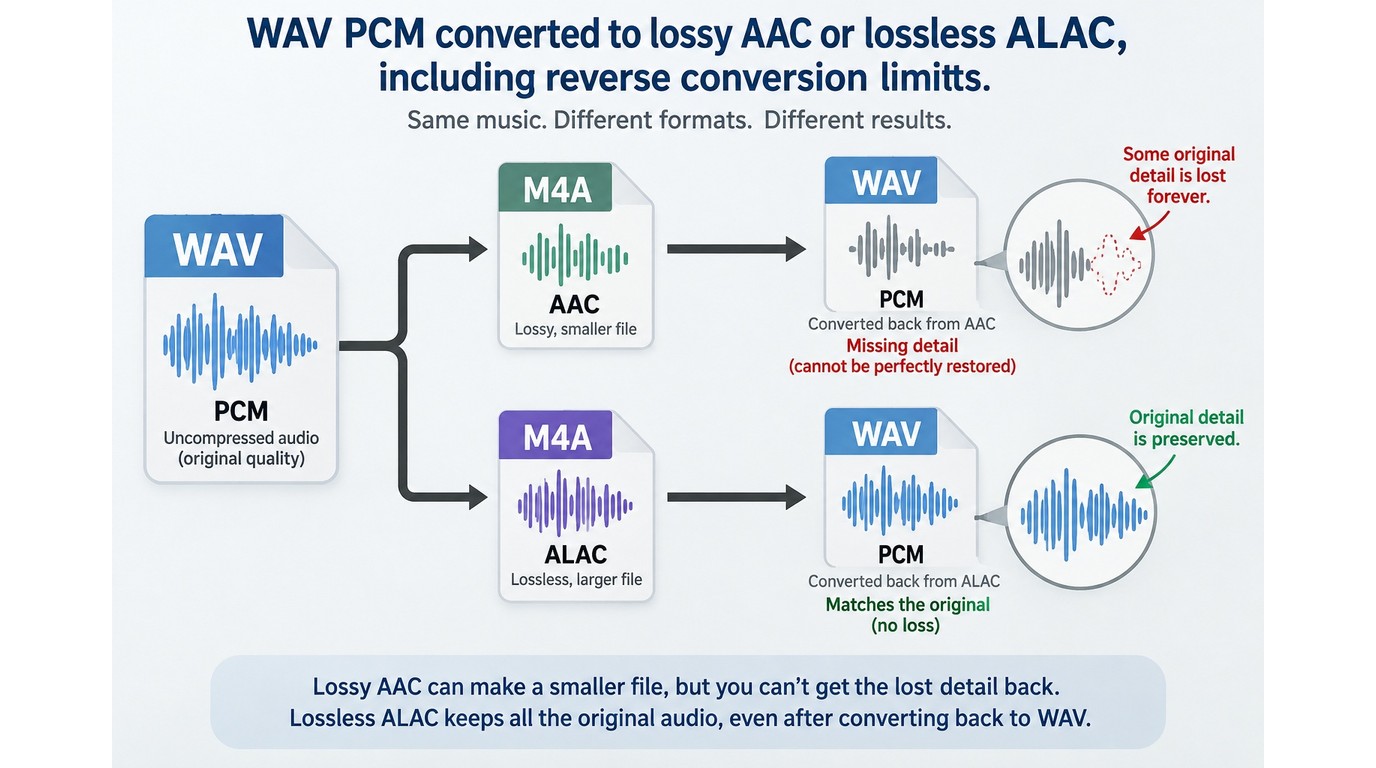
WAV can be converted to M4A without losing audio information when the M4A contains ALAC. An AAC-based M4A is lossy: it trades some audio data for a smaller file, and converting it back to WAV cannot restore what the AAC encode discarded.
Why M4A Is a Container, Not a Quality Level
The useful distinction is container versus codec. M4A is the container, the file wrapper identified by the extension. AAC and ALAC are codecs, the methods used to store the audio inside that wrapper.
WAV commonly holds uncompressed PCM audio. Sample rate records how many samples are taken each second, while bit depth records the precision of each sample. Bitrate describes the amount of data used per second in a compressed stream. Those properties shape the output; the letters in .m4a do not.
This is why an AAC preset can be the correct route to an M4A file. The interface may name the codec because that is the setting that changes compression and compatibility.
When AAC Is the Practical Choice
AAC makes sense when storage, mobile playback, or sharing matters more than keeping an uncompressed master. Audacity's official export guidance notes that M4A with AAC can deliver better quality than MP3 at the same file size. That does not make every AAC encode better; the source and encoder setting still set the ceiling.
For a phone copy, presentation track, game asset, or email attachment, AAC avoids carrying a large PCM file where the extra size adds little practical value. Keep the WAV as the master and treat the AAC M4A as a delivery copy. One master plus purpose-built exports is cleaner than repeatedly converting the same lossy file.
When ALAC Preserves the Lossless Workflow
ALAC is the correct M4A codec when you need WAV to M4A lossless conversion. It compresses audio without discarding information, so the decoded audio can match the WAV source. The result remains larger than AAC, but it works well for an Apple-centered library or a workflow that needs smaller lossless files.
The destination app still matters. Some software accepts AAC-based M4A but not ALAC, while an editor may prefer WAV for simple interchange. Test one representative file before converting a library, then inspect both playback and metadata.
Why Converting Back to WAV Does Not Restore Lost Detail
A larger file is not proof of recovered quality. As one Reddit user in r/FL_Studio asked, "Is there anyway to convert it back to a wav file like i dont know how all that works is the original quality lost forever and is it that much of a differenc." If the M4A uses AAC, the missing detail is already gone; WAV merely stores the decoded AAC audio without further compression.
Apple's format-conversion guidance makes the same practical point: converting a compressed file to an uncompressed format does not improve its quality. This also applies when converting MP4 to WAV. The new WAV can help an editor accept the file, but it does not become the original master.
Desktop Conversion Methods for Mac and Windows
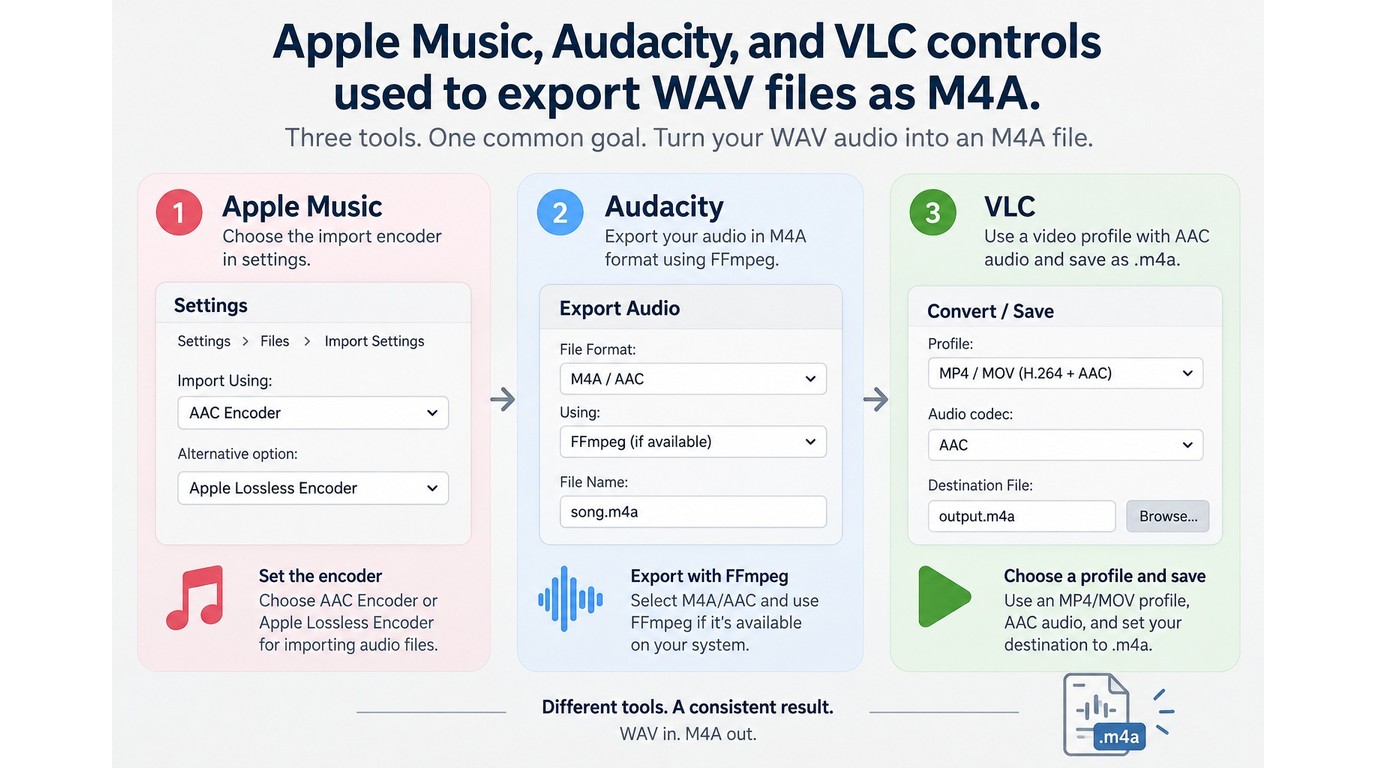
Use Apple Music on Mac for library-based conversion, Audacity with FFmpeg when you need editing control, or VLC when you already know its profile system. Choose a desktop route for private audio, repeat jobs, or any project where the codec must be checked before a full batch runs.
Apple Music on Mac for Library-Based Conversion
Apple Music is a direct way to convert WAV to M4A on Mac when the files belong in a music library. Its import settings expose both AAC Encoder and Apple Lossless Encoder, so the codec choice is clear.
- Open Music > Settings > Files > Import Settings.
- Choose AAC Encoder for a smaller M4A or Apple Lossless Encoder for ALAC.
- Import the WAV files and select the tracks in the library.
- Open File > Convert, then create the selected format version.
Apple Music keeps the original alongside the converted copy, so check which version you are editing or moving. It fits you if library organization matters. It is less direct for files that should stay outside the Music library or for Windows-based work.
Audacity with FFmpeg for Editing Control
Audacity suits a WAV that needs trimming, fades, level changes, or channel work before export. M4A import and export depend on FFmpeg, and Audacity provides official FFmpeg installation steps for Windows and macOS.
- Install Audacity and its recommended FFmpeg library.
- Import the WAV with File > Import > Audio.
- Make the required edits and listen across each edit point.
- Choose File > Export Audio, select M4A/AAC, and set the output options.
- Export one sample and inspect it before processing more files.
Audacity gives you more editing control than a one-click converter. It is not ideal when you want untouched batch conversion with no timeline work, and ALAC availability should be checked in the export options rather than assumed from the M4A extension.
VLC for a Familiar Utility Workflow
VLC can handle a quick conversion through Convert/Save on Windows or Convert/Stream on macOS. The catch is its profile editor: the filename extension can say M4A while the selected encapsulation or audio codec says something else.
- Add the WAV in VLC's conversion window.
- Create or edit a profile using an MP4/MOV container and AAC audio.
- Save the destination with an
.m4aextension and start conversion. - Inspect the finished codec in VLC before deleting the WAV.
VLC suits you if it is already installed and you are comfortable checking profiles. It is less suitable for a large managed library or a workflow that requires ALAC, tag preservation, and predictable folder handling. For M4A to WAV using VLC, choose a WAV-compatible output profile and apply the same post-conversion checks.
Method Selection at a Glance
The right method follows the file's sensitivity, operating system, and codec requirement. A quick upload saves setup time, while desktop tools give you a clearer checkpoint before repeated work.
| Method | Operating system | Upload required | Suitable for | Codec control |
| Online converter | Modern browser | Yes | One non-sensitive file | Service-specific |
| Apple Music | macOS | No | Music-library conversion | AAC or Apple Lossless |
| Audacity + FFmpeg | Windows, macOS | No | Editing before export | M4A requires FFmpeg |
| UniFab Video Converter | Windows, macOS | No | Local batches | M4A endpoint not listed |
Source: Apple Support, Audacity Support, and UniFab's official Video Converter page, as of September 2026.
For one non-sensitive file, the online route avoids installing software. For private audio, Apple Music, Audacity, or VLC keeps the source local; choose by library, editing, or profile-control needs. When the queue itself becomes the problem, a local batch converter becomes relevant, provided its exact input and output choices match the job.
UniFab for Batch WAV-to-M4A Workflows: Verify the Fit
UniFab Free Video Converter fits a local batch workflow, but its public page does not list M4A as an output example. It confirms WAV and AAC, so proceed only if the app exposes the required M4A container and codec.
What UniFab's Product Page Establishes
The UniFab Video Converter page describes a Windows and macOS app that processes local file or folder inputs and supports more than 1,000 video and audio formats. As of September 2026, it costs $0 and adds no watermark.
Batch size decides whether this route earns its setup time. It suits repeated private work; one WAV is usually quicker in Apple Music or a browser converter.
Confirm the WAV and M4A Endpoints Before Starting
Two limits matter: M4A is absent from the public examples, and a desktop batch interface adds little value to one non-sensitive file. Check a sample first:
- Add one representative WAV, not the full folder.
- Open the output selector and look for M4A plus AAC or ALAC.
- Convert the sample and inspect duration, codec, metadata, and playback.
- Add the remaining files only after the sample passes.
Broad format coverage does not prove a specific endpoint. If M4A is absent, use a tool that names the required container and codec.
Who Benefits Most from a Local Batch Workflow
Batch conversion matters when repetition starts creating errors. As one Reddit user in r/techsupport put it, "I have a big folder which contains many sub and sub folders. In those there are many .wav files, and I'd like to convert all of them to AAC with variable bit rate."
That scenario suits a local queue, but folder input does not promise a recreated tree, retained tags, or playback order. Test one small folder first. UniFab does not fit when M4A is absent, Linux is required, or a built-in Mac tool handles the job.
WAV and M4A Conversion FAQ
The remaining questions are mostly about reverse conversion and compatibility. These are destination problems: choose the format and codec the receiving app can actually open, then keep the highest-quality source as the master.
How Can I Convert an M4A File to WAV on Windows?
Answer: Audacity with FFmpeg provides a clear Windows route, and VLC can also work when its conversion profiles are configured correctly.
- Install Audacity and the recommended FFmpeg library.
- Import the M4A file into a new project.
- Choose File > Export Audio and select WAV.
- Play the WAV in the destination editor or player.
The WAV will be larger. If the source M4A contains AAC, the conversion improves compatibility but does not restore discarded audio detail.
Does Audacity Need FFmpeg for M4A Files?
Answer: Yes, Audacity's official documentation identifies FFmpeg as the component used for M4A import and export support. Install the recommended build, restart Audacity if needed, and confirm that one M4A opens before starting a batch.
FFmpeg is a media library that lets Audacity read and write formats outside its basic built-in set. Once installed, you can import M4A, edit it, and export WAV or AAC-based M4A through Audacity's export dialog.
Which Programs Can Open M4A Audio?
Answer: Apple Music, QuickTime Player, VLC, Windows Media Player, and common iPhone or Android audio apps can open many M4A files. Compatibility turns on the codec inside the container: AAC has broad playback support, while an older app may reject ALAC.
If a file fails, inspect whether it contains AAC or ALAC before converting it. A codec check is more useful than changing the extension or installing several random players.
Can I Create an M4A by Renaming the WAV Extension?
Answer: No. Renaming track.wav to track.m4a changes the label, not the container or codec, so the receiving app can reject the file or misidentify it.
The confusion is understandable. As one Reddit user in r/macapps asked, "It's 2026, why can't I convert a file by just changing its extension?" A real conversion reads the WAV audio and writes a new M4A container with AAC or ALAC inside it.
Which WAV-to-M4A Route Should You Choose?
Use an online converter for one non-sensitive file, Apple Music for a Mac library, and Audacity with FFmpeg when editing or codec control matters. For a large private collection, a local batch app is the cleaner route after M4A support passes a sample-file check. Choose AAC for compact delivery and ALAC for a lossless workflow, while keeping the original WAV as the master.