Neat Video is a video noise reduction plugin for editors who want precise control inside an existing NLE. Its profiling workflow can handle difficult grain and patterned noise, but the learning curve, host-specific licensing, and processing demands make it a better fit for deliberate finishing work than quick cleanup.
What Neat Video Does and Who It Fits
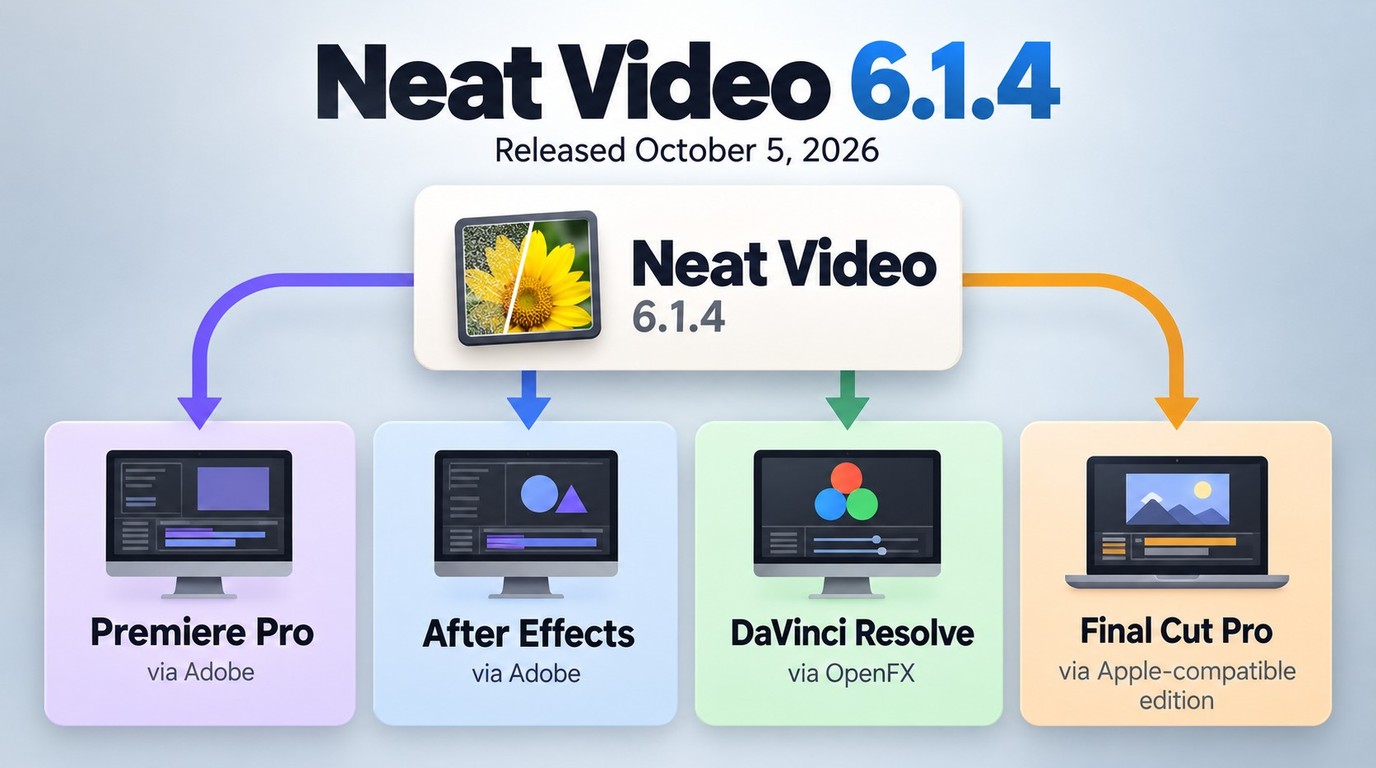
This Neat Video review finds a capable host-integrated denoiser rather than a standalone app. It suits editors who already work in Premiere Pro, DaVinci Resolve, Final Cut Pro, or another compatible host and are willing to build a representative noise profile.
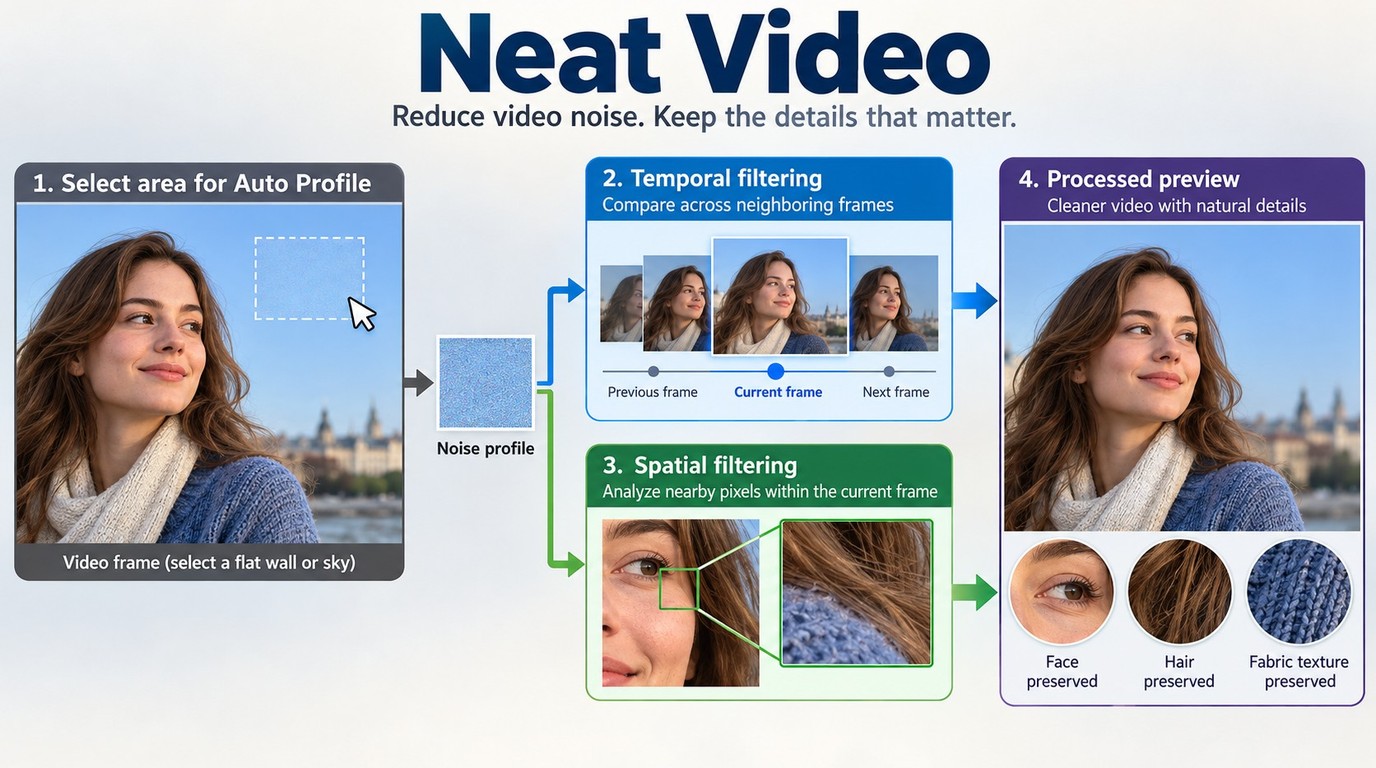
The Neat Video plugin analyzes a selected low-detail area, models the noise pattern, and applies temporal and spatial filtering while trying to preserve real texture. That manual control is the appeal, but it also means the result depends heavily on the sample and settings.
Current Version and Supported Editors
As of October 2026, Neat Video 6.1.4, released on October 5, 2026, is the current release; 6.1.3 is an earlier release. The product is sold and installed for a host family or plug-in API, so the correct edition must match the editor in use.
- Adobe workflow: Neat Video Premiere Pro and After Effects editions run inside Adobe hosts.
- OFX workflow: The Neat Video DaVinci Resolve path uses the OpenFX edition.
- Apple workflow: Final Cut Pro users need the corresponding Apple-compatible edition.
My editorial take is simple: host integration is valuable when denoising belongs inside an established color and finishing pipeline. It is less convenient for anyone who wants to process a file without opening an NLE.
Key Features of the Neat Video Plugin
The Neat Video denoiser stands out for profile-based control, texture-aware filtering, preview tools, and flexible CPU/GPU use. Its strongest features reward careful setup rather than one-click operation.
Noise Profiling and Detail Preservation
Neat noise reduction begins with a sample from a flat, low-detail region such as an evenly lit wall or sky. A strong profile helps the video noise reduction plugin distinguish noise from fine detail before temporal and spatial filters are adjusted.
- Temporal filtering: compares nearby frames to identify changing noise patterns.
- Spatial filtering: works within individual frames.
- Dust, scratch, flicker, and jitter controls: address specific defects when the footage calls for them.
A motion problem is not the same as sensor noise. If blur is the dominant defect, use a dedicated guide to remove motion blur rather than pushing denoising strength beyond a natural result.
Smart Sharpening
Sharpening can restore some perceived crispness after noise reduction, but it should follow a clean profile and conservative filtering. Increasing sharpness cannot recreate detail that was never captured, and aggressive values can emphasize halos or residual noise.
The practical judgment is to preserve believable texture first. A slightly textured image usually looks more natural than a waxy frame with hard artificial edges.
Instant Visual Feedback
The preview workspace makes it possible to compare the processed frame with the original before rendering. Check flat areas, faces, fabric, hair, and moving edges rather than judging the result from one easy region.
I would use the preview as a rejection test: if texture disappears or edges shimmer, rebuild the profile before adding more filter strength.
GPU Performance and System Demands
Neat Video render time varies with resolution, temporal radius, filter strength, effect order, host application, and hardware. A compatible GPU can help, but acceleration does not eliminate the cost of analyzing multiple frames.
- High-resolution media increases the amount of image data processed per frame.
- Temporal filtering reads neighboring frames and can raise memory and export demands.
- Heavy color effects, scaling, stabilization, and multiple denoise instances can compound the workload.
- CPU-only processing remains possible, but demanding projects may become impractical under a tight delivery deadline.
My recommendation is to test a representative short section before committing an entire sequence, then weigh the visual gain against the deadline.
Neat Video Pricing and License Limits
Neat Video is installed for a host family or plug-in API. Premiere Pro and DaVinci Resolve use different host editions.
Demo, Home, and Pro Compared
| Edition | Access | Host-license context |
|---|---|---|
| Demo | No-cost evaluation | Installed for a supported host |
| Home | Licensed edition | Matched to the purchased host or API family |
| Pro | Licensed edition | Matched to the purchased host or API family |
For readers asking whether Neat Video is free, the Demo is the no-cost entry point for checking compatibility and learning the workflow. Home and Pro require licenses, and the selected edition must match the host or plug-in API in use.
Host Licensing and Commercial Use
A license should not be assumed to cover unrelated host editions. An Adobe purchase and an OFX purchase serve different workflows, even when the same editor uses both Premiere Pro and Resolve.
Select the installer for the editor you use through Neat Video's official download route, then retrieve a purchased license through Neat Video's own download or account route.
Follow Neat Video's license terms and process only footage you own or are authorized to use.
Neat Video Workflow and Common Mistakes
A reliable workflow starts with the original-resolution clip, a clean sample, and a conservative preview. Most poor results come from a weak profile, excessive reduction, or an effect chain that makes the noise harder to model.
Build a Reliable Noise Profile
- Install the edition that matches the host editor, then restart the application.
- Apply Reduce Noise to the noisy clip.
- Open the Neat Video interface from the host's effect controls.
- Select a flat, low-detail area in the original-resolution frame and run Auto Profile.
- Inspect the preview across texture, edges, shadows, and motion.
- If the profile is weak, choose a better sample and rebuild it instead of compensating with stronger filtering.
- Adjust temporal, spatial, and sharpening controls conservatively, then apply the effect and render a short test section.
The Neat Video denoiser cannot infer an accurate noise model from a region filled with detail. The cleaner the sample, the less pressure there is to use settings that flatten the footage.
Premiere Pro Effect Order and Settings
In Premiere Pro, place Neat Video where it can inspect a stable representation of the original noise; other ways to remove grain in Premiere Pro may require a different effect order. Denoising before heavy creative color effects is often a sensible starting point, though the ideal order depends on the footage and the rest of the pipeline.
- Add the clip to the timeline and apply Reduce Noise from the Effects panel.
- Open Prepare Noise Profile from Effect Controls.
- Build and validate the profile at the clip's working resolution.
- Use Adjust and Preview to check texture retention with conservative temporal and spatial settings.
- Export a short representative selection before exporting the complete sequence.
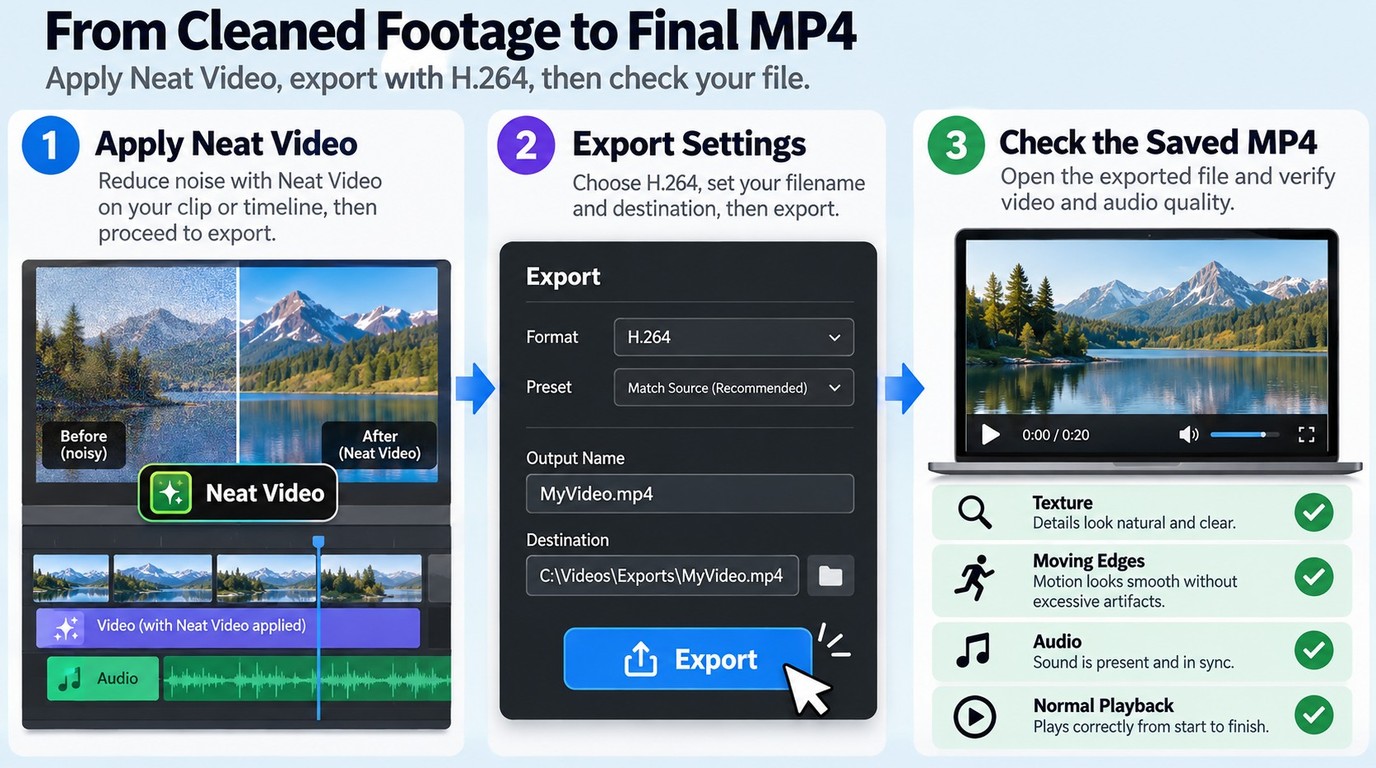
Export the Finished File From Your Editor
Neat Video processes the effect inside the host editor, but the host editor creates and saves the finished file.
- Apply the Neat Video settings and return to the host timeline.
- Open the host application's export controls.
- Choose the destination and delivery settings.
- Select the MP4 container and codec in the host exporter when MP4 delivery is required.
- Export the sequence to create the finished file.
- Open the saved file and inspect its texture, moving edges, audio, and overall playback.
In Premiere Pro, rendering a timeline preview is not the same as exporting the sequence. A preview may help assess the edit, while the export operation produces the deliverable file.
Neat Video Pros, Cons, and User Feedback
Neat Video is a strong fit when difficult footage justifies manual profiling and additional processing. It is harder to justify for occasional cleanup, limited hardware, or projects where turnaround matters more than granular control.
Strengths in Complex Footage
- Manual profiling can target patterned sensor noise and grain that generic filters may handle unevenly.
- Temporal and spatial controls give experienced editors room to balance cleanup against texture retention.
- Host integration keeps denoising inside the established edit, color, and export workflow.
In 2026, one Reddit user wrote, “Using Neat Video plugin in Resolve... love it.” In 2023, another user said it had saved wedding footage and was “definitely worth the money.” These are individual experiences, but they illustrate why editors may accept extra setup for difficult footage. That confidence depends on skill and time, not on an automatic guarantee.
Render-Time and Workflow Tradeoffs
- The profile-building process has a learning curve.
- Exports can slow sharply on high-resolution clips, longer temporal settings, and dense effect stacks.
- A poor profile may tempt users to over-process the image.
- The plug-in requires a compatible host and the correct host-specific edition.
- Manual control adds friction when the task is a quick batch cleanup.
In 2023, one Reddit user called the tuning process “way too fiddly,” while another described stressful previews and slow rendering during revisions. In contrast, an October 2026 Reddit user described Neat Video as fast but wished for more automation. These individual experiences point to different outcomes across workflows and hardware. For deadline work, test the hardest shot early rather than assuming the final export will scale cleanly.
Who Should Buy It?
| Scenario | Recommendation |
|---|---|
| NLE editor handling difficult noise | Choose Neat Video when host integration and manual control justify the setup time. |
| Editor comparing licensed editions | Match Home or Pro to the host and project requirements. |
| Creator seeking automated cleanup | A standalone workflow may be easier to repeat. |
| Urgent delivery or limited hardware | Test a difficult shot before committing the full sequence. |
Creators deciding whether a no-cost tool is sufficient can compare free video noise reduction software by workflow and output needs.
UniFab as a Standalone Neat Video Alternative
UniFab Denoise AI is a standalone Windows and Mac alternative for automated local denoising. It fits users who want batch processing without building a manual profile inside an NLE.
Where UniFab Fits
UniFab uses deep-learning denoising to preserve edges, textures, and details while producing MP4 or MKV output. Compatible GPU acceleration supports local workflows, and batch processing reduces repeated setup across multiple clips.
- Good fit: Windows or Mac users who want a standalone interface, local file handling, and repeatable batch jobs.
- Less suitable: editors who specifically want Neat Video-style manual noise profiles inside Premiere Pro, Resolve, or another host.
Denoise AI output reaches up to 4K and does not add manual noise profiles inside the NLE. Use the three free exports to check the standalone import-to-export handoff and confirm the required output before choosing it for repeatable local batches.
The third practical advantage is workflow consistency: once output settings are chosen, multiple files can move through the same local queue without rebuilding a profile for each clip, a useful distinction when comparing the broader workflows in this best video denoiser guide.
Local Processing and File Privacy
Denoise AI processes footage on the computer on Windows and Mac, so the local workflow does not require an upload. Import a file, choose Denoise AI, select Fast or High Quality, set the output, and start the job.
30-day Free Trial with full feature access!
Launch the UniFab program on your system ( Windows/ Mac), and select the “Denoiser” module. Hit the “Add” option to import the noisy Video you need to denoise into the program.
Customize resolution, quality, codec, and format to suit your project requirements.
Finally, select the “Start” option to end the video denoising process.
I would choose this path when repeatability and local file control matter more than per-shot profile tuning. Keeping the job local gives you direct control of the source and output files.
Denoising Result Evaluation
Judge denoising by retained texture, stable edges, reduced chroma noise, and consistent motion across frames. When removing grain from video, inspect the saved clip in motion because a still comparison cannot show whether texture and edges remain stable through the shot.
Neat Video vs UniFab: Which Workflow Fits?
The decision is mainly about workflow. Choose Neat Video for manual profiling inside a supported host; consider UniFab when a standalone Windows or Mac application, local processing, and batch automation better match the job.
| Product | Workflow | Noise controls | Export path |
|---|---|---|---|
| Neat Video | Host-integrated plugin | Manual profile; temporal and spatial controls | Finished file from the host exporter |
| Denoise AI | Standalone local batch app | Fast or High Quality mode | Direct MP4 or MKV export |
The practical conclusion is not that one product wins every project. Neat Video is more defensible for complex shots that reward careful profiling, while UniFab is easier to place in a repeatable standalone queue.
Neat Video FAQ
Can one Neat Video license cover both Premiere Pro and DaVinci Resolve?
Do not assume one license covers both. Premiere Pro uses the Adobe host edition, while DaVinci Resolve uses the OFX edition, so the license must match the host or plug-in API in use.
Does Neat Video require a dedicated GPU?
No. Neat Video can process with the CPU, while a compatible GPU can accelerate demanding projects.
Why can Neat Video take so long to render?
A timeline preview and the final export can involve separate processing. Preview renders are reused only when the host's export and smart-render settings support that workflow.
Is Neat Video free?
Neat Video offers a no-cost Demo for evaluation, while Home and Pro require licenses. Use Neat Video's official download route to obtain the installer.
Can it reduce grain without flattening fine detail?
A representative noise profile and conservative temporal and spatial filtering help reduce grain while retaining natural texture.
Which Neat Video edition does DaVinci Resolve use?
DaVinci Resolve uses the OFX edition of Neat Video, rather than the Adobe edition used by Premiere Pro.
Can Neat Video rescue severely noisy low-light footage?
It can reduce patterned noise when the profile represents the source, but it cannot recreate detail that was never captured. Very underexposed footage may require a compromise between cleanup and texture retention.
What should I do if Auto Profile cannot find a clean sample area?
Choose another representative frame from the same shot, select a flat, low-detail region, and rebuild the profile.