To convert MKV to WAV, extract the audio track you want and save it as PCM audio, an uncompressed representation of the sound. I recommend choosing the track before the converter: the wrong mix stays wrong, even after a successful export.
You can use an online converter for a small, non-sensitive file or export locally with VLC for an occasional graphical workflow.
For precise control when you extract audio from MKV with FFmpeg, select the stream explicitly. The steps below also explain where to find the WAV and how to check its channels, size, and sound.
What Converting MKV to WAV Actually Does
Converting an MKV to WAV writes one selected audio stream into a separate WAV file, usually as uncompressed PCM audio. The source MKV stays intact. It does not improve a poor recording, recover missing detail, or select the correct track automatically.
MKV Is a Container, WAV Is an Audio Format
MKV is a container. One file can hold video, several audio streams, subtitles, chapters, and metadata. WAV is an audio file format that commonly stores uncompressed PCM samples, although the WAV container can carry other audio encodings as well.
That difference explains why renaming set.mkv to set.wav does nothing useful. The media data remains unchanged. A converter must read the audio stream from the MKV, decode it if necessary, and write it in the chosen WAV-compatible format. If you need to keep the video, an MKV-to-MP4 conversion is a different workflow.
A creator in Reddit's r/obs described the practical version of this problem. They wrote:
"I was recording a dj set and was wondering how do I change .MKV to .wav. The sets are around 30-45 minutes. I want to post them to SoundCloud"
The technical job is not changing the suffix. It is identifying the mix that should leave the container.
Check the Source Before You Choose a Method
Play the MKV from beginning to end or spot-check its opening, middle, and closing. Note the intended language or OBS track, duration, sample rate, channel count, and available disk space. If the file has several audio streams, label the one that contains the full DJ mix rather than assuming the first stream is correct.
Rights and privacy note: Convert only media you own or are authorized to process. When using an online service, follow its terms, copyright requirements, and privacy or retention policy, and keep personal-use files from being redistributed.
When WAV Is the Right Output
WAV is a sound choice for editing, restoration, mastering, and interchange between audio applications because PCM avoids another lossy encoding stage. It is less convenient for email, mobile storage, or direct distribution because the files are large. For a DJ set, keep WAV as the edit or archive master, then create the delivery format required by the destination. The same distinction applies when you convert MP4 to WAV.
Which MKV-to-WAV Method Fits Your File?
Use an online converter for a small, non-sensitive MKV or VLC for an occasional local graphical job. For a multi-track OBS recording, I favor FFmpeg: explicit -map controls make your stream selection visible and repeatable.
| Method | Upload required | Track control | Suitable for | Main limitation |
| Online converter | Yes | Service-specific | Small, non-sensitive files | Upload caps and waiting |
| VLC | No | Moderate | Occasional local GUI jobs | Stream controls vary |
| FFmpeg | No | Explicit mapping | Large or multi-track files | Command-line learning curve |
Audio-track selection chooses the mix or language; sample rate, PCM bit depth, and output channels set how that audio is stored. These are separate controls. Online services offer different combinations, so look for a track selector when your MKV contains several mixes.
I would use a browser for a short, non-sensitive clip and explicit stream mapping for an unlabeled OBS recording. FFmpeg also supports command-line automation for repeatable local workflows.
Online Converter: For Small, Non-Sensitive Files
An online MKV to WAV converter avoids installation and usually presents a simple upload, format, and download flow. It suits a short clip with no private speech, client material, or unreleased music.
I would keep private speech and unreleased recordings on the computer. Upload-based conversion sends the MKV to a service; FFmpeg converts local media without that upload.
The desire to avoid uploads also appears in a r/software discussion about local file conversion.
Upload size, queueing, account prompts, and retention terms can turn the easiest interface into the slowest overall route.
VLC: For Occasional Local GUI Conversion
VLC keeps the file on the computer and offers a familiar Convert/Save window. It fits you if you want a local graphical workflow for occasional files.
Its weakness is transparency. Profile names and audio-codec controls differ across versions, and selecting a specific secondary stream is less direct than FFmpeg mapping. VLC is a reasonable middle ground, but it is a weak fit for an MKV with several unlabeled OBS tracks.
FFmpeg: For Large or Multi-Track Files
An FFmpeg MKV to WAV workflow processes the file locally and exposes stream indexes, codecs, channel layouts, sample rates, and mapping. It is the most controlled route for a long set, a private recording, or a repeatable folder workflow.
The cost is learning the command syntax. A single incorrect -map value can export commentary, silence, or the microphone instead of the finished mix. That is still a better failure mode than hidden selection because the command records exactly what was requested and can be corrected.
How to Convert MKV to WAV in 3 Practical Ways
To convert MKV to WAV, identify the correct audio stream, choose WAV with PCM audio, and set an output location. Keep the original. Verify the exported track, duration, and channels before you start editing.
Before You Start: Confirm the Track, Channels, and Storage
Work through this preflight before pressing Convert:
- Play the MKV and confirm it contains audible audio.
- Identify the intended language, mix, commentary, or OBS track.
- Record the source sample rate and channel layout if your player shows them.
- Decide whether to preserve multichannel audio or make an intentional stereo mix.
- Reserve enough storage for an uncompressed WAV plus the original MKV.
- Duplicate irreplaceable source media before changing the workflow.
For a 30- to 45-minute set, the track check matters more than the converter logo. A fast export of the microphone-only stream is still the wrong result.
Method 1: Use an Online MKV-to-WAV Converter
Choose this route for a small file that you are comfortable uploading. Review the service's terms and file-retention policy before adding the MKV.
- Open a reputable online conversion service over HTTPS.
- Read its upload, deletion, account, and privacy terms.
- Add the MKV and wait for the upload to finish.
- Choose WAV and select the audio stream or channel settings if offered.
- Start the conversion, then download the completed WAV. Use your browser’s download history to locate the saved file.
- Play the downloaded file and verify its duration and track identity.
Do not assume a “free” button means an unrestricted workflow. A service may apply queues, upload caps, account prompts, or paid allowances for larger files. If the interface never reveals which audio stream it chose, use a local method for a multi-track MKV.
Method 2: Export WAV with VLC
VLC is appropriate when you want a local interface and the correct stream is easy to identify. For the OBS set, that means the finished mix must be easy to distinguish from the microphone or chat tracks. Menu and profile labels can vary by VLC version.
- On Windows, open VLC and choose Media > Convert/Save.
- Add the MKV, then select Convert/Save.
- Choose a WAV or Audio CD profile if your build provides one.
- If needed, edit the profile to use WAV encapsulation and PCM audio.
- Set the destination filename with a
.wavextension and start conversion. - Open the WAV in a second player or editor and check the full duration.
The extension must match a real WAV/PCM profile. Selecting an MP3 profile and merely naming the destination .wav does not create a valid PCM WAV. If your VLC build does not expose a suitable profile or track choice, move to FFmpeg instead of guessing.
Method 3: Extract WAV from MKV with FFmpeg
FFmpeg runs from the command line on Windows, macOS, and Linux with FFmpeg installed. It gives you explicit stream selection for multi-track MKV files. For a DJ recording with separate mix, microphone, or chat tracks, inspect the stream list before exporting anything. Start by listing its audio details:
ffprobe -v error -select_streams a -show_entries stream=index,codec_name,sample_rate,channels,channel_layout:stream_tags=language,title -of compact "dj-set.mkv"
For a stereo DJ mix stored as the first audio stream, a practical command is:
ffmpeg -i "dj-set.mkv" -map 0:a:0 -c:a pcm_s24le -ar 48000 -ac 2 "dj-set.wav"
- Replace
0:a:0with the intended audio-stream position. - Use
pcm_s24lefor 24-bit little-endian PCM orpcm_s16lefor 16-bit PCM. - Match
-ar 48000to the source when possible instead of resampling without a reason. - Keep
-ac 2only when stereo output is intentional; omit it to avoid forcing a downmix. - Read FFmpeg's final summary and check that the output duration matches the source.
The final filename, "dj-set.wav", is the output path. A bare filename saves relative to the terminal’s working directory; use a full path to choose a different folder.
This command decodes the selected stream to PCM. It does not make a lossy source more detailed; it creates an edit-friendly uncompressed representation of the audio already present.
Verify the Output Before Deleting or Editing Anything
Play the WAV at the beginning, middle, and end. Confirm the set length, intended track, sample rate, bit depth, channel count, and absence of clipping or obvious distortion. In an audio editor, inspect whether the waveform and channel meters behave as expected.
Keep the MKV until the WAV has passed those checks and opened correctly in the destination editor. For a long recording, one minute of verification is cheaper than discovering after an edit that the export used the chat track.
Avoid the Wrong Track, Bloated Files, and Channel Problems
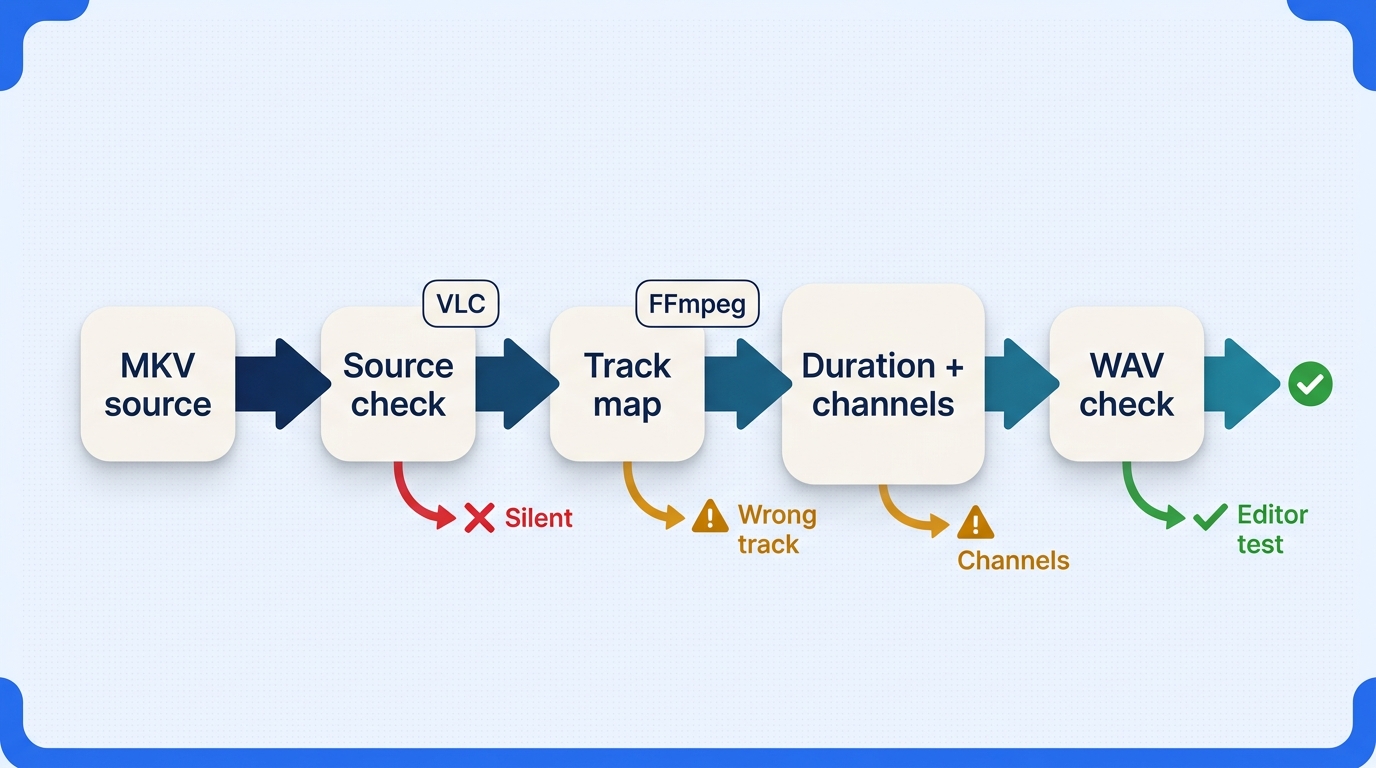
Preserve the intended audio by mapping the correct stream and matching source settings unless you have a reason to change them. Estimate PCM storage before conversion. Once a tool can write WAV, these decisions matter more than the tool's name.
Select the Intended Language, Commentary, or OBS Track
Multi-stream MKV files may contain several languages, a director's commentary, a clean program feed, or separate game, Discord, and microphone tracks. The default stream is not necessarily the one your editor needs.
One r/VegasPro contributor explained the OBS case directly:
"When I record it with OBS, I make sure to record into the .MKV format to make use of multiple audio tracks (game, discord, mic). These get remuxed into MP4 using OBS functionality."
The example shows why separate tracks need an explicit check. Inspect stream titles and listen to short exports when labels are unclear. With FFmpeg, explicit mapping makes that choice visible. With a GUI, look for an audio-track selector before conversion.
Match Sample Rate, Bit Depth, and Channel Layout
For most edit workflows, match the source sample rate rather than converting 48 kHz audio to 96 kHz by habit. Higher numbers do not restore information. Decoding AAC or Opus into PCM avoids another lossy encoding stage but cannot recover lost detail, just as MP3-to-WAV conversion cannot restore information discarded during compression.
Bit depth counts bits per sample, while bitrate counts bits per second. They measure different things. In the FFmpeg command, pcm_s24le selects 24-bit PCM; it does not set a bitrate of 24 bits per second.
Channel layout needs a deliberate decision. A stereo DJ mix should normally stay stereo. A 5.1 or 7.1 source can be preserved as multichannel PCM when the WAV variant, editor, and playback chain support it. Downmix it only when the deliverable specifically requires stereo.
Estimate WAV Size Before Converting a Long Recording
For uncompressed PCM, estimate size with this relationship:
sample rate × bit depth × channels × seconds ÷ 8
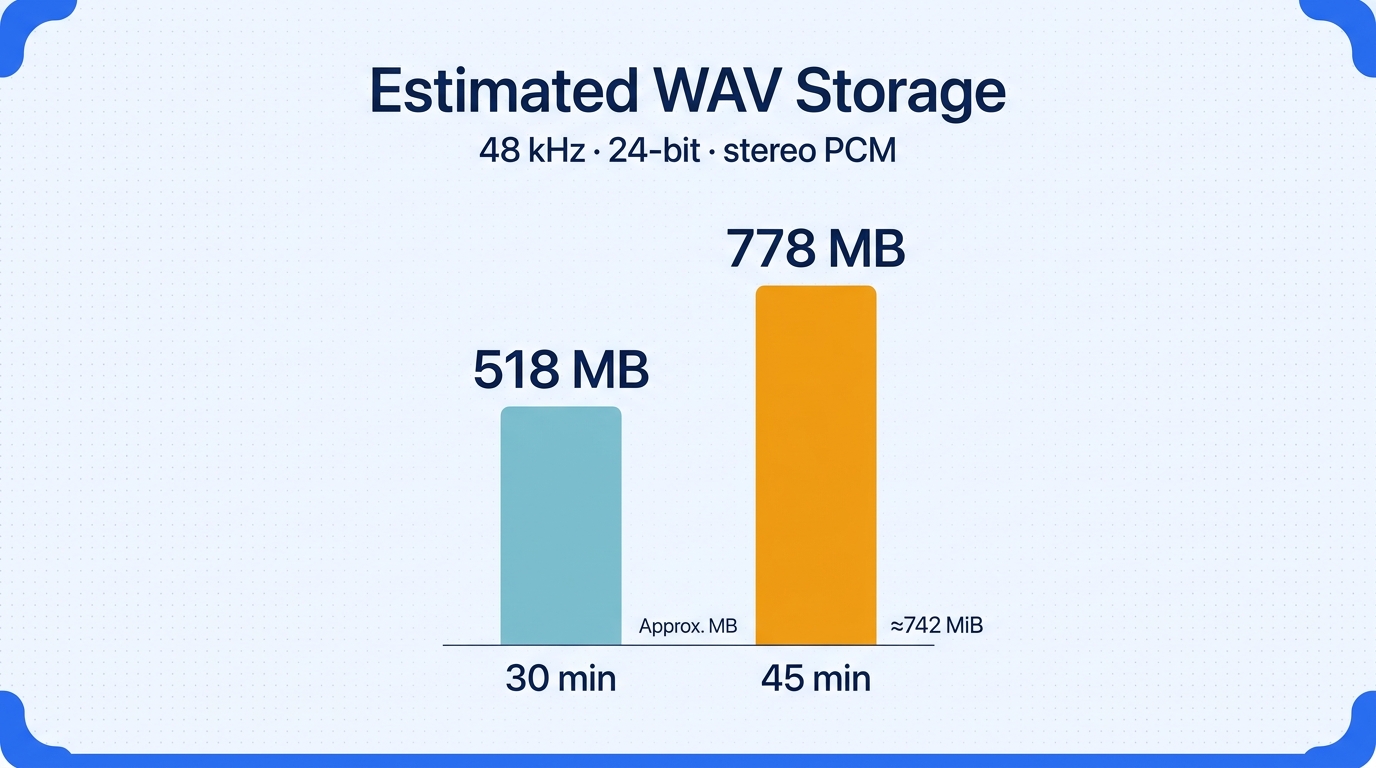
A 45-minute stereo file at 48,000 samples per second and 24 bits requires:
48,000 × 24 × 2 × 2,700 ÷ 8 = 777,600,000 bytes
That is about 778 MB in decimal units, or roughly 742 MiB, before minor container overhead. A 30-minute version under the same assumptions is about 518 MB. This is why WAV can feel disproportionate when the original MKV uses compressed audio.
Troubleshoot Silence, Distortion, or Missing Channels
Check problems in this order:
- Play the original MKV in a second application.
- Confirm the selected audio-stream index or GUI track.
- Compare source and output duration, sample rate, and channels.
- Remove any forced stereo setting when surround must be preserved.
- Lower levels only if the source or conversion is clipping.
- Test the WAV in another editor to isolate import limitations.
- Re-extract a short segment before rerunning the entire DJ set.
A flat waveform in one editor does not prove the MKV is silent. Some editors expose only the first stream or handle a container's secondary tracks poorly. The diagnostic order should separate a source-recording problem from a selection problem and an editor-import problem.
Where UniFab Fits in a Local Conversion Workflow
UniFab Video Converter provides local processing and batch conversion on Windows and macOS. You can organize several files in a desktop workflow without uploading recordings to a conversion service.
Compatibility Check: MKV In and WAV Out
Open your MKV in the installed application and select WAV when it appears among the audio outputs. Start with a short copy. If the file does not open or WAV is missing, use UniFab’s compatibility help or update information to resolve the format-menu issue.
Local Processing, Batch Conversion, and UniFab Output File Location
The UniFab output file location is the destination you chose for the conversion task. Open that folder in your file manager to find the completed file.
Local processing keeps the media on your computer, and batch conversion helps you manage a folder of recordings. Give each output a distinct filename. Check the intended track and destination for each task before starting the queue.
When a Local Desktop Workflow Fits
A browser workflow suits a small, non-sensitive file. UniFab’s strengths are local processing and batch management for recordings you want to organize on your computer.
Use the official UniFab download page for the Windows or macOS installer. After installation, open a short copy, choose the available output format, and confirm the destination folder before processing the full recording.
FAQs About MKV-to-WAV Conversion
Can Audacity Open an MKV and Export WAV?
Audacity imports supported audio from video containers through its FFmpeg library. Install that library for video import. If your MKV fails to open or the intended stream is unavailable, extract that stream to WAV first, then open the WAV in Audacity.
Is WAV or MP3 Better for a DJ Set Bound for SoundCloud?
Use WAV as the edit or archive master when storage allows, then export a delivery copy accepted by the destination. MP3 is much smaller but uses lossy compression. For a 30- to 45-minute OBS recording, an MP3 should not be the only surviving copy when a PCM master can be created.
Why Does an OBS Recording Look Silent in an Editor?
The editor may be reading the wrong MKV stream, ignoring secondary tracks, or encountering an unsupported codec. First play the MKV elsewhere, then inspect the OBS track assignments and the file's stream list. If the audio exists on a non-default track, map that track explicitly to WAV before importing it again.
Can a WAV File Keep 5.1 or 7.1 Audio?
WAV can carry multichannel PCM in compatible workflows, but the result depends on correct stream mapping, channel order, the editor, and the playback hardware. Do not force -ac 2 when surround preservation is the goal. Verify each channel after export, because a file that opens successfully can still contain a wrong or distorted channel layout.