Converting WebM to MP4 means changing the container and, when required, re-encoding incompatible video or audio streams. The right method depends on codec support, file size, privacy, and whether 4K, HDR, audio channels, and frame rate must remain intact.
My editorial rule: treat WebM-to-MP4 conversion as a decision tree, not a rename. Identify the streams, then choose online or local processing by privacy and file size. A quick remux can fail on VP8 or Opus, while a careless re-encode can flatten HDR or inflate the file. The path below ends with a quality check.
WebM vs MP4: what changes and which format you need
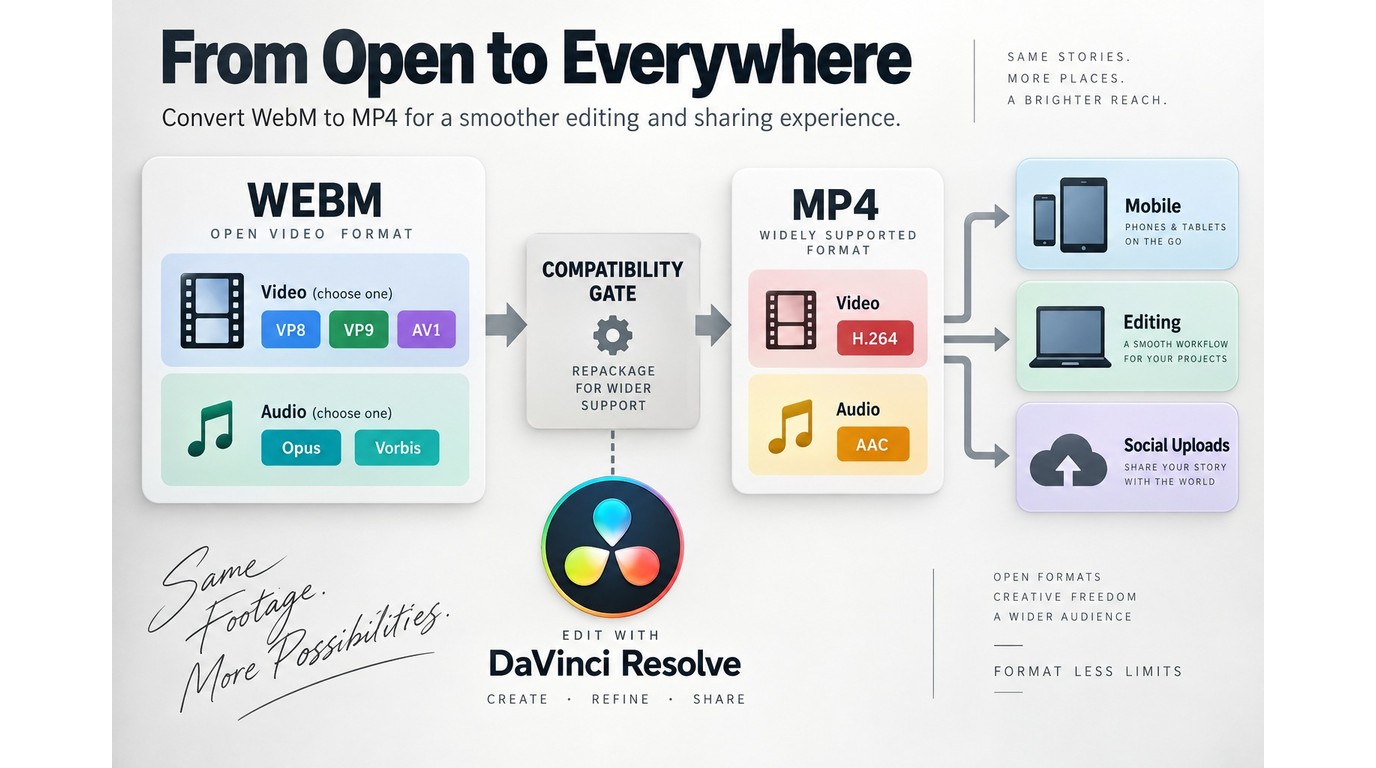
MP4 is often easier to play, edit, and share because more consumer apps expect common MP4 combinations such as H.264 video with AAC audio. WebM is a container commonly used with VP8, VP9, or AV1 video and Vorbis or Opus audio codecs. Opus and AAC audio codecs are not interchangeable in every editor. HDR (high dynamic range) carries a wider brightness and color range than SDR (standard dynamic range), while tone mapping adapts HDR brightness and color for an SDR output. Changing .webm to .mp4 in a file name does not change any of those streams.
Container, codec, and compatibility in plain English
A container is the file wrapper. A codec is the method used to compress the picture or sound. Remuxing changes only the wrapper; re-encoding decodes and compresses the streams again. MP4 may reject a WebM stream even when both files are called “video,” which explains why a VP8 remux can fail or why an editor imports pictures without sound.
One editor described the practical symptom in r/VideoEditing: “I use Davinci for all my editing needs, but recently hit a roadblock with WebM. It doesn't seem fond of the Opus audio or the HDR.” That is a compatibility clue, not a reason to lower every setting. First inspect the source codec and color mode with a media-information tool.
When MP4 is the more practical delivery format
Choose MP4 when the destination is a mainstream editor, mobile device, slide deck, or social platform that lists MP4 in its upload guidance. Keep WebM when your playback or web workflow explicitly supports it and you want to avoid another generation of compression. For a downloaded MP4, the practical target is usually a broadly accepted codec combination, not the smallest possible file.
The practical rule is simple: decide for the destination first, then preserve as much of the source as that destination can actually decode. This prevents the common mistake of chasing a “lossless” setting that still produces a file the editor cannot open.
Convert WebM to MP4 online in three steps
A WEBM to MP4 online converter suits a small, non-sensitive clip when you want one browser upload and download. It is less suitable for private footage or a multi-gigabyte library because the service controls retention, limits, and video/audio compression settings (codecs).
Please note: Convert only footage you own or are authorized to process, and follow the terms of any service you use. You remain responsible for copyright and for choosing a service whose upload and retention policy fits your material.
Before you start, have a non-sensitive WebM you own or are authorized to process, a stable connection, enough local space for the downloaded MP4, and a target app that accepts MP4.
Work through these steps:
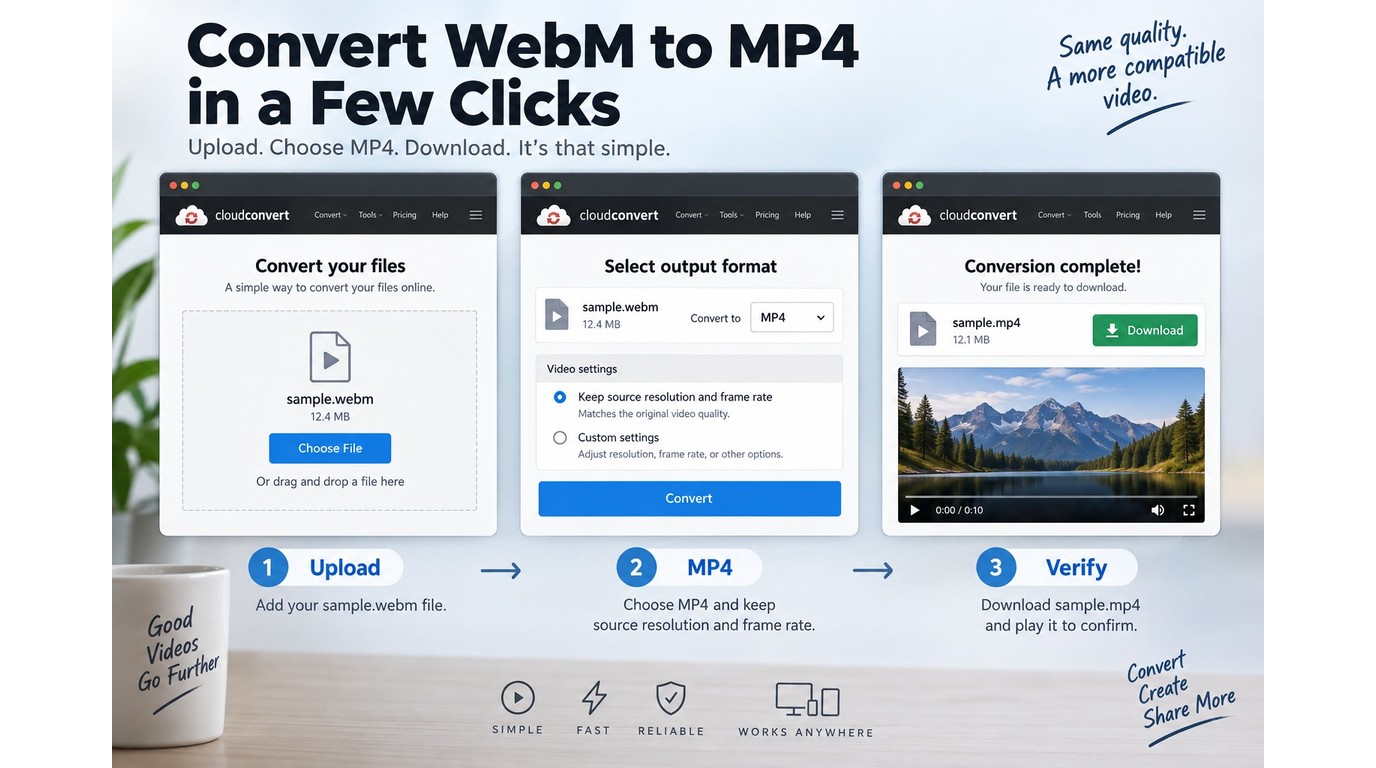
- Choose a converter and read its file policy. Check its size limit, upload retention, processing location, and browser support. For a Cloudconvert WEBM to MP4 job or a WebM to MP4 ezgif job, policy matters more than the name.
- Upload the WebM and select MP4. Keep the source resolution and frame rate for a first pass. Avoid changing HDR, bitrate (video data per second, affecting size and quality), or audio settings without a clear reason.
- Download and verify the result. Play the full duration or a representative section, check that dialogue and game audio are present, compare the resolution and aspect ratio, and look for a color shift. Keep the original WebM until the MP4 passes the check.
The browser route wins on convenience, not control. I would use it for a small, non-sensitive clip; upload privacy and limited codec control are the real trade-offs. For irreplaceable footage, local processing is more defensible.
Convert WebM to MP4 on Windows or Mac with desktop controls
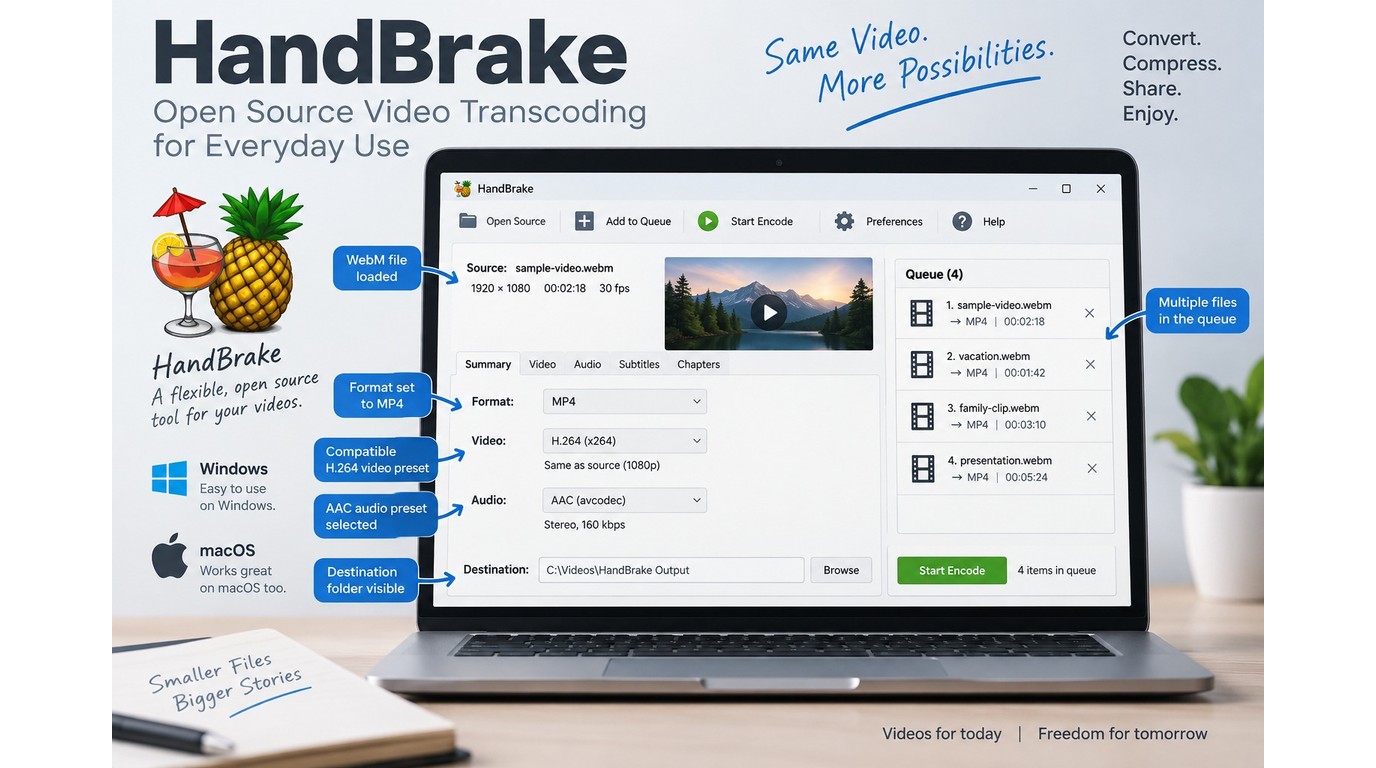
When browser upload is a poor fit, a local desktop workflow keeps the source on the computer and gives you a predictable destination folder. It is the clearest route for a WebM to MP4 Mac or Windows job. That matters when a folder of PS5 captures, removable storage, or strict audio and frame-rate requirements are involved.
A beginner-friendly desktop sequence
Only process footage you own or are authorized to use, and keep the local files inside the permissions and terms that apply to your project. Before starting, have the source WebM, a supported Windows or Mac computer, enough free storage for both the source and output, and the codec requirements for the destination editor or device. Then use this sequence:
- Install a desktop converter from its official site and confirm that your Windows or macOS version is supported.
- Import one short WebM sample before adding the whole folder.
- Choose MP4 as the output container and select a codec (the method used to compress video or audio) your editor or device accepts.
- Set the destination folder, then make sure there is enough free storage for both the source and output.
- Start the conversion and watch the first completed file for color, sound, duration, and frame-rate issues.
- Import that verified MP4 into the final editor or player before converting the rest.
For a beginner, this sequence is more useful than a long preset catalog. It creates a checkpoint early, so one wrong codec does not multiply across an entire drive.
Handling large folders instead of one clip at a time
Add files to a queue, use a consistent naming pattern, and write outputs to a separate folder. Leave storage headroom for temporary files, especially when re-encoding 4K footage. If the computer sleeps or an external drive disconnects, a batch can stop midway, so keep the machine powered and the source volume mounted.
The scale problem is real. A creator in r/NewTubers wrote, “I completed it in under 27 hours with around 22 hours of footage I have on an external hard drive (Around 400GB).” I would not send a 400GB library through a browser converter; a local queue and clear logs address the repeated-file problem directly.
Where Ubuntu, FFmpeg, and HandBrake fit
A WebM to mp4 Ubuntu workflow can use FFmpeg or HandBrake, but they are separate routes. FFmpeg exposes codec-level commands; HandBrake offers presets and a graphical queue. Settings depend on whether the source carries VP8, VP9, AV1, Opus, or another stream, so inspect it before copying a profile.
For a command-line route, the FFmpeg WebM-to-MP4 guide is useful when you need repeatable flags and scripting. HandBrake is a better fit when you prefer a visible queue, but its many options can feel slower to learn than a focused desktop converter.
The fit is straightforward: FFmpeg suits repeatable commands, HandBrake suits open-source controls, and a GUI converter suits a short learning curve across many local files.
For a large local folder, the next choice is whether a GUI can verify WebM input, queue files, and retain consistent destination settings before the batch starts.
Remux or re-encode? Preserve 4K, HDR, audio, and file size
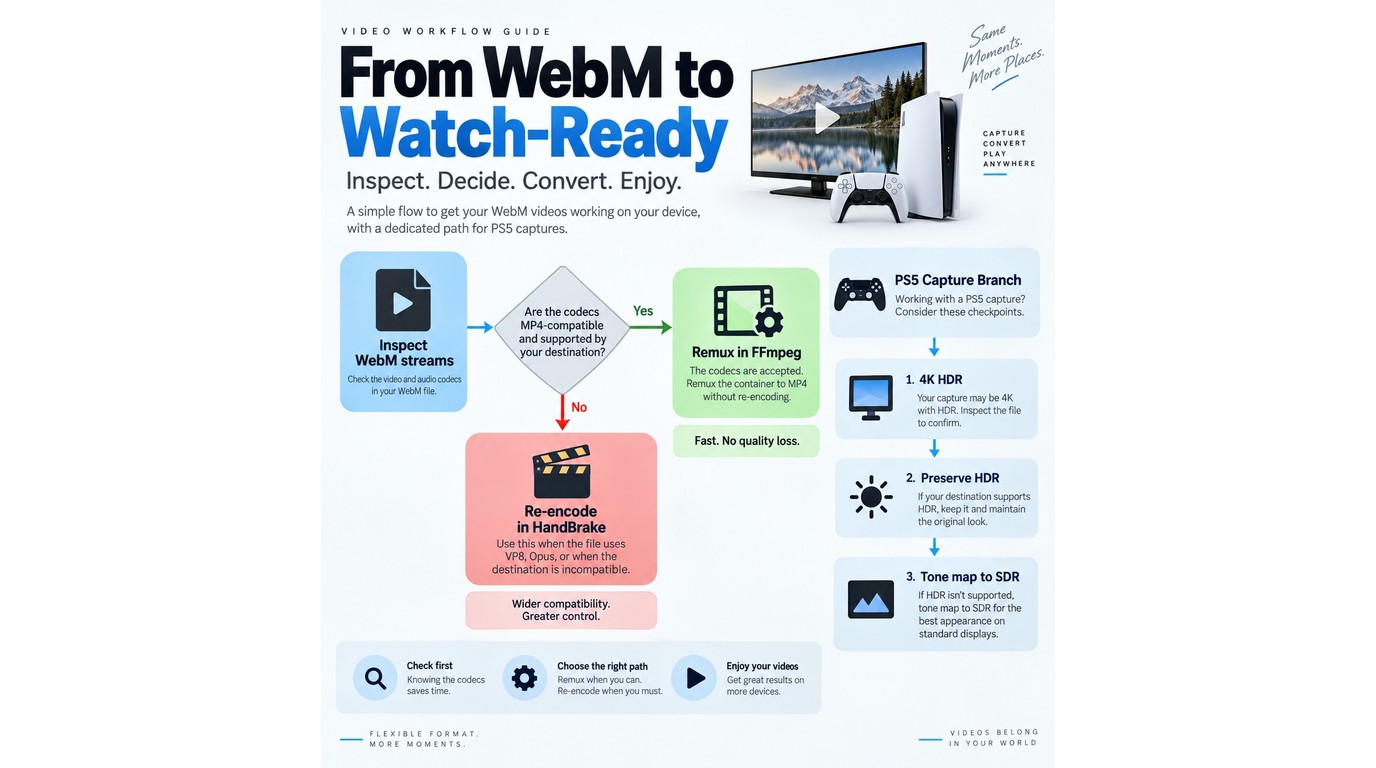
Remux when the source video and audio codecs are accepted inside MP4; re-encode when they are not or when the destination requires a different codec. Neither method guarantees the same visual result if HDR metadata, frame rate, or audio channel mapping is mishandled.
For a WebM to MP4 FFmpeg workflow, remux only when the existing video and audio codecs are valid in MP4; otherwise, re-encode to codecs the destination accepts.
Remuxing: fast, but only when the codecs fit
Remuxing copies the existing streams into a new container, so it can be fast and avoid another generation of compression. It can still fail when MP4 does not accept the WebM video or Opus audio stream. A user in r/ffmpeg summarized that exact problem: “I tried to remux VP8 webms to mp4 in all the popular remuxing software to no avail.”
Treat a failed remux as a codec diagnosis. Do not keep changing file extensions or assume a larger output means better quality.
Re-encoding: the compatibility trade-off
Re-encoding creates new video and audio streams. Select a delivery codec your target editor supports, and keep the source frame rate unless there is a reason to change it. Choose a quality mode that balances detail against size. A second generation can soften fine texture. An unnecessarily high bitrate can create a large file without restoring lost detail.
For a HandBrake WebM-to-MP4 workflow, plan on re-encoding incompatible streams and verify HDR color and audio in the finished file.
A PS5 recording can be HDR or SDR. Converting between them without the right color handling can produce the dull look described by one r/handbrake user: “When converting .webm (4K footage that is sometimes HDR & sometimes SDR, exported from my PS5) to .mp4, everything becomes dull / washed out looking.” If the output is intended for an SDR timeline, use an intentional tone-mapping workflow rather than a blind preset.
A verification checklist for 4K, HDR, and audio
Before deleting the WebM, check:
- Resolution and crop match the source.
- HDR footage still looks correct on an HDR-capable display, or has been deliberately tone-mapped for SDR.
- Audio plays on every channel you need, including Opus-to-AAC conversions.
- Duration, sync, and frame rate remain stable through a full scene change.
- The MP4 imports into the editor or player that matters to you.
If any check fails, return to the source properties and change one variable at a time. The verification result, not the extension, tells you whether the conversion succeeded.
UniFab Video Converter for local 4K batch conversion
UniFab Video Converter is a Windows and Mac desktop app that processes accepted files locally in batches, converts to 1000+ output formats at up to 4K, and supports NVIDIA, AMD, and Intel GPU acceleration up to 50x; confirm WebM input support in the current build before relying on it.
Verified fit for a local workflow
The distinction is workflow, not a promise that every WebM will open. Local batches avoid uploads and repeated output choices. For readers who want to “Convert WebM to MP4 for Free,” the verified fact is narrower: UniFab Video Converter has been $0 without a watermark.
| Workflow | Setup | Privacy | Batch scale | Controls |
| Online converter | Browser upload | Service-dependent | Varies | Basic |
| FFmpeg or HandBrake | Install app | Local | Queue or script | Codec-level |
| UniFab Video Converter | Windows/Mac desktop | Local processing | Batch processing | 4K output; up to 50x GPU |
Specs checked for this guide in September 2026; confirm the current build before relying on WebM input.
For readers comparing a WEBM to MP4 Converter for a large local queue, I would consider UniFab because its batch processing and 4K output address repeated files, but not before the current build accepts the source WebM. An online page remains simpler for one ordinary clip.
Important scope checks before choosing it
Confirm current system support and storage capacity, because a desktop workflow depends on the computer and drive available to you.
WebM to MP4 questions readers still ask
A WebM to MP4 video converter should be chosen by operating system, source-codec support, privacy needs, and batch size. The answers below cover those checks without repeating the full workflows above.
How do I convert WebM to MP4 on Windows without losing quality?
Import one sample, choose a compatible MP4 codec, keep the source resolution and frame rate, and verify color and audio before running a batch. Remuxing—changing only the container—can avoid generation loss when the existing codecs fit MP4; otherwise, re-encode, which recompresses the streams.
What is the simplest way to convert WebM to MP4 on a Mac?
Use a local GUI converter for a private file or a browser converter for a small, non-sensitive clip. A beginner in r/youtubedl described the need clearly: “I'm a beginner when it comes to working with yt-dlp and the terminal on macbook. Currently I have everything installed right and can download videos fine.” If terminal flags are not familiar, start with one sample in a GUI and verify it in the target editor.
Can I convert WebM to MP4 on Ubuntu with FFmpeg?
Yes, provided you choose settings that match the source codecs and your target player. FFmpeg is a strong fit for repeatable commands and scripts, but it requires you to understand the streams; HandBrake offers a more visible preset-and-queue workflow.
Is an online converter safe for private footage?
Safety depends on the service's upload, retention, and deletion policy. Do not upload confidential, client, or unreleased footage unless those terms fit your obligations. For sensitive files, a local converter keeps the source on your device.
How can I convert a large WebM library without uploading it?
Use a local queue or script, separate source and output folders, and leave storage headroom for temporary files. Start with one representative clip, then run the batch while the external drive stays connected and the computer does not sleep.
Will conversion keep HDR, Opus audio, and 4K detail?
It can, but only when the output container and codecs support those streams and the color workflow is correct. Check resolution, HDR appearance, audio channels, sync, duration, and editor import before removing the WebM.
Bottom line: choose the workflow that matches your files
Use an online converter for a small, non-sensitive clip. Use FFmpeg when codec control and repeatability matter, or a local desktop queue for large or private libraries. The same caveat governs all three: identify how the source video and audio are compressed and verify the finished MP4. A renamed extension cannot solve a container mismatch.