If a Windows application or recipient specifically requires WMV, convert MOV to WMV with a dedicated converter rather than a media player. Choose an output profile that matches the source resolution and frame rate, then check the finished file for picture quality, full duration, and audio sync.
A missing export option is often the easy part; corrupted video, softer detail, or drifting audio is where the job becomes costly. A practical rule is to confirm that the destination truly requires WMV before transcoding, because a format change is not a quality upgrade. The decision path is straightforward: confirm the target format, choose a route based on file sensitivity and batch size, then verify one representative output before processing the full queue.
Why Convert QuickTime MOV to WMV for Windows?
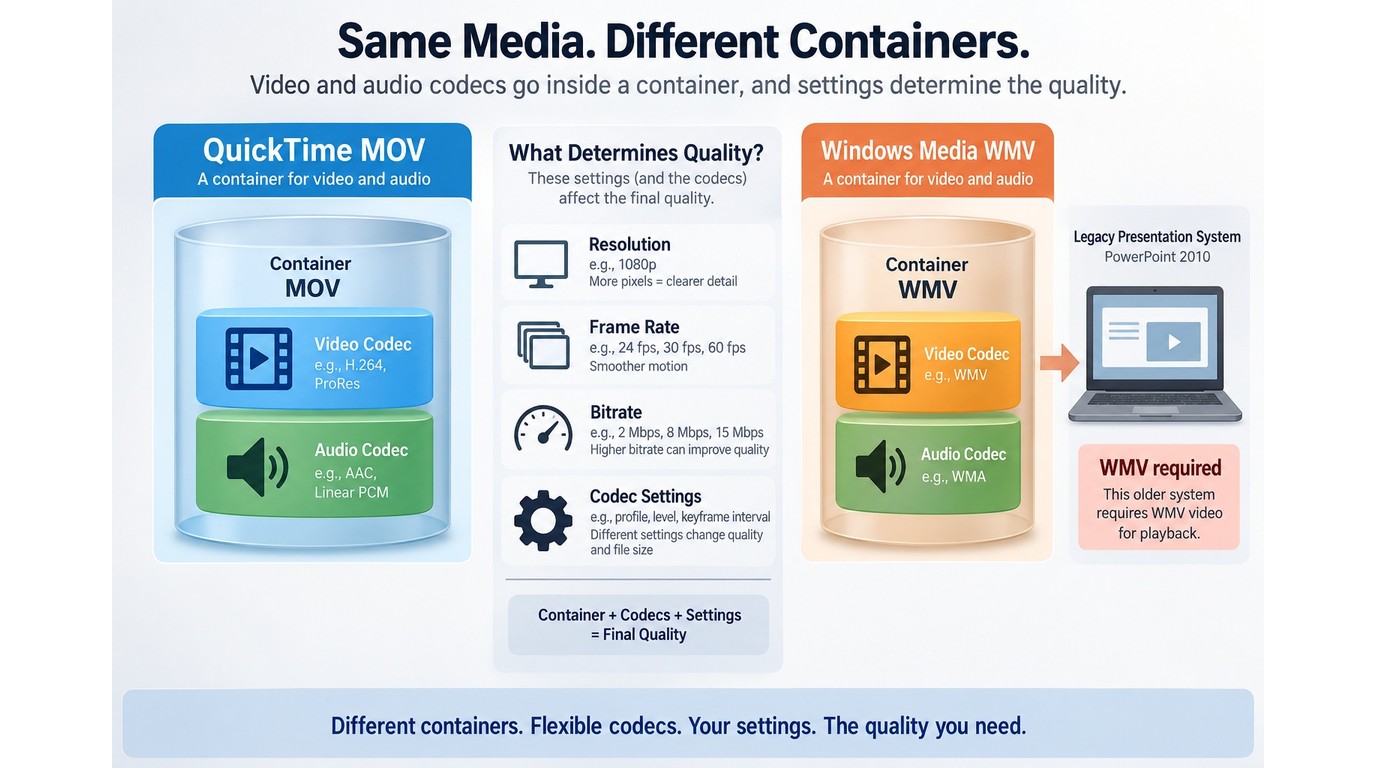
Convert a QuickTime MOV file to WMV when a Windows application, older presentation system, or recipient explicitly asks for that format. WMV is a compatibility target for a particular workflow, not an automatic improvement in image quality.
MOV and WMV Are Containers, Not Quality Settings
The file extension does not tell the whole quality story. MOV and WMV are containers that hold encoded video and audio, while resolution, frame rate, bitrate, and the selected codecs determine how the finished file looks and plays.
That distinction matters because raising an output setting cannot recreate detail missing from the source. A sensible conversion keeps the resolution and frame rate aligned with the original unless the destination has a documented limit. If broad modern playback is the goal rather than a WMV requirement, converting MOV to MP4 is usually the more portable route.
Where WMV Still Fits a Windows Workflow
WMV still earns its place in older Windows environments that were built around Microsoft media formats. Legacy PowerPoint installations, internal training systems, and established delivery specifications can reject a valid MOV even when the video itself is fine.
As one Reddit user in r/VideoEditing put it, “I need to put video into a Powerpoint presentation from work. My work has Powerpoint 2010 and for some reason every time I try to import a .mp4 or .mov I get an error.” That is the right reason to choose WMV: a known destination constraint. If the target accepts MP4 or the original MOV, another transcode adds time and another chance for quality loss.
What QuickTime Player and Windows Media Player Can Actually Do
Built-in players are useful for playback and basic media handling, but they are not a dependable MOV-to-WMV workflow. QuickTime Player does not provide WMV as a direct export target, while Windows Media Player is primarily a player rather than a general video transcoder.
There is no need to treat either limitation as a defect. They are different tools for different jobs. Use a dedicated WMV converter when you need control over the output profile, a batch queue, or a repeatable delivery process.
Online or Desktop MOV Converter: Which Route Fits?
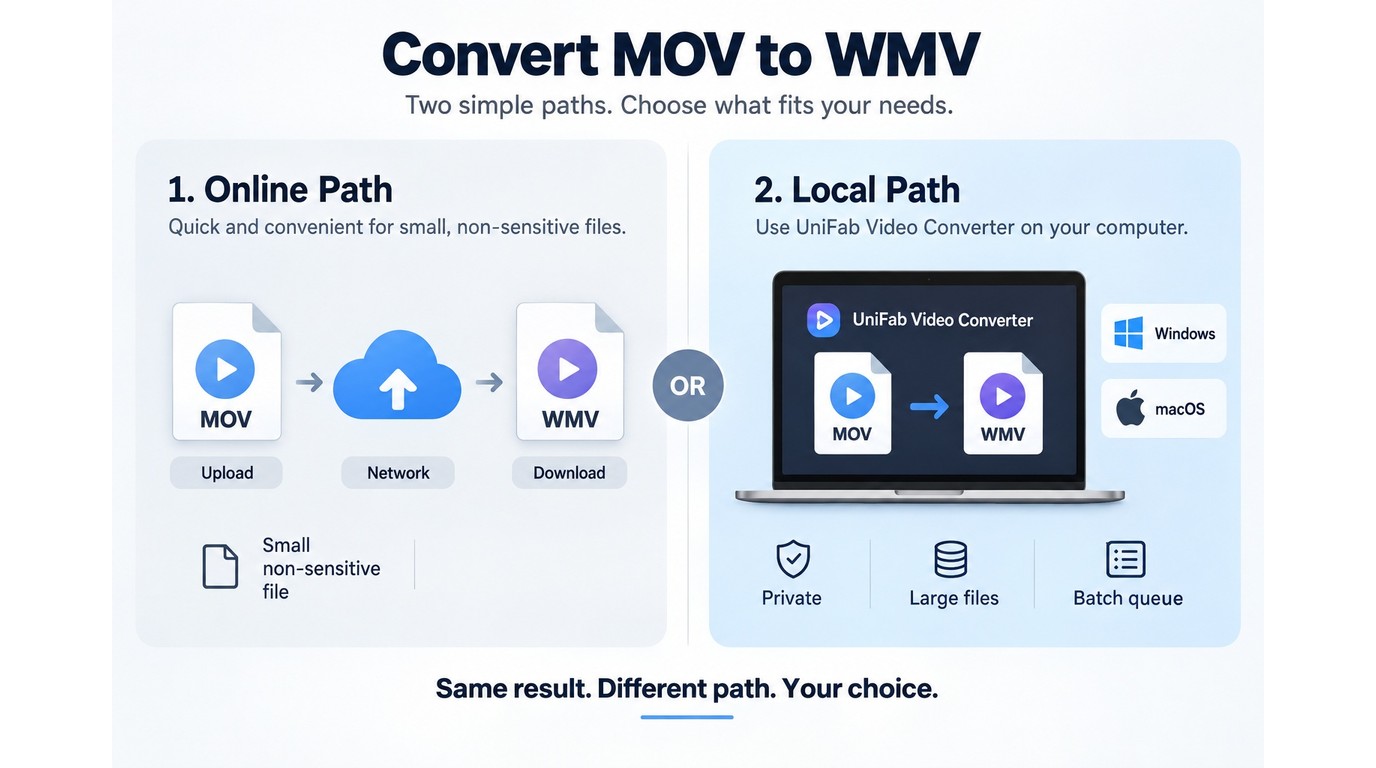
Use an online video converter for a small, non-sensitive file when convenience matters more than detailed control. Choose a desktop converter for private footage, large files, repeated work, or batch conversion because the media stays on your computer and does not depend on an upload.
| Route | Install | Upload | Best fit | Main tradeoff |
| Online converter | No | Required | Small, non-sensitive one-off | Network, size, privacy limits |
| Local desktop converter | Yes | Not required | Private, large, batch jobs | Storage and system use |
The practical difference is where the file travels. That choice matters more than whether a service labels itself free.
Online Conversion for a Small One-Off File
An online MOV-to-WMV converter removes the installation step. You upload the MOV, select WMV, wait for processing, and save the result. This route fits a short, ordinary clip when you have a stable connection and do not need fine control over the profile.
The tradeoff is the upload itself. Large footage can spend more time moving across the network than being converted, and confidential client or workplace video should not be sent to an unfamiliar service. Convert only files you own or are authorized to use, regardless of the tool.
Desktop Conversion for Private, Large, or Repeated Jobs
Local processing is the clearer fit when upload time, file sensitivity, or batch volume becomes part of the problem. As one Reddit user in r/software put it, “No web service, no account, no file size limits. Everything runs on your machine.” That quote describes the appeal of local tools, not a promise that every desktop app has identical limits.
A desktop route becomes more suitable as soon as the job contains several source files. Installation and disk use are real costs, but they buy a stable queue and keep the media inside your own storage workflow.
A Short Decision Checklist Before You Convert
Check these points before choosing a route:
- Is the MOV confidential, licensed, or client-owned?
- Is the file practical to upload on your connection?
- Are you converting one file or a batch?
- Does the destination require a specific WMV profile?
- Can you install software and reserve local disk space?
If privacy, scale, or repeatability appears twice in that list, a desktop route is the more defensible choice. For an occasional public clip, an online tool remains reasonable. When those needs point to local conversion, the next workflow adds a batch queue and an output check before delivery.
How to Convert MOV to WMV with UniFab
UniFab's free video converter handles MOV-to-WMV conversion locally on Windows and macOS. Work through four steps:
- Add one MOV file or a batch.
- Select WMV and review the output profile.
- Apply any necessary trims or crops.
- Convert locally and verify the result.
Before You Begin: Check the Source and Playback Target
UniFab Video Converter is a local Windows and macOS desktop app that converts MOV to WMV in batches, supports WMV output up to 4K, and is currently available at no charge with no watermark.
Prepare MOV files you own or are authorized to convert, a destination folder with enough space, and the playback requirements from the recipient or application. A 4K maximum is a ceiling, not a reason to enlarge a lower-resolution source.
1. Add One MOV File or a Batch
Open the Video Converter module and add the MOV source. Group files with the same delivery requirements; put different targets in separate queues.
2. Select WMV and Set the Output Profile
Choose WMV, then review resolution, frame rate, bitrate, and audio. Start with source-aligned values unless the destination requires something different.
3. Make Any Needed Trims or Crops
Use the built-in editor for necessary cuts or framing changes. Optional edits should not distract from the conversion profile.
4. Convert Locally and Verify the WMV
Choose the output folder and start conversion. Compare the WMV duration with the MOV, inspect motion, and listen near the end for audio drift.
This route fits private, large, or repeated jobs. It is not ideal when you have one small, non-sensitive file and do not want to install desktop software.
Preserve Quality in Large and Batch MOV-to-WMV Jobs
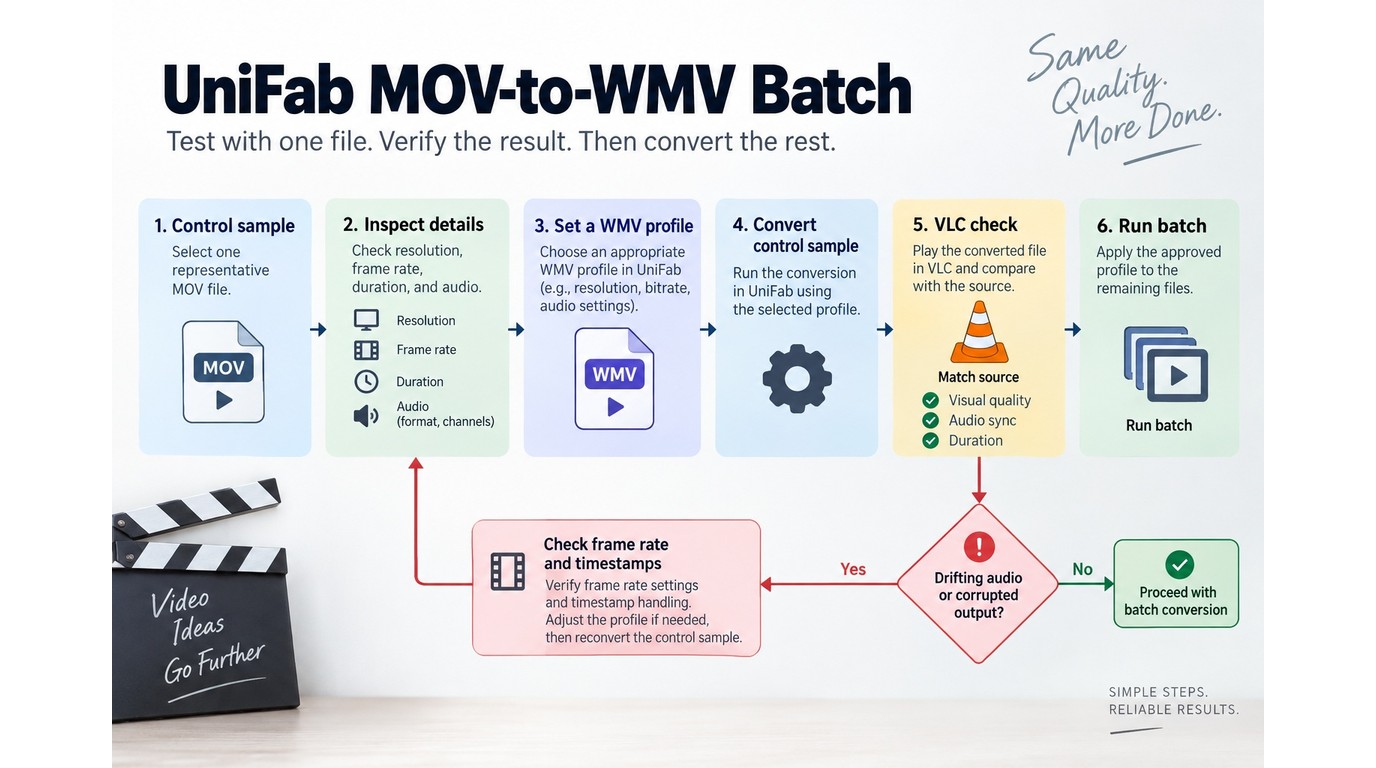
Reduce avoidable quality loss by matching the source settings, converting locally, and approving one representative output before running the full batch. The converter cannot protect the picture or audio if the selected profile conflicts with the source.
Match Resolution, Frame Rate, Bitrate, and Audio Settings
Source-aligned settings are safer than selecting the highest value in every menu. Keep the original resolution unless the destination requires a smaller frame, preserve the source frame rate when possible, and use a bitrate appropriate for that resolution and motion level.
Audio deserves the same attention. Keep the sample rate and channel layout compatible with the target application, especially when the source came from a camera or editor with an unusual timeline. A modest, verified profile is more useful than an ambitious preset that the receiving software cannot decode reliably.
Use Local Processing for Large or Private MOV Files
Local conversion removes the upload stage, which is useful for long recordings, client footage, and archives stored on external drives. It also makes recovery simpler because the source, queue, and output remain under the same file-management process.
Hardware acceleration can reduce processing time on supported NVIDIA, AMD, and Intel systems, but the codec, GPU, and source determine the gain. If the computer becomes unstable during a large queue, reduce parallel work and confirm that the output folder has enough free space.
Apply One Verified Profile Across a Batch on Windows or Mac
A batch should inherit a proven profile, not an untested guess. Use this order on either supported desktop system:
- Choose one file that represents the batch.
- Inspect its resolution, frame rate, duration, and audio.
- Create a WMV profile that matches the delivery target.
- Convert that file and watch the result from start to finish.
- Apply the approved profile to the remaining queue.
The first file is a control sample. That small pause is faster than discovering after delivery that every WMV has the same cropped frame or delayed audio. If the real goal is distributing the source rather than meeting a WMV specification, sending video without losing quality may avoid unnecessary transcoding.
Diagnose Corrupted Output and Drifting Audio
Audio drift usually points to a timing or profile mismatch rather than a file extension problem. One Reddit user in r/premiere described the symptom clearly: “once converted, the wmv is out of sync with its audio. As the video progresses it only gets worse.” Progressive drift is a reason to inspect frame rate and timestamps first.
Work through these checks in order:
- Open the WMV in VLC or another compatible player.
- Compare the MOV and WMV durations.
- Match the output frame rate to the source.
- Simplify the profile and reconvert a short segment.
- Rerun the batch only after that segment passes.
If VLC plays the file correctly while another application does not, the receiving environment may be the limiting factor. If the WMV fails in several players, return to the profile rather than repeating the same conversion settings.
MOV-to-WMV FAQ: WMV, MP4, Safety, and Common Errors
The right target depends on the receiving application, while safe conversion depends on file ownership, privacy, and a verified output profile. These quick answers keep adjacent MOV and MP4 questions tied to the original WMV task.
Can QuickTime Player Convert MOV to WMV Directly?
Answer: No direct WMV export path is available in QuickTime Player. Use a dedicated converter when the destination requires WMV; if it accepts MP4, that format usually gives you broader playback support.
Can Windows Media Player Convert MOV to WMV, or Only Play Files?
Answer: Windows Media Player is primarily for playback and media-library use, not general MOV-to-WMV transcoding. Being able to open a MOV does not mean the player can save it as WMV with a controlled profile.
Is WMV or MP4 the Better Target for Windows Playback?
Answer: MP4 is the stronger default for current devices, browsers, and sharing. Choose WMV when a legacy Windows application, presentation environment, or delivery specification explicitly requires it.
Is It Safe to Upload a Private MOV File to an Online Converter?
Answer: Uploading adds another system and storage path to the workflow, so local conversion is the safer operational choice for confidential footage. Use online services only for material you are authorized to process and comfortable transmitting to that provider.
Why Does a Converted WMV Go Out of Sync with Its Audio?
Answer: Progressive drift often comes from frame-rate, timestamp, or audio-profile mismatches. Compare source and output duration, match the frame rate, and convert a short segment before repeating the full job.
When Would You Convert MP4 to WMV Instead?
Answer: Convert MP4 to WMV for the same narrow reason you would convert MOV: the receiving application or recipient demands WMV. Otherwise, keeping MP4 avoids an extra transcode and preserves the more widely supported file.