![How to Enhance Low-Quality Security Camera Footage [2026 Guide]](https://artifact.dvdfab.me/2026/08/03/VWHBBcN4t84Q9ybMgsmlcni4BXFYv6S7/feature_cover.jpg)
Can Security Camera Footage Be Enhanced?
Here's the short answer: yes, but only within the limits of what your camera actually captured. In my editing work I've watched people jump straight to an AI enhancer hoping to read a plate or recognize a face, only to be disappointed. The useful gain depends on diagnosing the defect first and then choosing the least destructive fix.
This guide walks through why CCTV footage looks bad, how to match each defect (low light, compression, motion blur, focus, or plain low resolution) to the right action, which free and local tools are worth trying with their real limits, and where enhancement crosses from visual cleanup into interpretation you shouldn't treat as fact. If you also work on general video quality fixes outside surveillance, our general video quality fixes guide covers the broader workflow.
Why Security Camera Footage Looks Bad
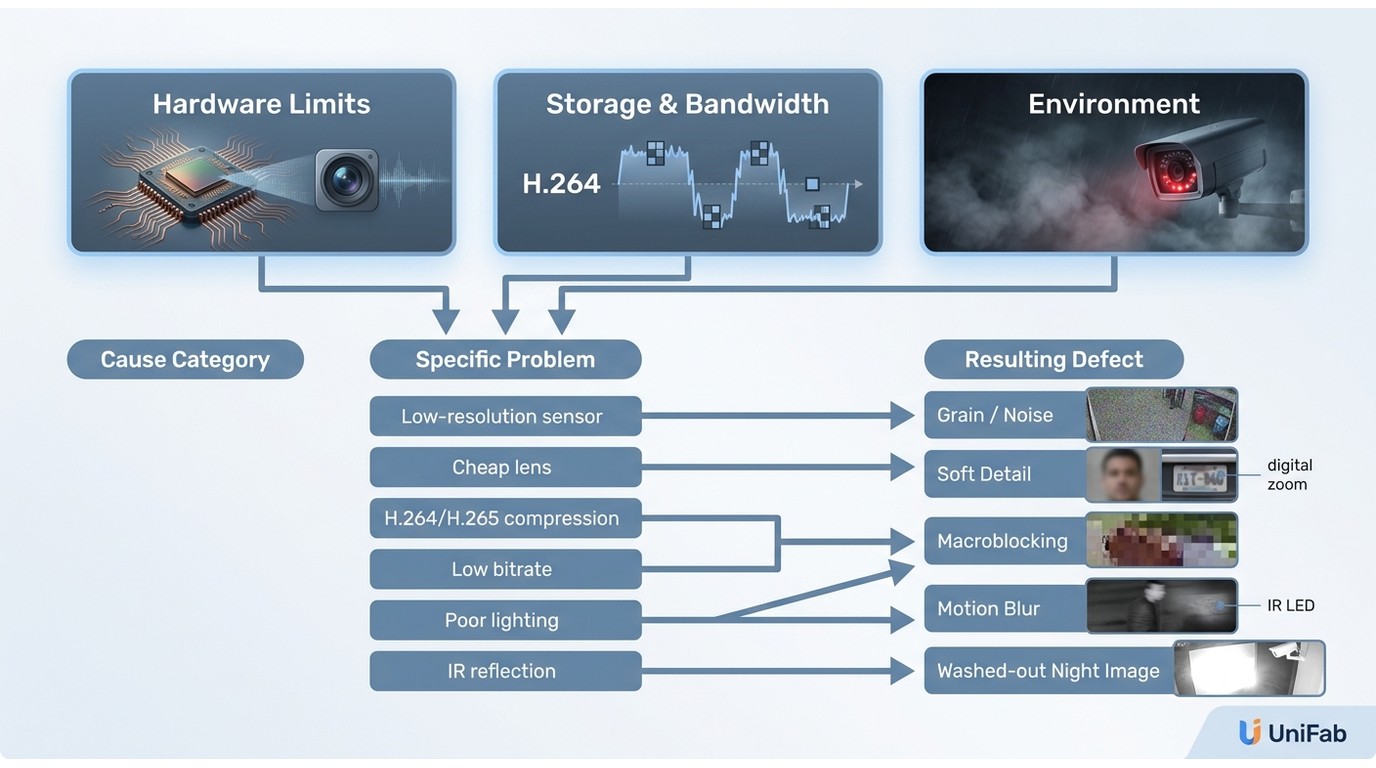
Security cameras often appear low quality because of a mix of cost trade-offs, storage limitations, compression settings, environmental conditions, and outdated hardware. Most systems must balance clarity with affordability and efficiency, which leads to reduced resolution, lower frame rates, or aggressive compression that significantly impacts image quality. Below is a complete breakdown of the main reasons security camera footage looks blurry, grainy, or unclear.
Cost and Hardware Limits
- Low-cost sensors and lenses: Budget-friendly cameras often use small, low-resolution sensors and basic lenses that cannot capture fine details such as faces, text, or license plates.
- Budget camera components: Cheaper cameras often have limited dynamic range, poor color accuracy, small apertures, and lower-quality IR LEDs — resulting in darker, noisier video, especially at night.
Storage and Bandwidth Limits
- High storage requirements: High-resolution video consumes massive storage, so many systems reduce resolution or frame rate to save space, which results in lower-quality footage.
- Limited network bandwidth: When Wi-Fi or network capacity is insufficient, cameras automatically lower bitrate or resolution, leading to blurry, choppy, or pixelated video. When possible, pull the main stream (not the substream) from the recorder and verify the native resolution and bitrate before processing — enhancing a downscaled substream wastes effort.
Technical and Environmental Problems
- Low resolution settings: Even when cameras support high resolution, many systems default to lower quality to save bandwidth or storage, resulting in unclear footage.
- Poor lighting conditions: Cameras struggle in low light, causing grain, noise, and motion blur — especially when relying on basic infrared LEDs at night.
- Heavy video compression: To reduce file size, systems apply strong H.264/H.265 compression, which removes important details and introduces pixelation or artifacts.
- Digital zoom instead of optical zoom: Digital zoom simply enlarges pixels, making the image appear blurred or distorted. Only optical zoom preserves detail.
- Improper camera placement: Cameras mounted too high, pointed toward bright light, or poorly positioned often capture unclear subjects and washed-out scenes.
- Dirty or foggy lens: Dust, fingerprints, rain, or condensation on the lens creates haze or blur, significantly degrading image clarity.
- Inadequate maintenance: Outdated firmware, loose cables, unfocused lenses, and lack of regular cleaning all contribute to reduced image quality over time.
- Outdated technology: Older analog or early-generation cameras lack modern sensors, wide dynamic range (WDR), and advanced processing, making them inherently low quality compared to modern IP cameras.
Match Each Defect to a Fix
Before touching any enhancer, name the dominant defect and pick the safest first action. Running an upscaler over noise or compression blocks tends to amplify the artifact instead of the detail you wanted.
| Dominant defect | Safest first action | Processing order |
| Low light / heavy noise | Improve capture (lighting, exposure) for future clips; for existing footage, denoise a copy | Denoise → mild sharpen → upscale |
| Compression blocks / macroblocking | Pull the highest-quality source available (main stream, original file) | Denoise/artifact removal → upscale |
| Motion blur | Accept as a hard limit; try frame selection from adjacent clearer frames | Pick best frame → light sharpen only |
| Focus error / soft lens | Refocus the camera; enhancement rarely recovers true focus | Mild deblur on a copy; do not over-sharpen |
| Glare / blown highlights | Reposition camera or adjust exposure; clipped highlights cannot be recovered | Tone adjustment only |
| Digital zoom artifacts | Work from the un-zoomed original recording | Denoise → AI upscale |
| Low native resolution | Verify the recording's real resolution first | Denoise → AI upscale (2×/4×) |
My rule of thumb: preserve the original, diagnose the defect, improve capture settings for future recordings, and process only a working copy. Diagnosis before upscaling is what separates a usable result from an exaggerated, artifact-heavy one.
What Surveillance Video Enhancement Does
Surveillance video enhancement improves the clarity, contrast, and readability of security camera footage — but it works on what the sensor already recorded. Realistic capabilities include:
- Upscaling low-resolution footage (SD → HD → 4K, with diminishing returns beyond)
- Reducing digital noise and grain
- Softening compression artifacts
- Improving visibility in low-light or night scenes
- Making faces, objects, or plates more inspectable when enough source pixels exist
What it doesn't do: invent detail that was never captured. AI models can predict pixels that look like a face or a plate, but predicted pixels are interpretation, not recovered evidence — a distinction the legal and recoverability sections below return to.
When Enhancement Is Worth Trying
Enhancement is worth the effort when there are enough source pixels for a human reviewer to work with, and when the goal is inspection rather than identification-as-fact:
- Reviewing an incident: Making a face, action, or vehicle easier to inspect for internal review — with the understanding that a clearer look is not the same as a positive ID.
- Everyday monitoring: Cleaning up night noise or compression so routine footage is comfortable to watch.
- Getting more from existing hardware: Squeezing more usable detail out of older cameras before deciding on a hardware upgrade.
- Preparing footage for a professional: Producing a cleaner reference copy for an investigator or forensic analyst, while the untouched original stays intact.
If the source is severely under-resolved or motion-blurred, be honest with yourself early — no tool will manufacture a certain answer from an ambiguous frame.
Security Camera Enhancement Software Options
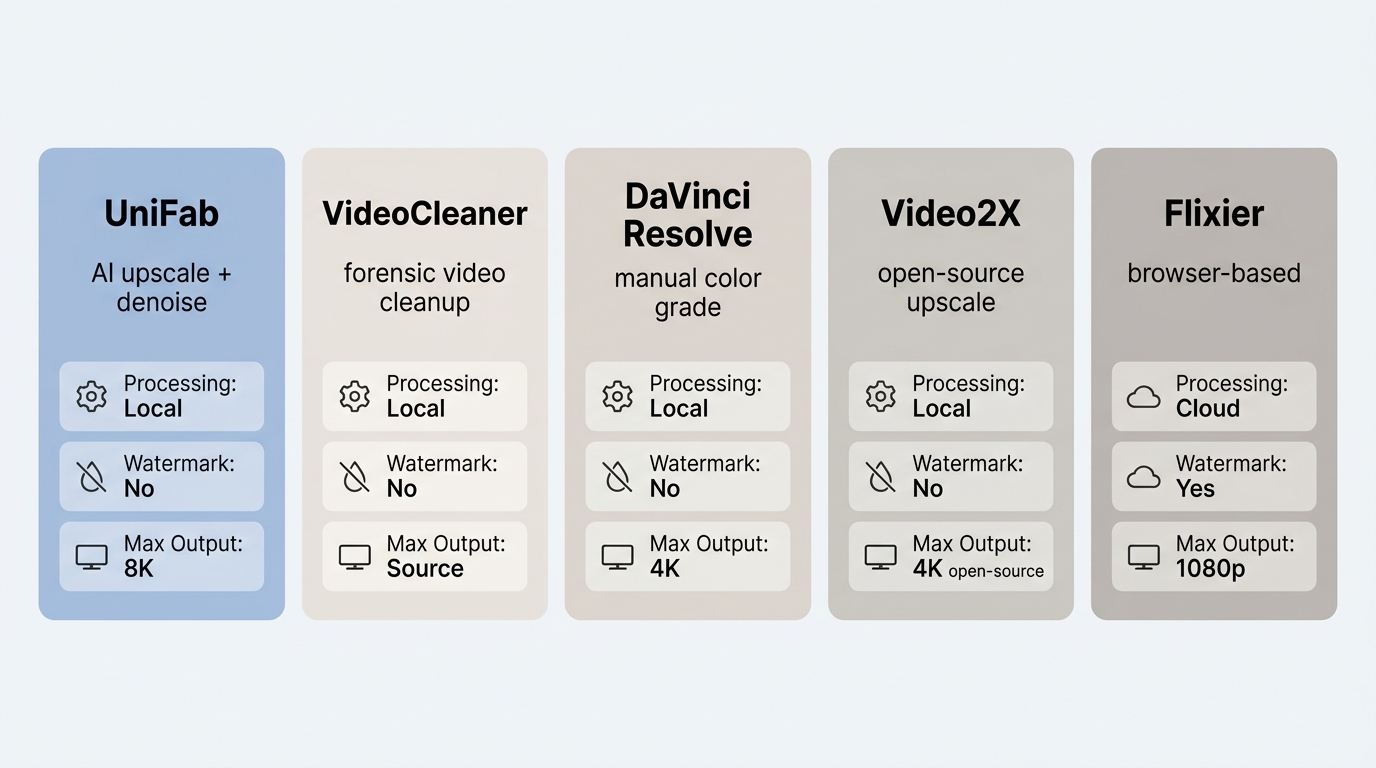
The right tool depends on what you're doing and where the footage will live. Forensic suites like Amped FIVE and Cognitech are built for law enforcement and reproducible analysis. AI-driven desktop tools such as UniFab and Topaz Video AI handle upscaling, denoising, and deblurring locally, which matters when the footage is sensitive. Free and open-source options — VideoCleaner, Video2X, DaVinci Resolve (free edition) — cover manual and scriptable workflows, while browser-based enhancers like Flixier trade privacy and clip limits for convenience. The comparison below highlights the practical trade-offs (as of August 2026).
| Tool | Workflow | Best fit | Processing | Free-use limit | Watermark | Upload / clip cap | Max output (free) | Privacy fit | Evidence-sensitive use |
| UniFab | AI desktop | Personal review, visual cleanup, batch | Local (Windows/Mac) | Per-feature try-outs (see vendor) | No watermark on try-outs | Local file size only | Up to 4K | Strong — files stay on your machine | Not a substitute for forensic analysis |
| VideoCleaner | Manual / forensic-lite | Reproducible sharpening, plate work | Local (Windows) | Fully free, open | None | None | Source resolution | Strong | Used by some agencies; document steps |
| DaVinci Resolve Free | Manual editor | Frame-by-frame color/sharpen/denoise | Local | Free edition | None on free edition exports | None | Up to 4K | Strong | Manual; document node graph |
| Video2X | Open-source upscaler | Scripted upscaling of clips/GIFs | Local (Windows/Linux) | Fully free, open | None | None | Model-dependent | Strong | Manual pipeline |
| Flixier | Browser editor | Quick sharpening, short clips | Cloud (upload required) | Free tier with export limits | Watermark on free plan | Short clip caps on free tier | 720p–1080p typical on free tier | Weak — cloud upload | Avoid for sensitive material |
| Kapwing | Browser editor | Casual cleanup, subtitling | Cloud | Free tier with limits | Watermark on free plan | Clip/length caps on free tier | Typically 720p on free tier | Weak — cloud upload | Avoid for sensitive material |
| Clideo | Browser tools | One-off adjustments | Cloud | Free tier with limits | Watermark on free plan | Upload size cap | Typically 480p–720p on free tier | Weak — cloud upload | Avoid for sensitive material |
Rule of thumb: if the footage identifies real people or relates to an incident, keep it on your machine. Browser enhancers are fine for demo clips and non-sensitive material.
Enhance security camera footage
- Pro-level surveillance video enhancement software
- 30-day free trial for full features, no watermark
UniFab All-In-One
Enhance security camera footage
- Pro-level surveillance video enhancement software
- 30-day free trial for full features, no watermark
UniFab All-In-One for Mac
AI Video Enhancement Tools
- UniFab: A local Windows/Mac AI toolkit with upscaling, denoising, and deblurring in one workflow, plus batch processing for reviewing many clips at once. Because processing runs on your machine, footage of identifiable people never leaves your system.
- Topaz Video AI: A capable AI upscaler with motion-trained models. Slower on typical hardware, with pricing that sits at the higher end of desktop tools.
- Flixier: Browser-based sharpening and denoising — convenient for quick cleanup on non-sensitive footage, but requires uploading the file.
Professional Forensic Software
- Amped FIVE: A leading forensic video analysis suite used by law enforcement. It includes 140+ scientifically validated filters for deblurring, noise reduction, lens correction, and detail recovery.
- MotionDSP Forensic: Designed for generating court-ready evidence from degraded CCTV footage. It specializes in stabilization, pixel-level enhancement, and handling low-quality bodycam or dashcam recordings.
- Cognitech: A forensic-grade tool built for facial reconstruction, object enhancement, and 3D analysis. It is widely used in legal environments due to its precise frame-by-frame enhancement algorithms.
- Prohawk: Real-time video enhancement software used by first responders and security teams. It automatically improves clarity in low-light, foggy, or motion-heavy surveillance environments.
Free and Online Options
- UniFab: Offers try-outs of paid AI features (see the vendor's current terms) alongside its lifetime licensing model, so you can process a representative clip locally before committing.
- YouCam Online Video Enhancer: A browser AI tool with free credits — fine for short, non-sensitive clips; requires upload.
- VideoCleaner: Fully free, open forensic-lite Windows tool used by some agencies for brightening, sharpening, plate work, stabilization, and lens correction. Runs locally.
- Video2X: Open-source AI upscaler (Windows/Linux) for enlarging low-resolution clips while preserving edges. Runs locally.
- DaVinci Resolve (free edition): Professional editor with strong manual sharpening, denoising, and color tools. Runs locally with no watermark on free-edition exports.
For anything that could become evidence, favor the local options. Upload-based enhancers are convenient, but sending identifiable footage to a third-party server is a decision worth making consciously — and the local UniFab workflow below is a natural next step.
Where UniFab Fits This Workflow
UniFab suits personal review and visual cleanup of surveillance footage on Windows or Mac. Because it processes locally, footage of identifiable people never leaves your machine — a real practical advantage over browser enhancers when the clip is sensitive. It is not a substitute for validated forensic analysis, and it cannot recover detail the original camera never captured.
Upscaling for Usable Viewing
UniFab's AI Video Upscaler enlarges low-resolution CCTV footage up to 4K, with diminishing returns on genuinely low-detail sources. The point is to make patterns already present in the frame easier to inspect — not to conjure identifiers that weren't sampled by the sensor.
Denoising and Deblurring
Night footage and older sensors produce grain and mild focus softness that hide real detail. UniFab's Denoise AI reduces grain and cleans compression noise so subsequent upscaling has cleaner input to work with. Motion blur remains a hard limit — enhancement can soften its appearance but cannot reverse it. This is also where general video sharpening methods overlap with surveillance work: the underlying principles are the same.
Face Enhancement With Clear Limits
UniFab's face-focused enhancement can make an existing facial region easier to inspect when enough source pixels are present. Use it to review what's there, not to claim a positive ID (see the legal section below for why predicted detail is interpretation, not identity).
Batch Processing and Local Toolbox
Reviewing a week of camera output one clip at a time is where most people give up. UniFab's batch queue lets you process many clips with the same settings and come back to the results, and because everything runs locally, none of that footage leaves your machine. The same interface groups related tasks — conversion, compression, color correction — under UniFab All-In-One, so a working copy can be prepared without hopping between tools.
Enhance CCTV Footage With UniFab
Step 0 — Preserve the original. Copy the source file to a working folder and set the original to read-only. Never edit or re-export the original; a chain-of-custody question later will thank you.
Step 1: Download and install UniFab.
Enhance security camera footage
- Pro-level surveillance video enhancement software
- 30-day free trial for full features, no watermark
UniFab All-In-One
Enhance security camera footage
- Pro-level surveillance video enhancement software
- 30-day free trial for full features, no watermark
UniFab All-In-One for Mac
Step 2: Launch the app, identify the dominant defect (refer to the defect-to-fix matrix above), and choose the least destructive module first — Denoise for night noise or compression, Upscaler for genuinely low native resolution.
Step 3: Import the working copy (not the original), preview a short representative segment before committing to the full clip, adjust settings on that preview, then click Start.
Step 4: The processed file is saved locally. Document the tool version, module, parameters, and settings alongside the output — that record is what makes the working copy defensible later. This workflow suits personal review and visual cleanup; for anything heading to court, hand the untouched original to a qualified forensic analyst. For a different starting point on grain reduction specifically, see how to remove grain from video.
Manual CCTV Enhancement Methods
Adjust Light, Noise, and Sharpness
- Balance exposure and brightness first — raising brightness on a noisy clip amplifies noise and can clip highlights unrecoverably
- Reduce digital noise before sharpening (sharpen-then-denoise burns noise into edges)
- Nudge contrast; avoid crushing shadows where subjects sit
- Sharpen last, and lightly — over-sharpening creates halos that read as artifacts, not detail
Preserve the Original and Export a Copy
MP4 is a container, not a quality setting — what matters is the codec, bitrate, frame rate, and resolution inside it. Keep the original file untouched and export a working copy:
- Codec: H.264 High Profile (or H.265 if downstream tools support it)
- Bitrate: choose from the source resolution and frame rate rather than a fixed range; a 1080p/30 clip and a 4K/30 clip need very different bitrates to avoid re-encoding loss
- Resolution: export at the working copy's resolution — don't downscale
- Frame rate: keep the source frame rate
- Avoid repeated lossy re-encoding; each pass throws away detail
- Document the output codec, bitrate, frame rate, resolution, tool, and settings alongside the file
Legal and Evidentiary Limits
Draw a firm line between visual cleanup (making what's there easier to see) and factual identification (claiming who or what is in the frame). AI-enhanced footage is interpretive: models predict pixels that plausibly fit the surrounding context, which is useful for review but not the same as recovered evidence.
- Keep the original untouched. Process a copy — the unmodified source is your primary artifact.
- Document every step. Tool, version, model, parameters, timestamps.
- Prefer reproducible tools for anything evidentiary. Suites like Amped FIVE, Cognitech, and VideoCleaner produce scientifically validated, reproducible enhancements.
- Disclose enhancement. Presenting AI-enhanced footage as if it were original can undermine its admissibility.
- Evidentiary treatment varies. Admissibility depends on jurisdiction, method, documentation, and expert foundation — no universal yes/no applies.
What Enhancement Cannot Recover
A quick reference for the recoverability of each common defect:
- Faces: more recognizable when enough source pixels exist; predicted detail is not identification.
- License plates: sometimes partially confirmable when a guess exists — more often confirmed than discovered.
- Night-time noise: reduces well.
- Motion blur: hard limit; AI can soften appearance but not reverse motion.
- Glare / clipped highlights: unrecoverable; the sensor recorded no data there.
- Heavy compression blocks: softens but never fully restored.
- Digital zoom pixelation: genuinely irrecoverable — work from the un-zoomed source instead.
The synthesis: use enhancement to inspect what's already present in the frame, not to manufacture certainty that the sensor never captured.
Choose the Least Destructive Workflow
The through-line of this guide: most disappointing results start upstream of the software. Diagnose the defect first, preserve the original, and match the fix to what the source actually contains. Free and open tools like VideoCleaner, Video2X, and DaVinci Resolve cover manual work well; local AI desktops like UniFab handle upscaling, denoising, and deblurring privately, without uploading sensitive footage. Reach for forensic suites when the outcome could end up in a legal setting. And when you're done, be honest about what the result is: a clearer view of what the camera already recorded — not new evidence the camera never captured.
Security Camera Enhancement FAQ
Can I enhance CCTV footage for free without a watermark?
It depends on the tool. Local open-source options like VideoCleaner, Video2X, and DaVinci Resolve's free edition export without watermarks and have no upload limits. Most browser enhancers add a watermark, cap clip length, and reduce output resolution on their free tiers. Check the comparison table above and pick a local option when the footage is sensitive.
Can ChatGPT directly enhance a security camera video?
No. A text assistant can help you plan settings, interpret metadata, or reason about which defect you're dealing with, but it doesn't process video frames. You still need a video editor, an AI enhancer, or a forensic tool to actually run the enhancement on the file.
Can AI make a blurry face or license plate readable?
Sometimes it can make a partially readable region easier to inspect — when enough source pixels are already present. What it cannot do is invent identity: predicted facial or plate detail is model interpretation, not recovered fact. Keep the original untouched, document every step, and don't treat a plausible-looking output as a positive ID.
Should I upload security footage to an online enhancer?
For a short, non-sensitive demo clip, browser tools are fine. For footage that identifies real people, relates to an incident, or might become evidence, process it locally instead. Sending identifiable video to a third-party server is a decision worth making deliberately, not by default because the browser is convenient.