Why Should You Sharpen Video?
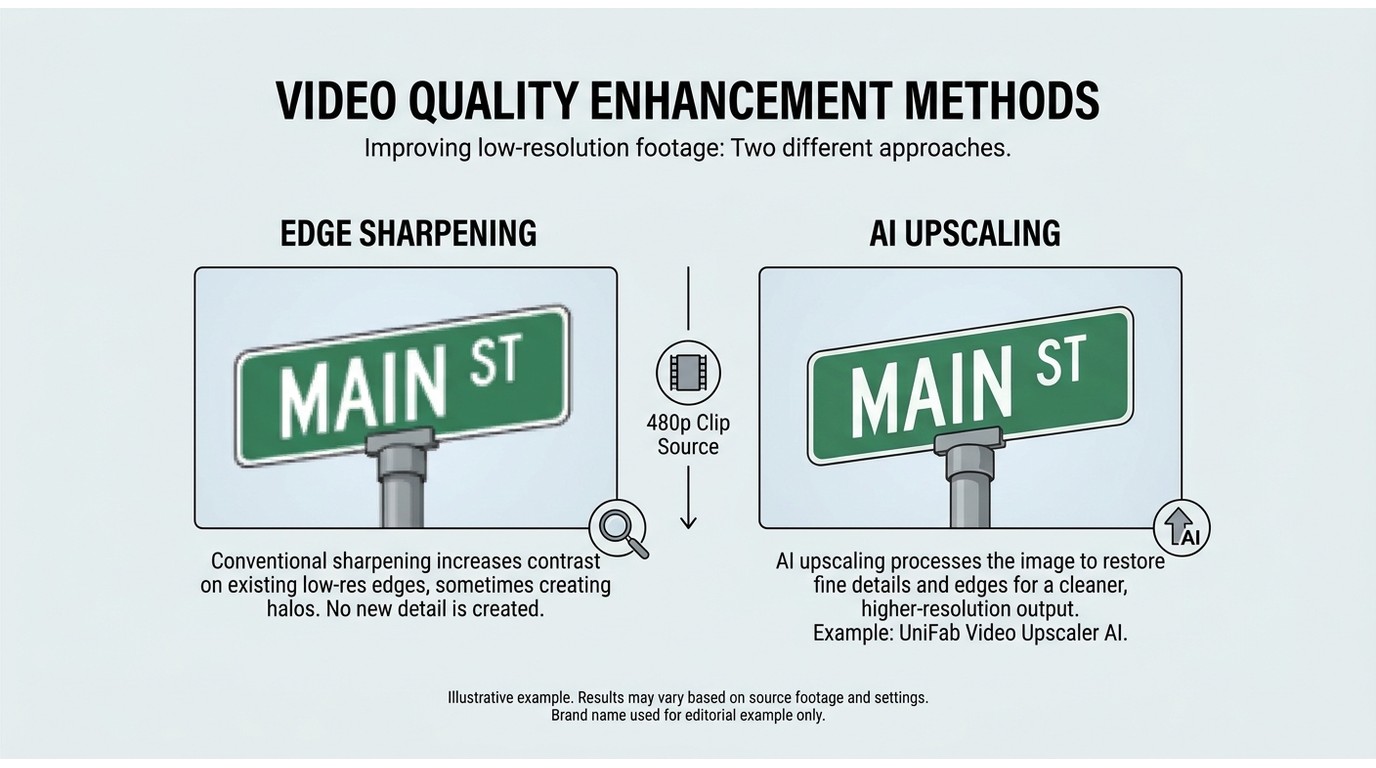
In short, sharpening improves the contrast of edges that already exist in a blurry video; it cannot recreate pixels that were never captured. To sharpen video quality effectively, diagnose the defect first, then denoise, upscale when needed, sharpen lightly, preview, and export.
- Improve Video Clarity — Blurry or soft-focus videos look unprofessional and lack visual impact. Sharpening enhances edges and fine details, making footage appear crisper and more polished.
- Handle Low-Resolution or Soft Footage Correctly — Sharpening increases contrast around existing edges, but it cannot reconstruct pixels that were never captured. For genuinely low-resolution or out-of-focus video, AI upscaling can rebuild detail before a light sharpening pass.
- Restore Old or Damaged Footage — VHS tapes, early digital camera recordings, and archived footage often suffer from inherent softness. Modern sharpening tools, applied conservatively after denoising, can revive these materials while keeping grain and Edge artifacts in check.
- Meet Professional Standards — Content creators, filmmakers, and marketers need sharp, detailed footage for post-production workflows. Video sharpening ensures your output meets professional broadcast and streaming quality requirements.
- Improve Text and Graphic Readability — Sharpening ensures that text overlays, subtitles, lower thirds, and graphical elements remain crisp and easily readable on all screen sizes.
- Optimize for Social Media Compression — Platforms like YouTube, Instagram, and TikTok apply their own compression during upload. Pre-sharpening your video helps maintain visual integrity after platform compression reduces overall quality.
Sharpen and Export a Video in Four Steps
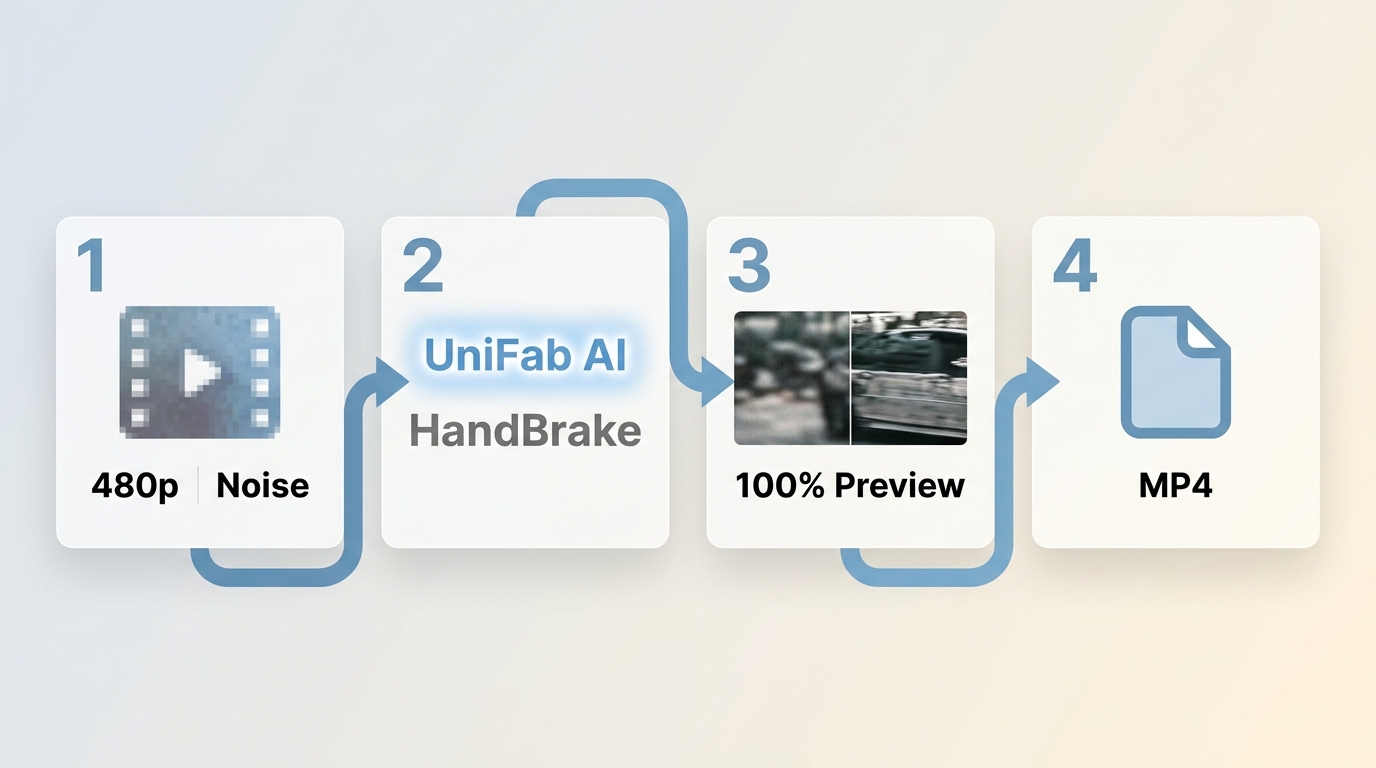
- Identify the defect. Determine whether the problem is low resolution, compression softness, missed focus, motion blur, low-light noise, or aging footage. A 480p clip that needs upscaling from 480p to 1080p needs more than a basic Edge filter.
- Match the method to the source. Use AI upscaling plus sharpening for heavily degraded material, and use a manual filter for footage that is already sharp enough but slightly soft from compression.
- Preview before committing. Import the file, choose a conservative mode or strength, then compare the original and result at 100% zoom and in motion. Single-frame previews can hide noise, halos, and unnatural texture.
- Export a usable master. Save the sharpened MP4, or retain the original format when your workflow requires it. For YouTube, Instagram, or TikTok, keep a high-bitrate master because platform compression can soften the uploaded file again.
Video Sharpening Tools Compared
| Tool | Type & Platform | Input / Output | Save / Export | Processing Location | Free Limit | Best Source Problem |
| UniFab Video Upscaler AI | AI desktop app for Windows and Mac | MOV, MP4, AVI, MPEG, WMV, F4V, MPG, TS, FLV → MP4 or MKV | Exports a new local video file | Local GPU processing or FabCloud | 3 watermark-free attempts | Low-resolution, noisy, old, or substantially soft footage |
| HandBrake | Open-source desktop encoder for Windows, Mac, and Linux | Video source files → MP4 or MKV | Re-encodes and saves a new file | Local computer | Free, with no usage limit | Compression softness and light manual sharpening |
| Flixier | Browser-based editor | Browser upload → exported video file | Exports from the editor | Cloud | Limited free tier | Quick edits when installation is not practical |
| HiQuality | Mobile enhancement app for Android and iPhone | Phone-library video → saved video | Saves to the photo library or shares to social media | Mobile app | Limited free usage | Quick mobile enhancement |
| Sharpen Video | iPhone sharpening app | Phone video → saved video | Saves to the photo library or shares directly | Mobile app | Limited free usage | Basic iPhone-only sharpening |
AI vs Manual Sharpening: Which Approach Is Right for You?
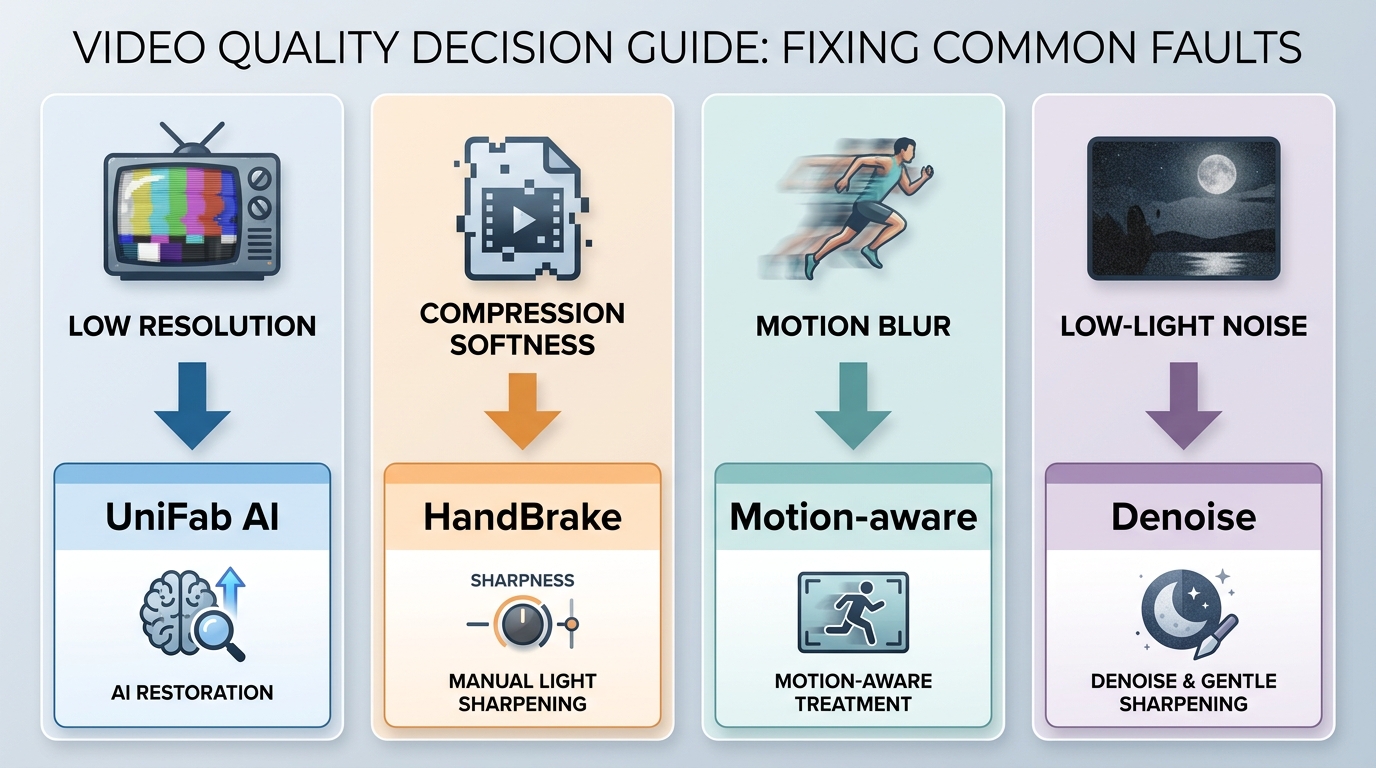
Before choosing a tool, identify the defect rather than treating every blurry clip as the same problem. Beginners often face several defects at once, so the fixes should be sequenced instead of applied as a single sharpness adjustment.
| Source problem | Recommended approach | Important first step |
| Low resolution | AI upscale, then sharpen lightly | Choose an output size that fits the intended screen or delivery format |
| Compression softness | Manual sharpening filter | Use a conservative setting and preview a short sample |
| Out-of-focus blur | AI enhancement may help, but results are limited by the source | Avoid aggressive sharpening that creates halos |
| Motion blur | Use motion-aware restoration when available; sharpening alone has limited value | Compare moving subjects, not still frames |
| Low-light noise | Denoise first, then sharpen lightly | Noise becomes more visible after sharpening |
| Old or archival footage | AI upscaling and denoising, followed by restrained sharpening | Preserve natural texture rather than forcing a modern digital look |
The practical judgment is simple: matching the fix to the defect matters more than whether a tool is labeled AI or manual.
- AI Video Sharpening (Automatic): AI-powered tools analyze each frame of your video, identify edges and details, and intelligently enhance them. This approach is best for significantly blurry, low-resolution, or outdated footage where substantial improvement is needed. AI sharpeners often combine sharpening with upscaling and denoising for comprehensive quality improvement.
- Manual Sharpening (User-Controlled): Traditional sharpening tools apply filter-based enhancement that you control through sliders and parameters. This approach works best for already-decent footage that needs subtle clarity tuning, giving you precise control over the result.
- Our recommendation: Start with an AI sharpener for weak or heavily degraded footage, then switch to manual filters only for fine adjustments on footage that is already close to your desired quality.
Method 1: AI Video Sharpener (Desktop)
UniFab Video Upscaler AI — Professional AI Sharpener
UniFab Video Upscaler AI is an AI-powered tool that sharpens and upscales low-resolution videos up to 16K resolution. It uses deep learning models to reconstruct detail, sharpen edges, and reduce noise in a single pass.
Supported OS: Windows and Mac
Key Features
- Sharpens and upscales blurry video to 1080p, 4K, 8K, or 16K resolution
- AI-powered noise reduction alongside sharpening
- 3 watermark-free attempts before licensing
- Four AI models tuned for different footage: Equinox, Vellum, Kairo (anime), and Titanus (DLC)
- Local GPU (CUDA) acceleration; FabCloud option for cloud processing up to 4K
- Batch processing for multiple files
- Lifetime license option — no forced subscription
- Broad format compatibility (MP4, MKV, AVI, MOV, and more)
How UniFab Reconstructs Detail
Unlike traditional sharpening filters that simply increase Edge contrast (often introducing halos and artifacts), UniFab's AI models understand video content at a semantic level. The AI reconstructs missing detail rather than artificially enhancing what is already there, resulting in genuinely sharper footage without the common artifacts of over-sharpening.
Sharpening Performance Test
Trade-offs to know: after the three included attempts, continued access is available through an annual or lifetime license; UniFab needs a modern GPU for reasonable speed at 4K and above, and, like every sharpener, cannot invent detail that was never captured. It is best for desktop workflows; phone-only users should see Method 4.
We tested UniFab by upscaling a 720p video to 4K. The results showed significant improvements in detail clarity — fine details on surfaces, text, and distant objects became noticeably sharper, and colors appeared richer and more vibrant while maintaining a natural, realistic appearance.
How to Sharpen Video Quality with UniFab
30-day Free Trial with full feature access!
Open UniFab and select ‘Video Upscaler' module from 'All Features', then, upload your low quality video for sharpening.
Customize output settings like resolution, quality, codec, format, and more to your preference.
Select “Start” to initiate the video sharpening process.
Method 2: Free Open-Source Sharpener (Desktop)
HandBrake — Free Video Sharpening Tool
HandBrake is a free, open-source video upscaler that includes built-in sharpening filters. While it does not use AI, it is an effective tool for reducing softness caused by poor compression and improving perceived clarity through re-encoding.
Supported OS: Windows, Mac, and Linux
What HandBrake Can Do
- Re-encode video with better bitrate or codec settings to reduce softness
- Apply unsharp mask and other sharpening filters
- Improve perceived clarity for already-decent footage
- Convert between formats while applying quality improvements
Important Limitation
HandBrake does not add "true AI sharpness" — it cannot reconstruct detail that does not exist in the source. It is best suited for footage that has become soft due to compression rather than footage that was originally captured at low resolution.
HandBrake Unsharp vs Lapsharp: Which to Use
HandBrake offers two sharpening filters. Both should be used conservatively and tested on a short sample before a full encode.
| Filter | Algorithm | Best Source Problem | Noise Sensitivity | Preset / Tune Families | Conservative Starting Point |
| Unsharp | General unsharp-mask sharpening | Slight compression softness in otherwise clean footage | Can emphasize visible grain | Preset and tune controls | Start with a light preset, then increase one step only if moving footage still looks soft |
| Lapsharp | Laplacian-based Edge sharpening | Soft footage where a gentler Edge treatment is preferred | Generally more forgiving with noisy sources | Preset and tune controls | Start with a light preset and compare against Unsharp at the same playback point |
If the source is noisy, denoise before either filter. The right choice is the one that improves moving detail without making grain, halos, or texture more obvious.
How to Sharpen Video with HandBrake
Step 1: Download and install HandBrake from the official website (handbrake.fr).
Step 2: Launch HandBrake and click "Open Source" in the top-left corner to import your video file.
Step 3: Select a high-quality preset from the "Presets" menu. Adjust the "Constant Quality" slider — lower RF values produce higher quality output.
Step 4: Navigate to the "Filters" tab and enable sharpening. Start with a light Unsharp preset for clean compression softness, or a light Lapsharp preset when the source is somewhat noisy. Denoise first if grain is already visible.
Step 5: Choose your save location using the "Save As" bar at the bottom of the window.
Step 6: First encode a short 10- to 20-second sample and compare it with the original in motion. Once the filter looks natural, click "Start Encode" to process and save the full sharpened video.
Pros
- Completely free with no watermarks or trial limitations
- Multiple sharpening filter options and presets
- Lightweight — runs well on less powerful hardware
- Cross-platform (Windows, Mac, Linux)
Cons
- Interface can be overwhelming for beginners
- No AI-powered enhancement capability
- Cannot reconstruct missing detail in low-resolution source material
Method 3: Online Video Sharpener (Browser)
This section covers how to sharpen video online free.
Flixier — Sharpen Video Online Without Installation
Flixier is a cloud-powered video editor that includes sharpening capabilities accessible directly in your web browser. It requires no software installation and can process videos quickly using cloud resources.
Supported OS: Any device with a modern web browser
How to Sharpen a Video with Flixier
Step 1: Log in to Flixier and click "Import" to upload your video from your computer, cloud storage, or a direct URL.
Step 2: Create a new project, set your desired aspect ratio, and drag your video to the timeline. Select the video clip, click the "Color" tab in the properties panel, and locate the Sharpen filter. Increase the sharpness value gradually while previewing the result.
Step 3: Click the blue "Export" button to render your sharpened video. Export times depend on clip length, resolution, and current cloud load.
Pros
- No software installation required — works entirely in the browser
- Cloud-powered rendering for fast processing
- Supports real-time collaboration with team members
- Easy to use with no prior video editing experience
Cons
- Requires a stable internet connection throughout the process
- Free tier has limitations on export quality and video length
- Sharpening capabilities are less powerful than dedicated desktop AI tools
Method 4: Mobile Video Sharpening Apps
Option A: HiQuality — Best for Android and iPhone
HiQuality is an AI-powered mobile app that sharpens video quality with a single tap. It uses advanced algorithms to improve resolution, enhance facial details, and boost overall clarity directly on your phone.
How to Sharpen Video with HiQuality
Step 1: Open the HiQuality app on your device and add the video you want to enhance.
Step 2: Choose from enhancement effects including Clarity, Contrast, Ambience, Vibrance, and Exposure. Adjust each control to achieve your desired level of sharpening.
Step 3: Save the enhanced video to your photo library or share directly to social media.
Pros
- AI-powered enhancement with one-tap operation
- Targeted enhancement for facial detail such as hair, eyelashes, and skin texture
- Works with both 2D and 3D anime content
- Available on both Android and iPhone
Cons
- Requires Pro credits to access full sharpening features
- Results may not match desktop AI tools for heavily degraded footage
Option B: Sharpen Video — Best for iPhone
Sharpen Video is a dedicated sharpening app for iPhone that enhances video by adjusting sharpness, saturation, exposure, brightness, and contrast with smart filtering algorithms.
How to Sharpen Video on iPhone
Step 1: Open the app and select "Open file" to load your video.
Step 2: Apply the sharpening effect and adjust additional color settings to your preference. Use the zoom feature to inspect fine details.
Step 3: Preview the enhanced video, then save to your photo library or share directly.
Pros
- Applies sharpening without re-encoding to a lower quality preset
- Compatible with all standard video formats
- Two smart sharpening algorithms optimized for different content types
- Supports direct social media sharing
Cons
- Occasional app stability issues (crashes reported by some users)
- iPhone-only — not available on Android
- Limited to basic sharpening — no AI upscaling or advanced enhancement
Pro Tips: How to Sharpen Video Without Artifacts
Tip 1: Denoise and Stabilize Before Sharpening
Sharpening amplifies everything in your footage — including grain, noise, and shaky edges. If your video is grainy or unstable, always clean it first with a denoising tool and stabilizer before applying sharpening. This prevents the sharpener from locking in unwanted noise.
Tip 2: Avoid Over-Sharpening
Excessive sharpening creates obvious artifacts that are difficult to remove:
- Glowing halos around high-contrast edges
- Crunchy textures that look digital and unnatural
- Amplified noise that makes footage look worse than before
The fix: Reduce sharpening strength, denoise first when grain is visible, and lower the radius if halos appear. Compare the original and adjusted version side by side in motion, not just on a single frame, because aggressive sharpening can flatten texture and look artificial during playback. When uploading to YouTube, Instagram, or TikTok, sharpen conservatively and keep a high-bitrate master so platform compression has less opportunity to amplify artifacts.
Tip 3: Match Your Tool to Your Source Material
- Heavily degraded footage → Use AI-powered tools (UniFab, HiQuality) that can reconstruct missing detail
- Slightly soft footage → Use manual tools (HandBrake, Flixier) for subtle enhancement
- Mobile/social media clips → Use mobile apps for quick fixes before posting
FAQs about Video Sharpening
Can you upscale a 480p video to 1080p while sharpening it?
Yes, but sharpening alone is not enough. A sharpening filter works on existing edges, while AI upscaling increases the output resolution and can rebuild plausible detail before a restrained sharpening pass.
What HandBrake settings should I start with, Unsharp or Lapsharp?
Start with a light preset for either filter and encode a short sample before processing the full video. Unsharp is useful for clean compression softness, while Lapsharp can be a gentler choice when the source has visible noise. Compare both in motion rather than relying on a paused frame.
Why does my video look noisy or show halos after sharpening?
Sharpening boosts grain and Edge contrast along with useful detail. Denoise first when needed, reduce the sharpening strength, lower the radius, and compare the result side by side during playback.
How can I sharpen a video for free?
HandBrake is a fully free desktop option for manual filters and re-encoding. Flixier offers limited browser-based use. If the source needs AI upscaling as well as sharpening, UniFab Video Upscaler AI includes three watermark-free attempts.
Can AI really restore a blurry, out-of-focus clip?
AI enhancement can improve soft or low-resolution footage, particularly when compression, noise, and limited resolution contribute to the problem. It cannot perfectly restore severe missed focus or motion blur when the original image information is absent.