Introduction
Color banding turns a smooth gradient into visible steps or stripes. The practical solution is to find the first stage where those steps appear, then fix that stage rather than stacking filters on footage that may already be clean.
This diagnosis-first approach matters because banding in video can begin in the source, appear during grading, enter with an export, worsen after a platform transcode, or exist only in the playback and display path. My editorial rule is simple: locate the break before choosing the remedy.
Quick Answer: What Is Color Banding?
The color banding meaning is straightforward: neighboring tones that should blend smoothly are displayed as separate bands. A common color banding example is a sunset sky that breaks into rings of blue, orange, or gray instead of showing a continuous transition.
Key Characteristics of Color Banding
Banding artifacts are easiest to see in broad, low-detail areas such as skies, shadows, fog, walls, and generated backgrounds. Banding in gradients may appear as rings, blocky tonal patches, or abrupt changes between neighboring shades.
- It is more likely when the source contains limited tonal precision.
- It can become more visible after strong grading, denoising, or compression.
- It often stands out in dark scenes as black color banding or stepped shadow detail.
- A higher-bit-depth workflow helps preserve available precision, but it does not recreate tones already missing from the source.
Why Color Banding Matters
The banding effect makes otherwise clean footage look compressed or unfinished. It can distract viewers, weaken visual continuity, and become more obvious when a delivery platform applies another encode.
Banding also changes how an editor should work. If the master is smooth but the uploaded copy is not, regrading the source is usually the wrong response; the delivery path needs attention instead.
What Causes Color Banding?
Banding in video can originate at four broad layers: the source, the processing chain, the delivery chain, or the playback and display path. The first visible break in that pipeline points to the likely cause.
Fix Color Banding with UniFab AI
Reduce color banding easily
Enhance video quality automatically
30-day free trial for full features, no watermark
UniFab Deinterlace AI
Fix Color Banding with UniFab AI
Reduce color banding easily
Enhance video quality automatically
30-day free trial for full features, no watermark
UniFab Deinterlace AI for Mac
Low Bit Depth
Low bit depth gives a gradient fewer tonal levels to describe subtle changes. An 8-bit file stores 256 levels per channel, while 10-bit and 12-bit media provide more precision for capture, grading, and export.
The distinction is preventive rather than restorative. Moving an 8-bit source into a 10-bit timeline can reduce further rounding during later adjustments, but it cannot recover tonal values that the camera or an earlier encode never retained.
| Bit depth | Tonal levels per channel | Capture implications | Editing headroom | Export use | What conversion cannot restore |
|---|---|---|---|---|---|
| 8-bit | 256 | Records fewer intermediate shades, so demanding gradients are more vulnerable | Limited room for strong exposure, contrast, or saturation changes | Common for delivery, but easier to damage through repeated processing | Missing source tones and detail lost to earlier compression |
| 10-bit | 1,024 | Records finer tonal transitions when the source was captured at 10-bit | Better resilience during grading and color transforms | Useful for precision-preserving masters and compatible delivery workflows | Detail absent from an 8-bit or heavily compressed source |
| 12-bit | 4,096 | Provides still finer source precision when supported by the capture path | More room for demanding finishing work | Most relevant to acquisition and intermediate workflows | Information clipped, crushed, or discarded before conversion |
The practical takeaway is that converting early can protect the rest of the workflow, but no container or bit-depth label repairs information that was never recorded.
Lossy Compression
Lossy compression reduces subtle image information to control file size. Flat gradients are especially vulnerable because small tonal differences may receive fewer bits, producing compression banding and other banding artifacts.
A second encode can make the issue more visible even when the local master looks acceptable. This is why the exported master and the platform-processed copy must be evaluated as separate outputs.
Excessive Color Grading
Strong contrast, saturation, exposure, or LUT changes can stretch a narrow tonal range until its individual steps become visible. Bright saturated areas and lifted shadows are common places for grading banding to appear.
When a LUT introduces visible steps, reduce the transform, work from a higher-precision source when available, and check the image before adding texture. A heavier correction rarely restores a gradient that the first correction already broke.
Noise Reduction Filters
Aggressive denoising can erase the fine texture that visually separates adjacent tonal levels. Once that texture disappears, a smooth area may resolve into obvious steps.
If a denoising pass is involved, compare the image before and after the filter. The Neat Video guide provides related context, but any filter should be judged on a short sample rather than assumed to solve gradient detail.
Underexposure and Poor Lighting
Underexposed footage contains little usable separation in dark tones. Lifting those shadows later can expose black color banding, noise blocks, and clipped transitions that a higher bitrate cannot fully rebuild.
For difficult low-light material, protect the source first: avoid crushing shadows during capture, limit repeated encodes, and make smaller tonal adjustments. My preference is to preserve some natural texture rather than denoise a shadow until it becomes a flat staircase.
Color Management and Chroma Subsampling
A color space mismatch, range error, or poorly managed conversion can create or exaggerate steps even when the file is nominally high bit depth. Rec.709 and Rec.2020 material should move through an intentional, managed conversion path.
Chroma subsampling records color detail at a lower resolution than brightness detail. 4:2:0 is common for delivery, while 4:2:2 or 4:4:4 retains more color information for production. Chroma sampling is not the sole cause of banding, but it can reduce effective precision when combined with grading and compression.
Also check full-versus-limited range handling. A player, GPU, or display interpreting the wrong range can crush or stretch shadows and make a smooth ramp look stepped.
Display and Playback Limitations
A clean file can still look banded in one player or on one panel. Display processing, calibration, color profiles, panel precision, and playback software can all create apparent monitor banding.
Compare at least two players and a second display before changing the file. If scopes remain smooth and the artifact follows one screen, the display path is the more likely cause.
Cables, Ports, and GPU Output
Cables and ports are less common causes, but the GPU output format and range can alter the visible result. Check these after the source, grade, and export have been cleared.
A useful hardware test is to keep the same file and player, then change one variable at a time: GPU range, output bit depth, port, cable, and display. If the gradient changes without a new encode, the file is not the first failure point.
The synthesis across all eight causes is consistent: the appropriate color banding fix depends on where the tonal staircase first appears, not on which filter is easiest to apply.
Diagnose Where Color Banding Starts
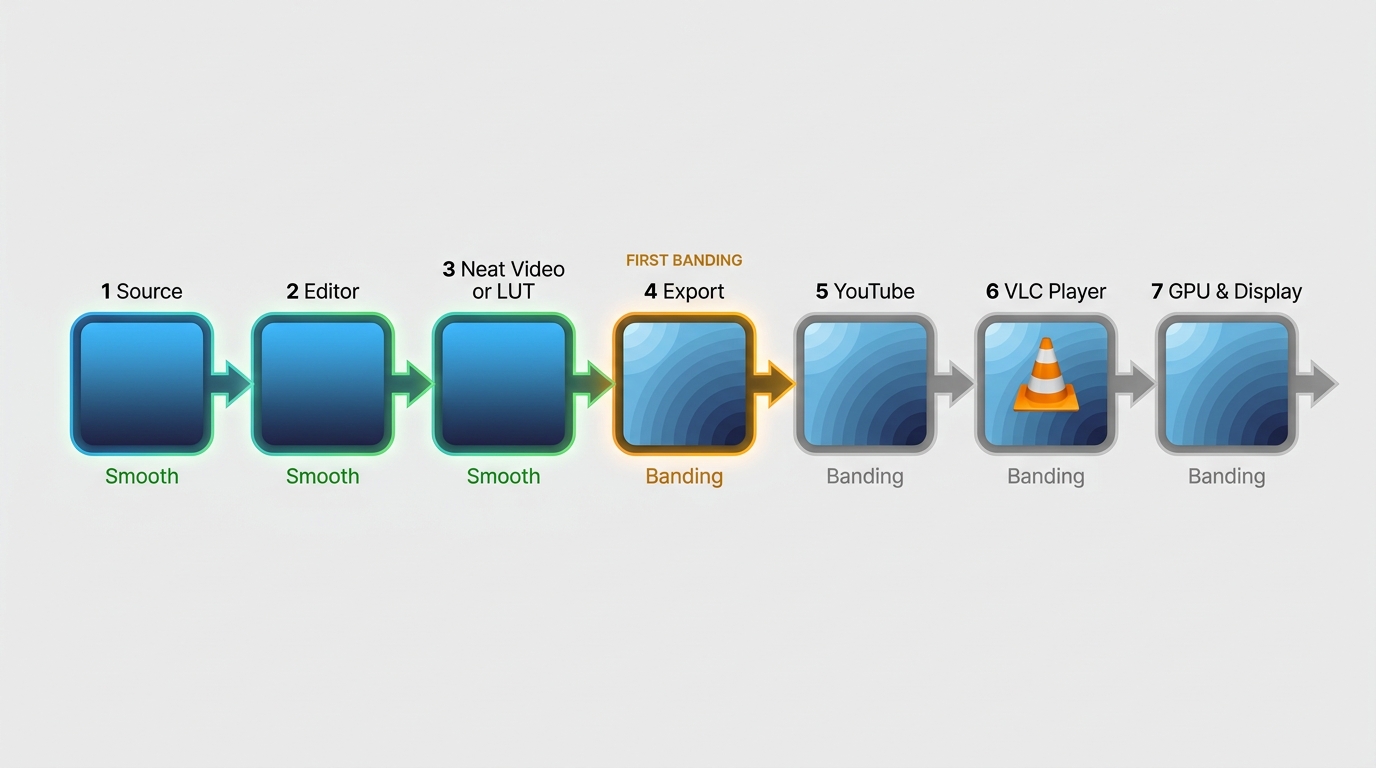
A reliable color banding test compares the same gradient through the entire path. Changing filters before locating the failure stage wastes time and can hide the real problem.
Run a Gradient and Scopes Test
Use a known smooth gradient beside a difficult section from the actual video. The synthetic ramp reveals processing problems, while the real frame shows whether the source already contains banding.
- Open the original source and a known smooth grayscale or color gradient in the editor.
- Inspect waveform or RGB parade scopes for abrupt plateaus instead of a gradual transition.
- Compare the source viewer with the timeline before effects.
- Turn off grading, LUTs, denoising, and sharpening one at a time.
- Export a short high-quality master that avoids an unnecessary extra compression pass.
- Play the master in more than one player, then compare it with the processed platform upload.
- Repeat the check on a second display with a known color profile.
This is the fastest way to separate banding in gradients from a display illusion. For a repeatable software check, keep the test clip, timeline, player, and viewing conditions unchanged while altering one stage at a time; the first changed output identifies the responsible stage.
Compare Source, Export, Upload, and Display
The same frame should be checked at the source, editor preview, master export, upload, player, and display. That comparison turns a vague banding test into an actionable diagnosis.
| Where banding first appears | Likely cause | Next action |
|---|---|---|
| Original source | Capture precision, underexposure, or earlier compression | Use a better source if available, then mask the remaining steps conservatively |
| Editor preview after an effect | Grading, LUT, denoising, timeline precision, or effect order | Disable effects and rebuild the chain in a higher-precision project |
| Master export | Codec, bitrate, range, color tags, or export precision | Correct the export path and produce a cleaner master |
| Platform upload | Platform transcoding or delivery bitrate allocation | Compare the processed version with the master and adjust the upload encode |
| One player only | Decoder, color management, or player settings | Use another player and review color-output settings |
| One display only | Panel, profile, GPU range, port, or cable | Cross-check another calibrated display before editing the file |
For a practical playback check, a smooth ramp displayed from the same local file should not change when only the player changes. If it does, investigate decoding and color management before touching the grade.
Seven Ways to Reduce Color Banding
A dependable video debanding workflow follows an order: diagnose first, preserve precision, choose a targeted correction, add texture only when useful, export a clean master, and verify the delivery copy.
- Locate the first stage where the gradient breaks.
- Protect the remaining precision in the timeline and master.
- Try a dedicated debanding or targeted smoothing method.
- Add controlled grain or dithering if the output benefits from it.
- Keep blur local so important detail remains intact.
- Export a clean master and an appropriate delivery file.
- Inspect the upload and at least one other display.
Add Controlled Noise or Grain
Fine grain can mask visible steps by breaking up flat tonal regions, but it is not a universal fix. Effect order, project precision, grain size, and the final encode determine whether the texture survives.
Best for: mild banding in otherwise usable gradients, especially when a small amount of natural texture suits the image. Not ideal for: heavily compressed sources or delivery encodes that erase fine grain.
Make a short test export before processing the full video. The useful balance is a smoother-looking gradient without turning clean surfaces into noise or sacrificing retained texture.
Apply Dithering
Dithering uses controlled variation between neighboring pixels to make limited tonal steps less obvious. It can be effective when the final format has less precision than the working timeline.
Best for: reducing visible quantization during a planned conversion to a lower-precision delivery format. Not ideal for: footage whose source already contains large, blocky bands and missing detail.
Use Targeted Blur
A slight Gaussian blur can soften a localized gradient, but it should be masked to the affected region. Whole-frame blur trades one artifact for lost detail.
Best for: skies, walls, or defocused backgrounds with isolated bands. Not ideal for: faces, text, hair, foliage, or textured surfaces that need crisp edges.
Preserve Higher Bit Depth
A 10-bit workflow or 16-bit timeline can reduce additional rounding during grading and compositing. It is most valuable before the gradient has been damaged.
Best for: 10-bit or higher source footage and projects with substantial color work. Not ideal for: expecting an 8-bit-to-10-bit conversion to reconstruct missing shades.
Use Debanding Filters Carefully
Dedicated filters may smooth stepped gradients more selectively than a general blur, but current availability and exact capabilities should be checked before treating any named tool as a recommendation.
Neat Video, Magic Bullet Looks, ReShade Dband Shader, and similar options may provide useful denoising, grain, or debanding controls in some workflows. Select by host compatibility, masking controls, preview quality, temporal consistency, and the ability to protect edges rather than by a broad product claim.
Best for: footage with repeatable gradient artifacts that can be isolated and previewed. Not ideal for: incorrect color tags, platform transcoding, GPU range errors, or panel limitations.
Choose Better Export Settings
A clean export separates the high-quality master from the delivery file. The master should preserve the timeline's available precision; the delivery version should meet the platform's requirements without unnecessary re-encoding.
As of July 2026, YouTube recommends variable-bitrate uploads, commonly delivers H.264 video with 4:2:0 chroma, expects BT.709 for SDR, and may convert unsupported wide-gamut SDR during processing. Treat the upload as a new encode, not a copy of the master.
- Export a high-quality mezzanine master before creating the web-delivery file.
- Keep SDR color tags and range handling consistent through export.
- Avoid repeated compression passes between the master and upload.
- Use enough bitrate for the scene's gradients and texture rather than relying on one universal number.
- Compare the processed upload with the local master at the same frame.
Best for: banding introduced at export or after YouTube processing. Not ideal for: source banding that is already visible before the first edit.
Verify the Upload and Displays
YouTube color banding and display-side banding can look identical at first. Verification prevents an editor from degrading a clean master to compensate for a separate delivery problem.
Best for: cases where the local master looks smooth but the online or on-screen result does not. Not ideal for: replacing source inspection; the upload check is the final stage, not the first.
For a controlled display test, play the same local master and processed upload on two screens without changing the player settings. A problem limited to one screen points toward the panel, profile, or GPU output; a problem limited to the upload points toward transcoding.
Where AI May Help With Banding
AI may help when the task is broader color restoration and the source still contains usable structure. It should not be presented as a dedicated color banding fix without verified before-and-after evidence.
Interlaced scan artifacts are different from gradient steps. UniFab Deinterlace AI addresses scan structure, while this interlaced versus progressive guide explains the distinction; neither should be treated as proof of dedicated debanding.
Where UniFab May Help
UniFab Video Colorizer AI is relevant when the goal is local, automated color restoration for black-and-white old films or historical footage. It supports Windows and Mac, GPU acceleration, batch processing, MP4 and MKV output, and resolution up to 4K.
The honest boundary matters: Video Colorizer AI is not verified here as a dedicated video debanding filter. It may support a color-restoration workflow, but it will not correct an export tag, a platform transcode, GPU range handling, a cable problem, or a display limitation.
Fix Color Banding with UniFab AI
Reduce color banding easily
Enhance video quality automatically
30-day free trial for full features, no watermark
UniFab Deinterlace AI
Fix Color Banding with UniFab AI
Reduce color banding easily
Enhance video quality automatically
30-day free trial for full features, no watermark
UniFab Deinterlace AI for Mac
Use it only for footage you own or are authorized to process, and remain responsible for the material you import and export.
When AI Is a Good Fit
AI is a reasonable fit when a user wants automated local processing and the diagnosis points to a restoration problem inside the image, not a configuration or delivery failure.
- Good fit: black-and-white or historical material that needs color restoration, batch processing, and a local workflow.
- Limited fit: baked-in gradient damage where reconstruction may soften the symptom but cannot guarantee missing tones.
- Poor fit: incorrect color-space tags, full-versus-limited-range errors, platform transcoding, GPU output, cables, or display hardware.
The editorial judgment is to use AI after the pipeline test, not before it. That keeps an optional restoration step from obscuring a simple export or display correction.
Conclusion
The most reliable way to prevent color banding is to diagnose where it begins, preserve the precision still available, apply a targeted correction, export a clean master, and verify the delivery and display versions separately.
Low bit depth, compression, grading, denoising, color management, playback, and hardware can produce similar-looking steps, but they do not share one fix. AI color restoration can be an optional later step when its verified capability matches the material; it should not replace source-to-display troubleshooting.
Color Banding FAQs
Can Color Banding Be Fully Removed?
Sometimes. Banding introduced by grading, export, playback, or display settings can often be reduced substantially by correcting that stage. When the steps are baked into a low-precision or heavily compressed source, a filter may mask or partially reconstruct them, but it cannot recover all missing tonal information.
Why Can 10-Bit Video Still Show Banding?
10-bit video banding can persist when the source was already damaged, a grade stretched limited tones, chroma subsampling reduced color precision, compression removed subtle differences, color management was wrong, or the player and display introduced the visible steps.
Does Converting 8-Bit to 10-Bit Help?
It can help prevent additional quantization during later editing and export, especially if conversion happens before heavy processing. It does not generate the intermediate tones missing from the original 8-bit source, so it is a workflow-protection step rather than a restoration method.
Is the Video or Monitor Causing Banding?
Run a color banding test with a known smooth gradient, inspect scopes, compare the source and master in multiple players, and view the same file on another display. If the artifact follows the file, investigate the media path; if it follows one screen, investigate the display path.
Why Does YouTube Add Color Banding?
YouTube transcodes uploads for delivery, and that process changes bitrate allocation, chroma sampling, and sometimes color handling. The processed upload may therefore show steps absent from the master. Compare matching frames and adjust the upload encode without damaging the clean local master.
Can Adding Noise Make Banding Worse?
Yes. Grain placed at the wrong stage, processed in a low-precision project, or compressed too aggressively may disappear unevenly and expose new banding artifacts. Test a short segment, review the final delivery encode, and keep the grain large enough to survive without overwhelming texture.
Which Export Codec Preserves Gradients Best?
There is no universal winner. Use a high-quality mezzanine codec and sufficient bit depth for the master, then create a compatible delivery file with controlled color tags, chroma, and bitrate. The best choice is the one that preserves banding in gradients through the actual playback path.