![How to Make a Video 4K: 5 Methods Compared [2026]](https://artifact.dvdfab.me/2026/07/22/rSMrLps-_E7GcHEkpVTYJL3j3yqEjDP6/feature_cover.jpg)
Making a video 4K is not just a matter of choosing a larger resolution. A 3840×2160 export changes the frame size, while an AI video upscaler may reconstruct plausible detail. This guide compares five workflows, explains their limits, and shows how to check the result before a long render.
The practical takeaway is simple: use dedicated AI reconstruction when visible detail matters, an editor when 4K is part of a larger project, a cloud tool for a short upload, or ordinary resizing when you mainly need a standards-compliant 4K file.
Make a Video 4K in Three Steps
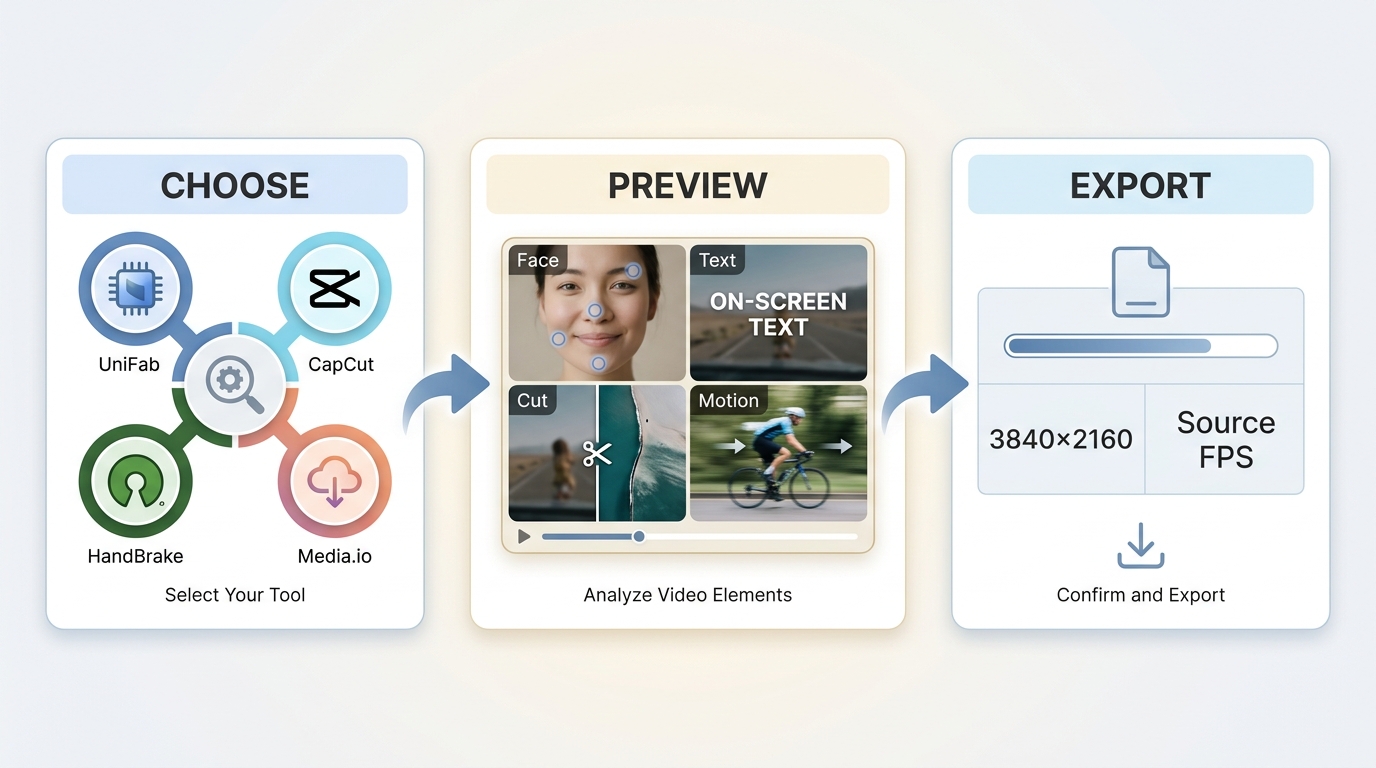
To make a video 4K, choose a workflow that fits the source, process a short preview, and export at 3840×2160 with settings matched to the destination. The preview matters because 4K video upscaling can improve apparent detail, but it can also expose compression and focus problems.
- Load the cleanest source available into a suitable 4K video upscaler, editor, cloud service, or transcoder.
- Select a reconstruction or scaling method, then preview a representative section with faces, text, motion, and a scene cut.
- Set the output to 3840×2160, preserve the source frame rate unless a deliberate conversion is required, and export the finished file.
Selecting 3840×2160 creates a 4K-sized output; the reconstruction method and source quality determine whether it also looks more detailed. A short preview is a more reliable decision point than committing immediately to the full video.
What Making a Video 4K Actually Means
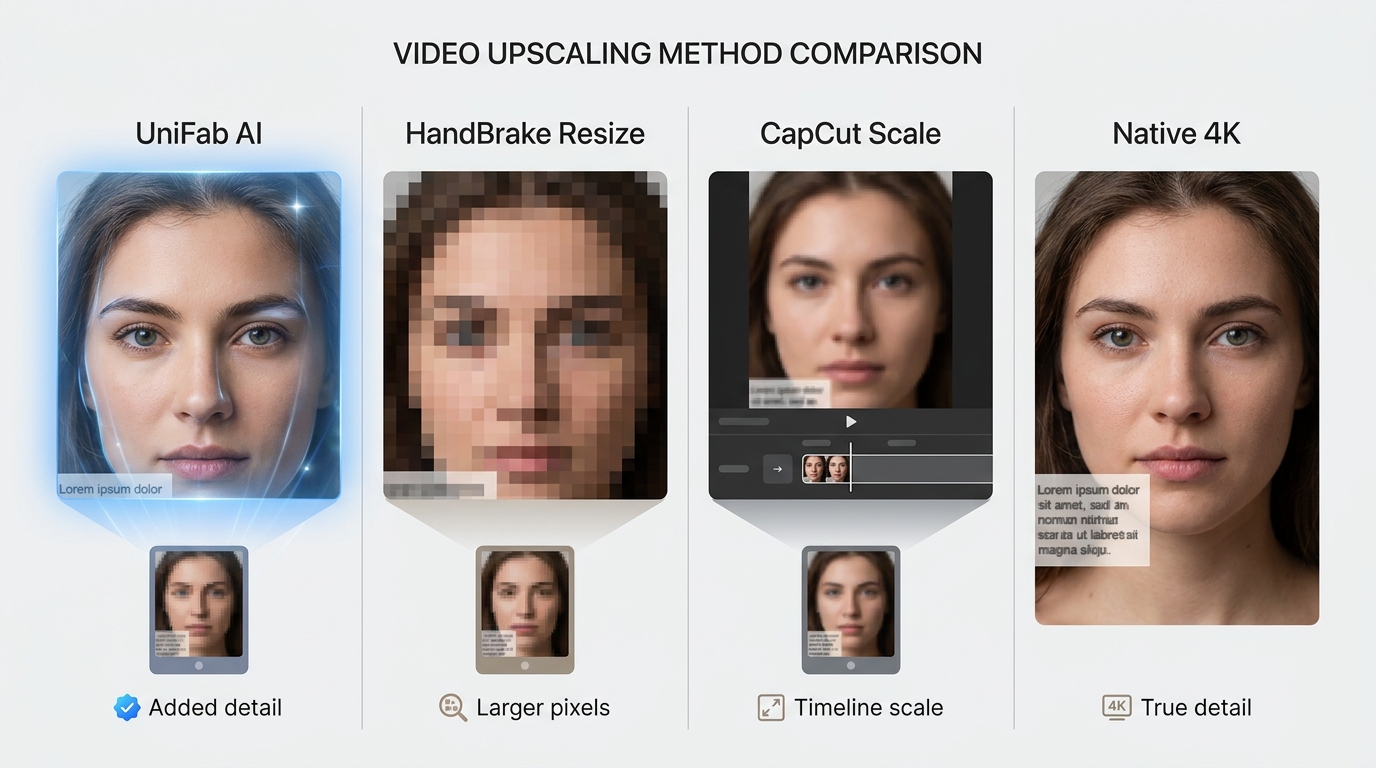
To convert MP4 to 4K, separate the file container from the image itself. MP4 can hold a 3840×2160 video, but changing dimensions alone does not restore texture, edges, or fine detail lost in the source.
AI Reconstruction vs. Simple Resizing
An AI video upscaler analyzes patterns across frames and generates plausible detail, while simple resizing enlarges the existing pixels. Both can produce a 3840×2160 video, but they solve different problems and can create different 4K upscaling artifacts.
- AI reconstruction: Aims to improve perceived detail, reduce visible noise, or clarify edges. Results depend on the model and the condition of the source.
- Ordinary resizing: Changes frame dimensions without claiming to recreate missing information. It is useful for delivery compatibility and controlled transcoding.
- Editor scaling: Places scaling inside a wider workflow for cutting, color, graphics, sound, and final delivery.
- Native 4K capture or generation: Starts with 4K material instead of enlarging existing footage. When reshooting is possible, this avoids many reconstruction compromises.
A 4K deliverable can match high-resolution displays and platform delivery requirements more closely, but resolution by itself does not guarantee better ranking, engagement, or a sharper-looking source.
Choose the Right Method Family
A desktop 4K upscaler is the stronger fit for long or sensitive footage, an online 4K upscaler is convenient for short clips, and a 4K video on phone workflow suits quick social edits. Editors and transcoders cover projects where reconstruction is not the main goal.
- Dedicated desktop AI: Suits model selection, batch work, local processing, and sources that need visible reconstruction.
- Cloud AI: Suits short files when installation is inconvenient and uploading the source is acceptable.
- Mobile or desktop editor: Suits projects that combine trimming, captions, effects, and a 4K export.
- Open-source transcoder: Suits users who need exact output dimensions and codec control without AI restoration.
- Full post-production editor: Suits experienced editors who need scaling alongside grading, effects, and timeline delivery.
Method 1: UniFab Desktop AI Upscaling
UniFab Video Upscaler AI is a desktop 4K upscaler for Windows and Mac that uses dedicated reconstruction models, supports batch processing, and can export MP4 or MKV at resolutions up to 16K. Local processing is a practical privacy fit for sensitive or long footage.
It suits users who want model choice and a dedicated AI video upscaler. It is less suitable for anyone who needs a phone-only editor or wants to finish an entire cutting and graphics project in one timeline.
Choose the Right UniFab Model
The four current models cover different source characteristics. Model choice should follow the footage rather than the desired marketing label, because excessive texture or sharpening can make a 4K video upscaling result look less natural.
- Equinox: A general model for mixed live-action material and routine enlargement.
- Vellum: A texture-focused option for footage where surfaces and fine patterns need careful treatment.
- Kairo: An anime-focused model designed to preserve linework and stylized detail.
- Titanus: A film-oriented model officially described as three times faster than its predecessor, without implying one speed for every source or computer.
The desktop workflow supports output up to 16K, while FabCloud is a separate cloud route that supports output up to 4K. For footage that should not be uploaded or for long batch jobs, local desktop processing is the more appropriate choice.
Upscale and Export to 4K
Use a short representative section before the full job. Check faces, fine text, grain, fast movement, and a scene cut, then keep the selected model only if the preview improves the source without introducing distracting artifacts.
30-day Free Trial for full feature, without watermark!
- Step 1
Launch and open UniFab. Then, tap the All Features option and click the Upscaler module. Next, click the Add Video button to upload the video that you want to upgrade to 4K.
- Step 2
Select 4K resolution, choose one model based on your needs and video type, you can also customize the output video parameters.
- Step 3
After completing the customization process, hit the Start option to begin and finish the video upscaling process from poor resolution to 4K.
A 30-day full-feature desktop evaluation with no watermark is available. That period is useful for checking whether the reconstruction models suit a representative source before choosing a longer-term license.
Method 2: CapCut Editing Workflow
CapCut combines editing and 4K export in a phone, desktop, or browser workflow. It is a practical way to make a 4K video on phone when the project also needs trimming, captions, transitions, or social formatting.
CapCut Strengths and Limits
CapCut is convenient when editing is the main task and upscaling is one step in the project. Its official tools support HD, UHD, and 4K-oriented enhancement, but access and export conditions can vary by device, account, and current plan.
- Suitable for: Short-form creators, phone-based editing, captions, effects, and quick delivery from one interface.
- Less suitable for: Long batch restoration, sensitive footage that should remain local, or users who want several specialized reconstruction models.
- Watch for: Aggressive sharpening on faces, small lettering, and compressed social-media sources.
The dedicated CapCut video upscaler guide covers the editor in more depth without turning this comparison into a second CapCut tutorial.
Create a 4K Export in CapCut
The reliable CapCut path is to finish the edit, confirm the project and export resolution, and inspect a short result on a larger screen. A 4K setting cannot recover detail that is absent from a heavily compressed source.
{{STEP_GUIDE_1}}
Method 3: Media.io Cloud Upscaling
Media.io is an online 4K upscaler for short browser-based jobs. It can convert MP4 to 4K without a local installation, but uploading, cloud queues, clip limits, and credit use make it a narrower fit than desktop processing.
Media.io Strengths and Limits
As of July 2026, Media.io lists MP4 and MOV support, clips up to five minutes, a 960×960 minimum, a 2160×2160 maximum, and credit use that rises with resolution. Those boundaries make it better for short clips than long-form or confidential footage.
- Suitable for: A short one-off clip, a computer without suitable local hardware, or a quick browser workflow.
- Less suitable for: Long videos, batch libraries, private material, or projects that need exact local control over processing.
- Watch for: Upload time, queue time, credit consumption, and whether the source dimensions meet the service limits.
Create a 4K Export in Media.io
Confirm the source length and dimensions before uploading. The cloud route is convenient only when the clip fits the service limits and the upload itself is acceptable for the material.
{{STEP_GUIDE_2}}
For a broader selection of browser and desktop options, the guide to upscaling video to 4K provides a better handoff than expanding the cloud comparison here.
Method 4: Convert Video to 4K Using HandBrake (Open Source)
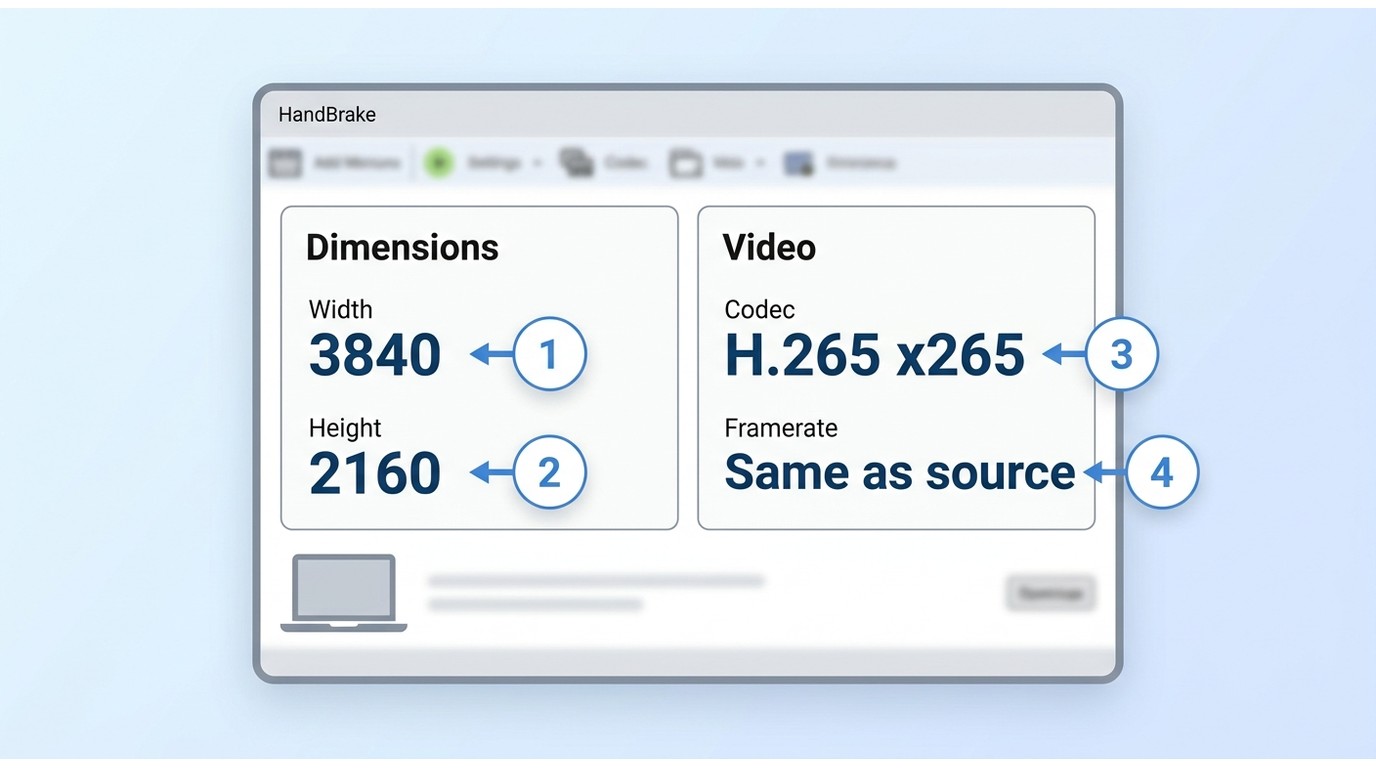
HandBrake can convert MP4 to 4K by resizing and transcoding the source, but it does not reconstruct missing visual detail. It is a good fit when the requirement is a standards-compliant 3840×2160 file rather than AI restoration.
HandBrake suits users who want open-source codec and dimension control on Windows, Mac, or Linux. It is not ideal for severely compressed, noisy, or soft footage where the goal is to create plausible new detail.
How to Make Videos 4K Using HandBrake
The core workflow is to set the dimensions, choose a compatible codec, retain the intended frame rate, and encode. Treat the output as a resized delivery file, not as native 4K capture.
- Open HandBrake and load the source video.
- In Dimensions, set the output width to 3840 and height to 2160 while preserving the intended aspect ratio.
- Choose H.264 for broad compatibility or H.265/HEVC for greater efficiency where the destination supports it.
- Keep the source frame rate unless conversion is intentional, then choose a bitrate or quality target appropriate for the destination.
- Start the encode and inspect the finished file for scaling halos, compression, and motion changes.
HandBrake is useful when a service, display, or project specification expects a 3840×2160 video. The open-source route should not be presented as AI detail recovery, and enlarging a low-resolution file can make its original defects easier to see.
Method 5: DaVinci Resolve Studio Scaling
DaVinci Resolve Studio places Super Scale inside a complete editing, grading, effects, and delivery environment. The Studio edition includes the AI Neural Engine toolset associated with Super Scale; the free edition should not be treated as offering the same feature.
This workflow suits experienced editors who already need a timeline and color pipeline. It is less suitable for someone who wants a focused, low-setup upscaler or does not need the wider post-production environment.
Use Super Scale and Export in 4K
Super Scale belongs in a controlled project workflow: apply it to the source clip, evaluate the effect in context, then set the timeline and delivery output to 3840×2160. Avoid assuming that a stronger scale or sharper setting will produce a better image.
- Open DaVinci Resolve Studio, import the clip into the Media Pool, and place it on the timeline.
- Enable Super Scale for the source clip through the Studio controls, then adjust its available sharpness and noise settings conservatively.
- Set the project or timeline resolution to 3840×2160.
- Review faces, titles, grain, motion, and scene cuts in the timeline before delivery.
- Export through the Deliver page with the codec, bitrate, and frame rate required by the destination.
Processing time depends on the source, scaling settings, effects stack, GPU, and output configuration. A representative preview is more informative than a universal duration estimate.
Compare the Five 4K Workflows
The five methods differ more in workflow and evidence than in the 4K label. The useful comparison is whether a method reconstructs detail, where it processes the file, what limits apply, and whether it fits the source and device.
| Candidate | Workflow family | Reconstructs detail or resizes only | Best source type | Platform and device | Local or cloud processing | Privacy fit | Clip-length constraints | GPU requirement | Verified cost or usage limit | Maximum verified output | Measured processing time | Output file size | Visible artifacts | Best for | Not ideal for |
| UniFab Video Upscaler AI | Dedicated desktop AI reconstruction | Reconstructs plausible detail with Equinox, Vellum, Kairo, or Titanus | SD, VHS, older footage, anime, and low-resolution video | Windows and Mac | Local desktop; separate FabCloud option | Strong fit for footage that should remain on the computer | Desktop batch workflow; practical limit depends on hardware and storage | Compatible GPU recommended for AI processing | 30-day full-feature desktop evaluation with no watermark | Desktop up to 16K; FabCloud up to 4K | Not measured here; record source, model, GPU, and settings in a matched test | Depends on codec, bitrate, frame rate, duration, and output resolution | Possible texture, skin, grain, text-Edge, or temporal artifacts if the model is mismatched | Local reconstruction, model choice, and batch work | Phone-only editing or a full timeline workflow |
| CapCut | Mobile, desktop, and browser editor scaling | Offers enhancement and scaling inside an editing workflow | Short social clips and projects that also need editing | Phone, desktop, and web | Varies by feature and platform | Fit depends on whether the selected feature processes locally or online | Practical limit depends on device resources and current account access | Device-dependent | Feature and export access vary by platform, account, and current plan | 4K-oriented enhancement and export support | Not measured here; time a short matched export on the intended device | Depends on the selected export settings and project duration | Possible oversharpening, compressed text edges, or softened facial detail | Editing and 4K delivery from one interface | Long batch restoration or several dedicated AI models |
| Media.io | Cloud AI upscaling | Cloud enhancement rather than simple local resizing | Short supported MP4 or MOV clips | Web browser | Cloud | Weak fit for confidential material because the source must be uploaded | Up to five minutes; source dimensions from 960×960 to 2160×2160 | No local GPU required | Credits increase with resolution | Within the service's listed dimension limits, including 4K-oriented output | Not measured here; record upload, queue, processing, and download separately | Depends on the cloud export settings and source duration | Possible smoothing, Edge halos, temporal inconsistency, or cloud recompression | Short browser-based jobs | Long, private, or batch footage |
| HandBrake | Open-source resizing and transcoding | Resizes only; does not claim AI detail reconstruction | Clean footage that mainly needs a 3840×2160 delivery file | Windows, Mac, and Linux | Local | Strong fit for local processing | Depends on storage, source duration, and computer resources | No AI GPU requirement; hardware encoding support varies | No license fee | User-defined 3840×2160 output for this workflow | Not measured here; record codec, encoder, hardware, and quality setting | Controlled through codec, bitrate or quality target, frame rate, audio, and duration | Possible scaling softness, ringing, or extra compression | Standards-compliant resizing and codec control | AI restoration or plausible detail reconstruction |
| DaVinci Resolve Studio | Full editor with Studio Super Scale | AI-assisted scaling within a post-production workflow | Projects that also need editing, grading, effects, and delivery | Desktop systems supported by DaVinci Resolve Studio | Local | Strong fit for local project media | Depends on timeline length, effects, cache, storage, and hardware | A suitable GPU is important for the Studio AI toolset | Requires a DaVinci Resolve Studio license for Super Scale | 4K delivery covered by this workflow; higher project limits depend on the Studio configuration | Not measured here; record Super Scale settings, effects stack, GPU, and export preset | Depends on delivery codec, bitrate, frame rate, audio, and timeline duration | Possible sharpened edges, noise changes, grain shifts, or temporal artifacts | Experienced editors building a complete post-production project | Quick single-purpose upscaling with little setup |
Repeatable Output Test
This is a repeatable protocol, not a claim that all five tools were benchmarked under identical conditions. Use it to create evidence that can be compared without turning one preview into a universal performance promise.
- Source clip: Use the same 60-second 1920×1080 MP4 at 30 fps and record its measured bitrate. Include a face, fine text, camera movement, grain, and at least one scene cut.
- Target: Export each eligible workflow at 3840×2160, preserve 30 fps, and use comparable codec and bitrate targets where the controls permit.
- Path: Record the exact computer, operating system, GPU, and local software version. For Media.io, record upload, queue, processing, and download time separately.
- Measurements: Record processing time, output file size, and whether the workflow completed without interruption. Do not substitute a vendor speed statement for a measured result.
- Visual checks: Compare the same frames and moving sections for waxy skin, tiling grids, ringing around text, altered grain, stutter, inconsistent detail across scene cuts, and changes to the original grade.
The trade-off that matters most is whether visible reconstruction improves the actual source enough to justify the processing time and artifact risk. A nominal 4K export is easy to create; a more convincing result requires a source that gives the model usable information.
Best Fit by Source and Device
Choose UniFab for dedicated local reconstruction and model selection, CapCut for a 4K video on phone or a quick edit, Media.io for a short online job, HandBrake for controlled resizing, and DaVinci Resolve Studio for a complete post-production timeline.
- For badly compressed or unfocused footage, test a short section before choosing any long AI render.
- For old film or tape restoration, the old-movie 4K restoration guide addresses source-specific cleanup in more depth.
- For a focused 1080p conversion workflow, the 1080p-to-4K guide covers that narrower starting point.
Save and Check Your 4K Output
Reliable 4K export settings describe the file clearly: 3840×2160 dimensions, an intentional frame rate, a compatible codec, and a bitrate chosen for the destination. File size follows those choices rather than the 4K label alone.
Set MP4 and 3840×2160 Export Options
MP4 is a container, while 3840×2160 describes the frame dimensions. To convert MP4 to 4K cleanly, choose settings that the destination can play and avoid changing several variables without a reason.
- Dimensions: Set width to 3840 and height to 2160, with the intended aspect ratio preserved.
- Frame rate: Preserve the source frame rate unless smoother motion or a delivery specification requires a deliberate change.
- Codec: Choose H.264 for broad compatibility or H.265/HEVC for greater efficiency where supported.
- Bitrate: Select it for the destination, source complexity, frame rate, and codec rather than applying one universal value.
- File size: Expect it to vary with bitrate, duration, codec, frame rate, audio, and encoder settings.
- Save behavior: Keep the original file, export to a new filename, and confirm the finished dimensions and playback before deleting intermediates.
Preview Artifacts Before Full Processing
4K upscaling artifacts are easiest to catch in a short preview. Inspect the hardest part of the video, not a static or unusually clean frame, and compare it with the source at the same display size.
- Check faces for waxy skin or shifting features.
- Check subtitles, signs, and interface text for ringing or broken edges.
- Check flat surfaces for tiling grids or repeating patterns.
- Check grain and fine texture for smearing, crawling, or artificial detail.
- Check movement for temporal stutter and details that change from frame to frame.
- Check scene cuts for inconsistent reconstruction and unexpected color or contrast changes.
Low-bitrate, severely compressed, or badly focused footage may not justify a long 4K render. In that case, a restrained resize or keeping the original resolution can look more honest than aggressive reconstruction.
Frequently Asked Questions
These answers clarify the file, quality, time, phone, and storage questions that remain after choosing a workflow.
Can an MP4 file be 4K?
Yes. MP4 is a container, and it can hold a 3840×2160 video. Changing an MP4 to those dimensions creates a 4K-sized file, but only a reconstruction method can attempt to add plausible detail beyond ordinary resizing.
Can converting to 4K damage a video?
The source file is not physically damaged if it is kept, but a poor export can create ringing, waxy faces, tiling, stutter, altered grain, color shifts, or extra compression. Export to a new file and approve a short preview before processing the full video.
Can a 1080p video become true 4K?
It can become a 3840×2160 video, and AI reconstruction may improve apparent detail, but it does not become identical to footage captured natively in 4K. Source bitrate, focus, motion, compression, and model choice set the quality ceiling.
How long does 4K upscaling take?
Duration varies with source length, model, output size, GPU, software settings, and any cloud queue. Test a representative segment, record its settings and time, then estimate the full job from that matched sample instead of relying on one universal speed claim.
Can you make a 4K video on a phone?
Yes. Supported mobile editors can create a 4K export, and CapCut is one example of an editing-first phone workflow. Long clips, batch processing, private footage, and model-specific reconstruction are usually easier to manage on a suitable desktop.
Why does a 4K file get much larger?
A 4K frame contains more pixels, but final size also depends on bitrate, duration, codec, frame rate, audio, and encoder settings. Choose those values for the destination rather than assuming every 4K file needs the same size or bitrate.