If an editor or Windows app rejects your AVI, convert AVI to WMV with an AVI-to-WMV converter that lets you select WMV, preserve the source resolution and frame rate, set a sensible bitrate, and test the result in the destination app before deleting the original.
An editor can reject an AVI even after a converter says the job succeeded, because the codec inside the new container is still unsupported. My rule is simple: let the destination app choose the output format, not the filename you started with. The steps below apply to online and local tools, then the format comparison explains when WMV makes sense and when MP4 is the safer choice. The troubleshooting section closes the gap when a converted file has audio but no picture.
How to Convert AVI to WMV in Three Steps
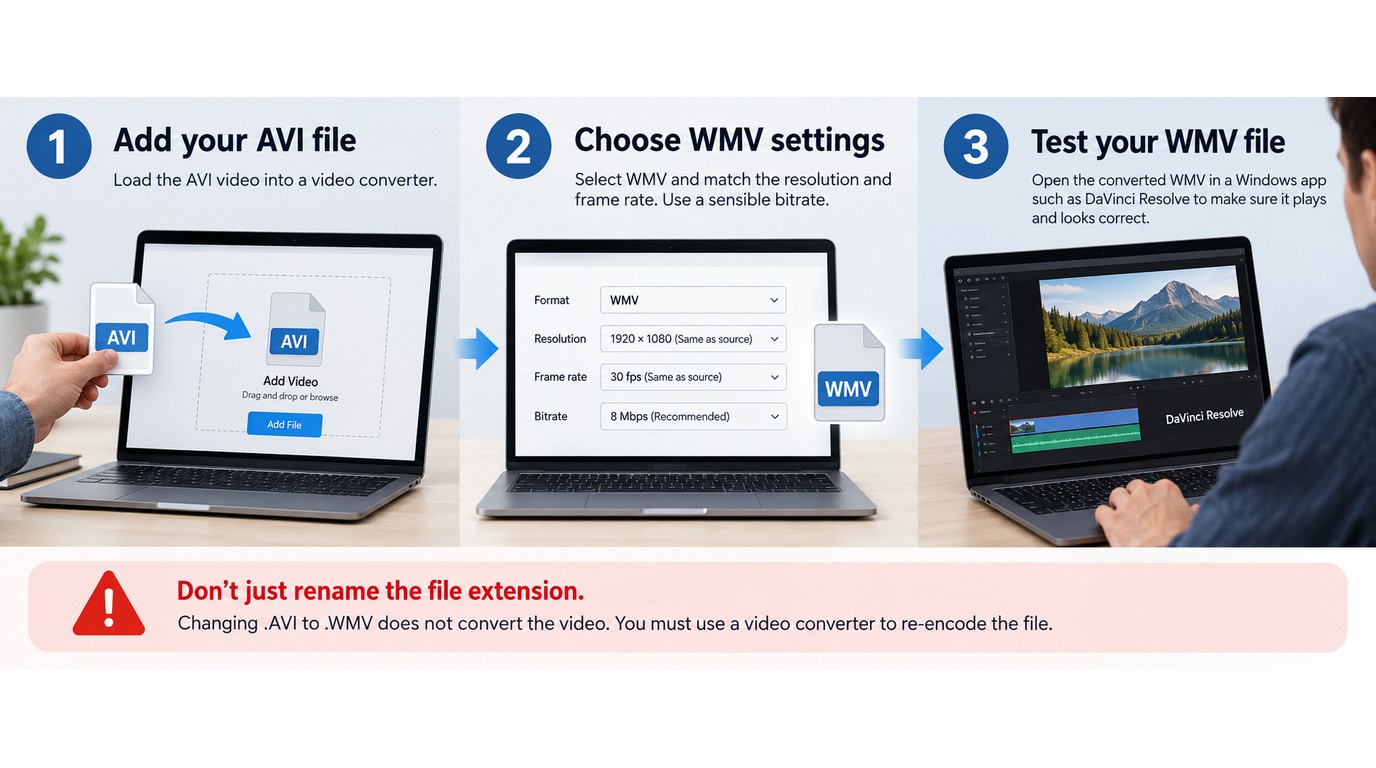
Before you begin, identify the app or device that must open the finished file. Then use this three-step AVI-to-WMV workflow:
- Add the original AVI to an online or desktop converter.
- Select WMV and match the source resolution and frame rate.
- Convert the file, then test it in the destination app.
That final playback test matters more than a converter's success message. A valid WMV file can still carry a video codec that the receiving editor does not accept.
Prerequisites: Identify the Target App and Keep the Source AVI
Start with the destination, not the converter. Check whether the player, presentation system, editor, or older Windows workflow explicitly requires WMV and whether it names a supported codec. If it accepts MP4 with H.264 video, MP4 will often be easier to share across phones, browsers, and modern editors.
Keep the source AVI in a separate folder, choose a destination with enough free space, and note the source resolution and frame rate. Those values form your baseline. Conversion cannot restore detail that is absent from the source, so raising a 720p AVI to a 4K output merely creates more pixels rather than more captured detail.
Rights reminder: Convert only video you own or are authorized to process. Before uploading private or client footage to an online converter, review the service's terms, file-retention period, and privacy policy.
The need for this preparation is not theoretical. As one Reddit user in r/davinciresolve put it, “Does anybody have a reasonable workflow for dealing with these formats? ... some are wmv format, some avi, and others. But those 2 are a real problem. DR doesn't like either, and it is a trifle ... persnickety about what conversion it will accept.” The practical answer is to work backward from the receiving app's requirements.
Step 1: Add the AVI File
Add the AVI without renaming its extension. Renaming clip.avi to clip.wmv changes the label, not the container or codec, so the compatibility problem remains.
If the converter displays media details, compare the listed resolution, frame rate, video codec, audio codec, and duration with the source. A missing duration or an unreadable video track points to a damaged file or an unsupported input codec. In that case, try opening the AVI in another player before starting a long conversion.
For one small, non-sensitive file, an online AVI-to-WMV converter can be convenient. A desktop converter is the more practical fit when the file is private, large, or one of many items in a queue.
Step 2: Choose WMV and Set Resolution, Frame Rate, and Bitrate
Select WMV as the container, then choose a preset the destination app supports. Keep the source resolution unless you have a separate delivery requirement. Match the source frame rate to avoid duplicated or dropped frames, especially with screen recordings and camera footage.
Bitrate controls the central tradeoff between visible detail and file size. A very low bitrate can add blocking, banding, and smeared motion; an excessive bitrate makes the file larger without recovering lost detail. If the converter offers a quality-based control instead of a fixed bitrate, begin near its recommended setting and judge a short sample in the target app.
My editorial preference is conservative here: preserve the source geometry first, then reduce bitrate only when storage or transfer size is a real constraint. File extension changes are easy; avoiding an unnecessary second encode is the part that protects the image.
Step 3: Convert and Test the WMV Output
Choose the output folder and start the conversion. For a long video, export a short sample first if the software allows it. A one-minute test can reveal a rejected codec, incorrect aspect ratio, missing audio, or sync drift before you commit to the full file.
Open the finished WMV in the actual destination app, not just the converter's preview window. Check the beginning, a motion-heavy middle section, and the final minute. Confirm that picture and sound stay synchronized and that the app can scrub through the timeline.
Keep the AVI until the WMV passes that check and any downstream export finishes. The right result is not merely a file ending in .wmv; it is a file the intended workflow can decode and use.
AVI vs WMV: Quality, Size, Codecs, and Compatibility
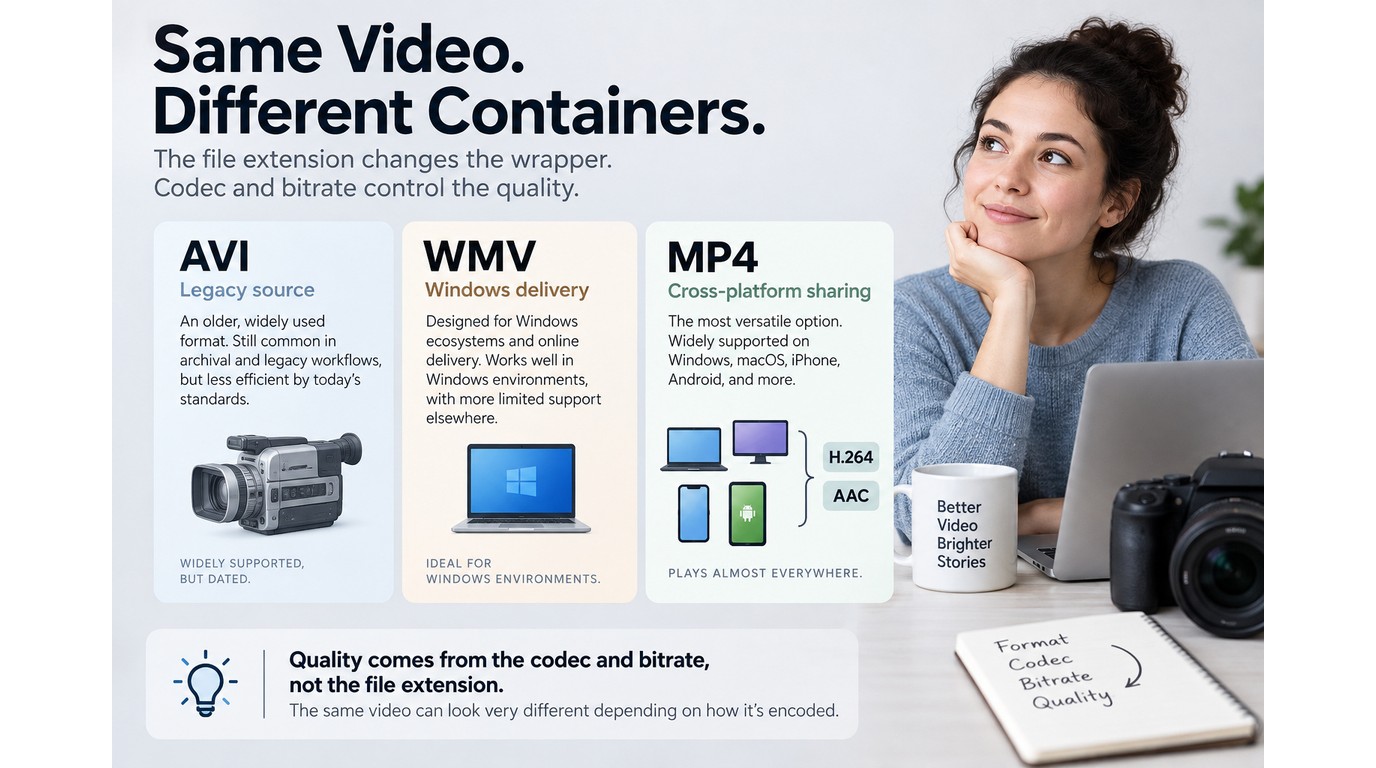
AVI and WMV are containers, so neither format has an automatic quality advantage. Codec, bitrate, resolution, frame rate, and duration determine most of the visible quality and file size, while the destination app determines which container is practical.
AVI, WMV, and MP4 at a Glance
| Decision point | AVI | WMV | MP4 |
| Primary fit | Legacy sources and editing | Windows-oriented delivery | Cross-platform sharing |
| Quality logic | Codec and bitrate decide | Codec and bitrate decide | Codec and bitrate decide |
| Typical size | Often larger with older codecs | Often compact in Windows workflows | Often efficient with H.264 or H.265 |
| Compatibility risk | Embedded codec may fail | Weaker outside Windows workflows | Usually broad device support |
| Choose it when | Source must stay unchanged | Destination specifically needs WMV | Broad playback matters |
Source: Microsoft Support's File Types Supported by Windows Media Player and Codecs FAQ, as of September 2026. Size outcomes follow bitrate, codec, and duration rather than the container alone.
The practical upshot is direct: choose WMV for a known WMV requirement, not because its name sounds more compatible with Windows.
AVI and WMV Are Containers, Not Quality Settings
A container is the file wrapper; a codec is the method used to encode and decode the video or audio inside it. Microsoft's Codecs FAQ explains why a player can recognize a file type yet still fail when the required codec is missing.
This distinction also answers whether AVI is outdated. AVI remains usable as a container, but an AVI carrying an older or uncommon codec can be difficult to import. WMV narrows the workflow toward Microsoft-oriented playback, while MP4 commonly carries H.264 video and AAC audio for wider device and browser support.
What Controls Quality and File Size
Bitrate and duration do most of the work in file-size calculations. Two one-hour files encoded near the same total bitrate will land near the same size even if one ends in .avi and the other in .wmv. Codec efficiency changes how much visible detail fits into that bitrate.
Lossy conversion also has a cost. Re-encoding compressed AVI video into WMV discards some information, and a higher output resolution does not reverse that loss. As one Reddit user in r/software put it, “Every time I convert something from any format to .avi ... I get an immense loss in video quality. ... Anyone know of a good cheap or free ... software that results in little to no loss in video quality? (SPYWARE FREE TOO PLEASE)” The concern is valid, but the answer lies in codec and bitrate choices rather than the AVI label itself.
When WMV Fits and When MP4 Is More Practical
WMV fits a Windows-centered handoff when a legacy player, learning system, presentation tool, or client specification requests it. It is not ideal when the file must move among browsers, phones, Macs, and several editing apps.
MP4 is the better default when the destination accepts H.264/AAC and broad playback matters. AVI is worth preserving as the untouched source when it contains legacy footage or a codec you do not want to re-encode yet. If your goal is a modern archival wrapper with multiple tracks rather than Windows delivery, an AVI-to-MKV workflow is another route.
My view is that “AVI vs WMV” is the wrong final question. Ask what the destination can decode, then choose the container and codec pair that meets that requirement with the fewest conversions.
A Free Local AVI-to-WMV Workflow with UniFab
UniFab Video Converter processes AVI files locally on Windows or macOS, queues multiple files, and exports WMV without a watermark. It fits large, private, or repeated jobs better than a browser upload, but it still requires a desktop installation and compatible output settings.
Why Local Processing Matters for Large or Private Files
Local processing keeps client footage, family archives, and long recordings on your computer rather than sending them to a browser service. You still need trusted software, enough storage, and a destination app that accepts the output codec.
Batching is the stronger reason to install a desktop converter. As one Reddit user in r/software put it, “Trying to track a 'clean' piece of software on the web that accomplishes batch conversions is difficult.” A saved preset applies the same WMV settings across the queue.
How to Convert AVI to WMV with UniFab Video Converter
Put the earlier compatibility decisions into one local queue:
- Open UniFab Video Converter and add one or more AVI files.
- Select WMV as the output format.
- Match the source resolution and frame rate, then set bitrate for the target use.
- Choose a local output folder and apply the preset to the queue.
- Start conversion, then test one WMV in the destination app.
This fits repeated jobs with one delivery specification. It is not ideal for a single non-sensitive file when you want no installation.
Verified Capabilities and Practical Limits
As of September 2026, UniFab Video Converter costs $0, runs on Windows and macOS, supports batches, and adds no watermark. It accepts AVI and produces WMV; its broader catalog covers more than 1,000 format combinations.
Output can reach 4K, but that ceiling does not add source detail. UniFab lists GPU acceleration up to 50x on supported NVIDIA, AMD, and Intel hardware; throughput is tied to the GPU, driver, codec, settings, and storage.
The destination remains the limit. UniFab can create a WMV, but it cannot make an old app decode an unsupported codec. Test a short sample before processing the full queue.
AVI and WMV Conversion FAQ
These answers cover the decisions that remain after the main conversion: when to choose MP4, what reverse conversion changes, and why a valid container can still produce a black screen. Each answer returns to the same test: the target app must decode the video and audio inside the file.
Can I Convert AVI to MP4 Instead of WMV?
Answer: Yes. Choose MP4 when you need broad playback across current browsers, phones, TVs, social platforms, and editing apps, provided the destination accepts it. H.264 video with AAC audio is a common compatibility pair.
Use the same quality controls as the WMV workflow: preserve the source resolution and frame rate, then set a bitrate that suits the delivery size. Converting AVI to MP4 does not improve image detail by itself, and MP4 is not inherently higher quality than AVI. It is often more practical because the codecs commonly placed inside it have wider support.
Can the Same Converter Change MP4 to WMV?
Answer: Yes, a converter that accepts MP4 input and provides WMV output can reverse the direction. Make that conversion when a Windows-centered destination explicitly requests WMV, not as a routine extra step.
If the MP4 already opens in the target app, leave it alone. Another lossy encode adds processing time and can reduce detail. If WMV is required, match the source dimensions and frame rate, choose the supported WMV preset, and test a short segment before converting the full video.
What Does an AVI-to-Video Converter Actually Change?
Answer: AVI is already a video container. An AVI-to-video converter changes the container, the encoded streams inside it, or both.
A container-only change is called remuxing: the video and audio streams move into a new wrapper without being re-encoded. Transcoding decodes and encodes at least one stream, which allows a new codec but introduces a quality and time cost. Renaming the extension does neither, so it cannot solve a codec mismatch.
The useful question is not whether AVI becomes “video.” It is whether the output uses a container and codecs accepted by the destination.
Why Does the WMV File Play Audio but Show No Video?
Answer: The target app can decode the audio stream but not the video stream. An unsupported video codec is the leading suspect, followed by an incomplete conversion, damaged source data, or a limitation in the receiving app.
The symptom appears in real workflows. As one Reddit user in r/AndroidQuestions wrote, “My AVI video files are produced by my dashboard camera, using Motion Jpeg Video codec in AVI videoformat. When opening the video in any video editing app I've tried then I get a black screen? The sound track plays fine but the video track doesn't appear.”
Work through these checks in order:
- Open the WMV in another player to separate file failure from app failure.
- Inspect the video codec with a media-information tool.
- Reconvert a short sample with a WMV preset supported by the target app.
- Match the source frame rate and resolution, then test again.
Do not convert the full library until that sample displays both picture and sound. The sample is your compatibility proof.
Choose the Right AVI-to-WMV Workflow
For a small, non-sensitive one-off file, an online converter is the shortest route after you review its terms, retention window, and privacy policy. For large, private, or repeated files, local conversion gives you more control and supports batching. My final rule stays the same: let the destination app choose WMV or MP4, test the output there, and keep the AVI until the job is accepted.