If an old WMV needs to become portable audio, convert WMV to MP3 in a browser or with desktop software. Choose online for a small, non-sensitive file; choose local processing for private, large, or batch work. Conversion extracts existing audio and cannot recreate a missing track.
A converter site can feel like the bigger risk when an old family clip or work recording leaves your drive. That hesitation is a useful decision signal, not a nuisance: file sensitivity and workload matter more than a “converter” label. The path below starts with that choice, then moves through a three-step online workflow, sensible MP3 settings, and a local batch method.
My editorial rule is simple: browser convenience wins for one disposable file, but local processing wins for private or repeat work because it removes the upload step and preserves shared settings.
Online Converter or Desktop Software: Which Fits Your WMV File?
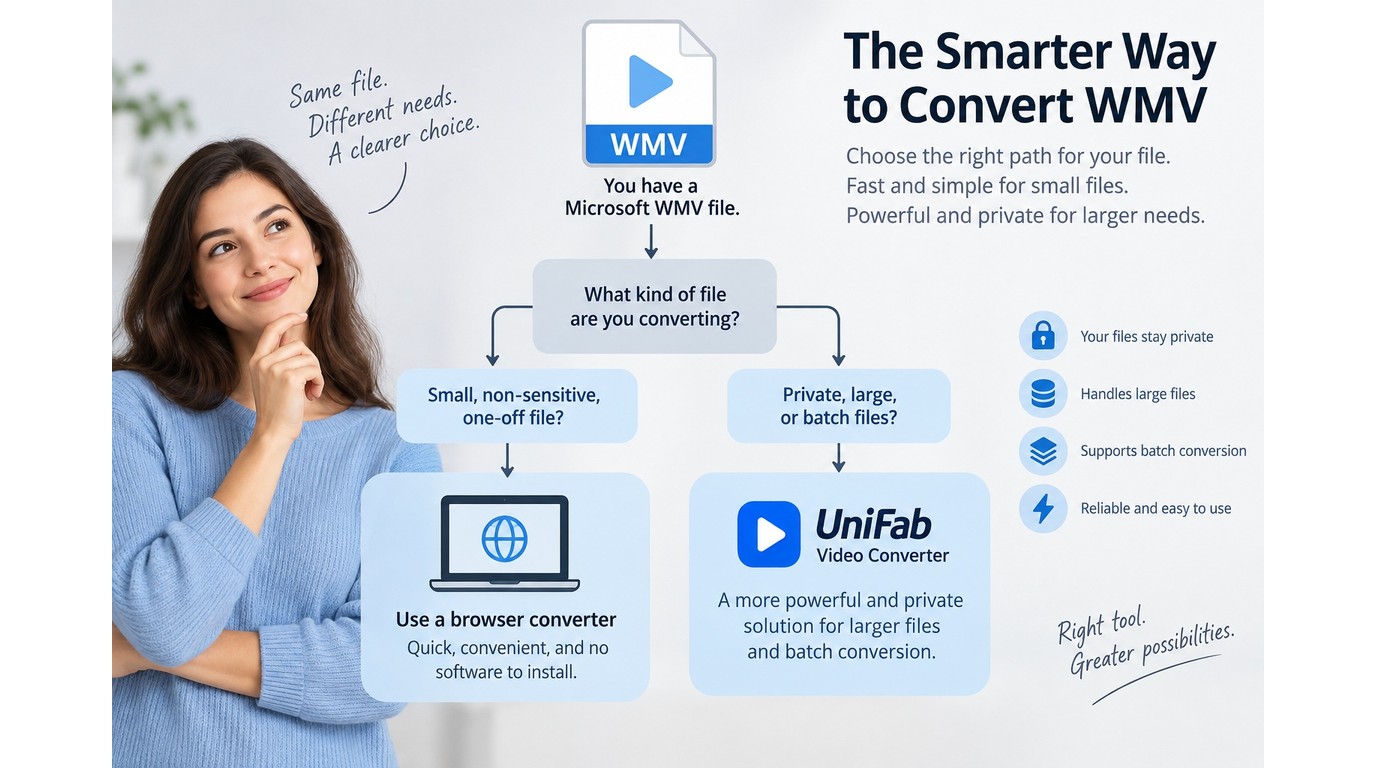
For a small, ordinary WMV, an online converter is usually the shortest route because it avoids installation. Desktop software fits better when the file is private, large, or one of many files, because processing can stay on your computer and settings can be reused.
Please note: Before uploading, read the service’s terms and privacy policy, and send only content you are authorized to process for personal use. A local workflow reduces upload exposure, but it is not an absolute privacy guarantee.
What Changes When WMV Becomes MP3
WMV is a video container that can hold a picture and one or more audio tracks. MP3 is an audio-only, lossy format, so the conversion keeps the sound track and drops the image. A larger MP3 setting cannot restore detail that was already missing from the WMV source.
That distinction matters when you are deciding whether the target should be MP3 at all. If you still need the picture, convert to a video format such as MP4; if you need a listenable soundtrack, MP3 is the narrower and more portable result.
Prerequisites Before You Convert
Check three things before blaming the converter:
- Open the WMV in a player that can decode its video and audio profiles.
- Play a section near the beginning and end, and confirm that sound is actually present.
- Keep the original file and confirm that you have permission to process it.
Microsoft’s WMV9 decoder documentation lists multiple decoder profiles, which is why an older file can work in one player and fail in another. One Reddit user in r/VideoEditing described the edge case plainly: “Only windows media player works fine with it. Handbrake doesn't do it, reports no source or titles.” That is a compatibility clue, not proof that the audio is gone.
When an Online Converter Is Enough
Use a WMV to MP3 converter online when you have one short, non-sensitive file and no practical way to install software. The usual pattern is simple: select the file, choose MP3, wait for processing, then download the result. Upload time, size caps, retention, and batch support are controlled by each service, so they can change the decision for a large archive.
If cost is the deciding factor, you can convert WMV to MP3 free online with a service that explicitly lists a $0 option; its file-size, retention, and download limits still determine whether it fits the job.
Use when: you have a one-off file on a managed computer. Avoid when: the recording is private or very large, or a folder of WMVs needs repeated settings.
When Desktop Software Is the Better Fit
Local video converter software is the better fit when the WMV should remain on your computer, when uploads would take longer than the conversion itself, or when you need a repeatable queue. Installation and operating-system support are the trade-offs. On a locked-down school or work Mac, a browser path may still be the only practical option.
Use when: you have private archives or repeat jobs. Avoid when: you cannot install an app and need to convert one disposable file.
| Decision factor | Online converter | Local desktop software |
| Setup | Browser access; usually no install | App installation required |
| File handling | Cloud services upload the file; browser-only tools process it in the browser | Processing stays on the computer |
| Large files | Upload time grows with file size, and service caps may apply | No upload step; processing stays local |
| Batch work | Online services set their own file-count and queue limits | UniFab queues multiple WMV files with one shared MP3 profile |
| Speed factors | Upload and service capacity | Local hardware, including GPU support |
The table is the decision in compact form: convenience favors the browser, while control favors local processing. Neither route fixes a silent or damaged source.
How to Convert WMV to MP3 Online in Three Steps
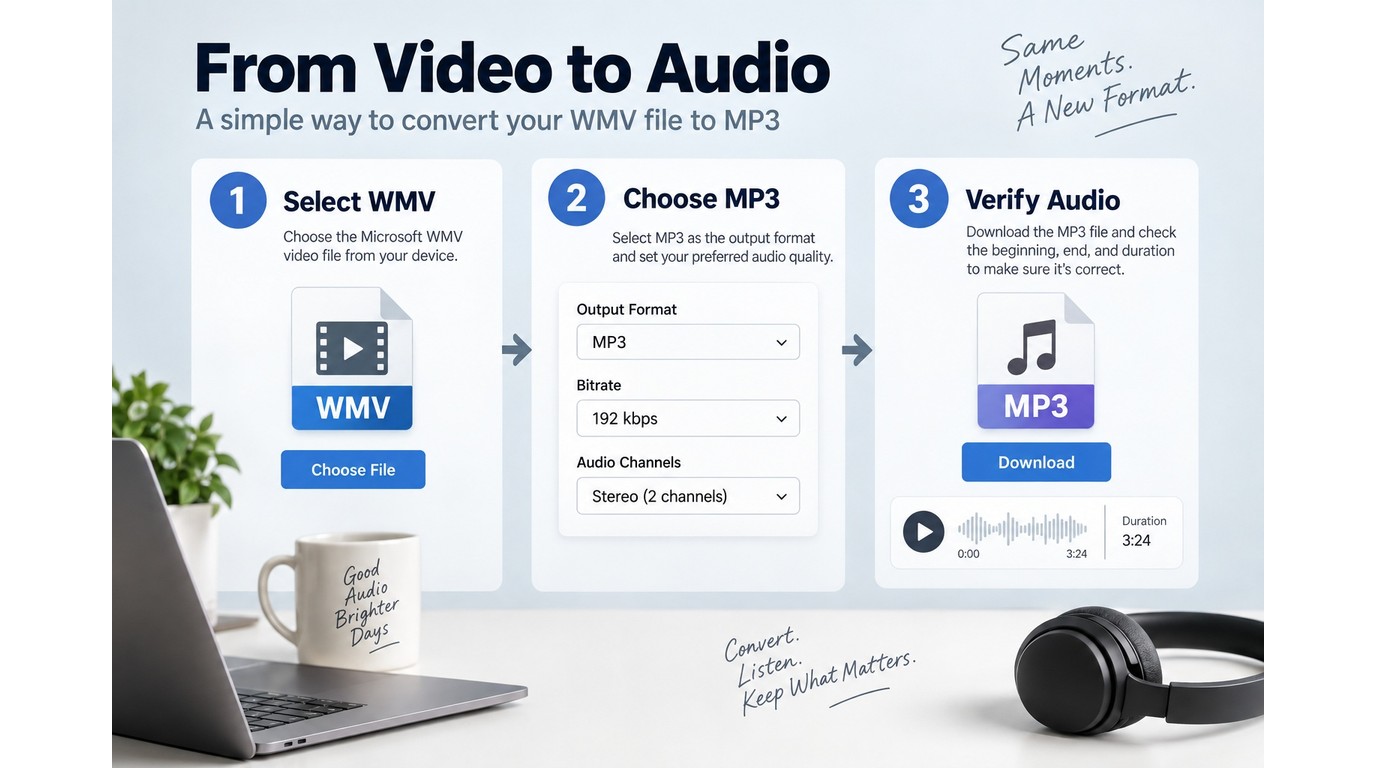
The online workflow has three actions: select the WMV, choose MP3 and its audio options, then download and verify the result. The last step is part of the conversion, not an optional afterthought, because a file can finish processing while still containing the wrong track or duration.
Use this order:
- Select the WMV file and confirm the upload is allowed.
- Choose MP3, review bitrate and channel controls, and start conversion.
- Download the result, check its beginning and end, and keep the source until it passes.
1. Select the WMV File
Open the converter’s file picker and select the original WMV. If the file is personal, confidential, or covered by workplace rules, stop here and use local software instead of uploading it. A browser tab is convenient; it is not a substitute for a privacy decision.
If the service rejects the file immediately, test the WMV in a compatible player first. A rejection can mean the container or codec profile is unsupported, not that the file contains no audio.
2. Choose MP3 and Set the Audio Options
Set the output format to MP3, then inspect the available bitrate, channel, and sample-rate controls. Choose a speech-oriented option for lectures or voice notes, a balanced option for mixed material, and the higher available setting only when the source contains music or other detail worth keeping. MP3 remains lossy at every setting.
Do not select a higher bitrate as a repair strategy. It can create a larger file, but it cannot add information that the WMV never stored. If the tool offers no controls, accept its default only for a quick, low-stakes copy and keep the source for a better conversion later.
3. Convert, Download, and Verify the Audio
Start the conversion and download the MP3 to a folder you can identify. Play the first minute, skip to a late section, and compare the duration with the WMV. Listen for dropouts, silence, or a missing channel before deleting the original.
This check catches the failure that matters most: a successful download that contains only part of the source. One Reddit user in r/handbrake described batch files where “the audio cuts out near the end of each video,” with the gap appearing within about five seconds of the finish. A quick end-of-file check is enough to catch that class of defect.
I treat end-of-file verification as part of conversion, not cleanup: an MP3 that drops the final seconds has not passed, even if the service labels the job complete.
Choose MP3 Quality, Bitrate, and Channel Settings
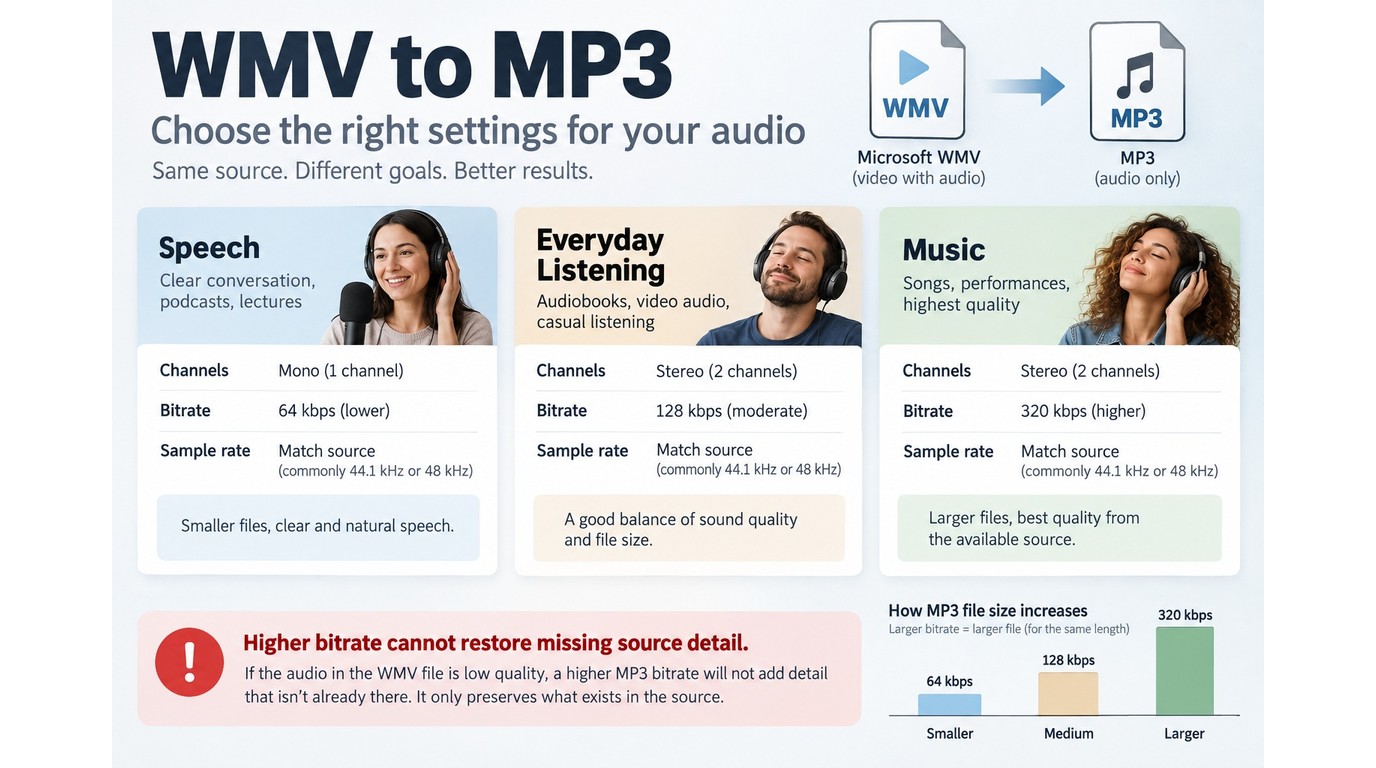
Match MP3 settings to the source audio: use mono for mono speech, preserve stereo when it exists, and keep the sample rate close to the original. A higher bitrate may retain more of the available detail, but it cannot restore information the WMV never contained.
Match the Output to the Source Audio
MP3 applies another lossy compression stage. If the WMV already contains heavily compressed or noisy audio, the output ceiling is set before conversion begins. For a voice memo, prioritize clear speech and a manageable file; for music, preserve stereo when the source is stereo and avoid downmixing unless compatibility requires it.
The quality question is therefore diagnostic first. If the source sounds wrong in a capable player, changing MP3 settings will not solve the underlying problem.
Balance Bitrate Against File Size
Bitrate controls how much audio data the MP3 stores per second. Use the lower available setting for spoken-word material, a middle setting for everyday listening, and the higher available choice for music or sound effects. The exact labels differ by converter, so follow the options the selected tool actually exposes.
The sounder rule is to match the source rather than chase the highest menu value: a second lossy encode cannot restore detail the WMV never contained.
I would not spend bitrate on a damaged source; a second lossy encode can only preserve or discard what is there, never rebuild detail that is missing.
One Reddit user in r/FileFlows summarized the right instinct while discussing a different target format: “My primary goal is to automatically retain the original bitrate of these videos during the conversion process.” For WMV-to-MP3 work, retention is not literal because MP3 is a new lossy encode; the useful goal is to avoid throwing away more detail than the listening use requires.
Check Channels, Sample Rate, and Duration
Mono is sensible for a mono lecture or dictation. Stereo is appropriate when the WMV contains separate left and right information. A source-matched sample rate avoids unnecessary resampling, while the duration check confirms that the full track survived.
A short verification checklist is enough: confirm the file opens, listen at the beginning and end, check duration, and compare one representative section with the WMV. If any item fails, return to the source and codec diagnosis instead of raising the bitrate.
Batch-Convert Large WMV Files Locally with UniFab
For multiple or large WMV files, a local queue removes the upload step and makes shared MP3 settings repeatable. UniFab Video Converter fits that job on Windows or macOS, but it requires installation and does not imply an unlimited file-size ceiling.
Why UniFab Fits Private and High-Volume Jobs
UniFab Video Converter is a local Windows and macOS app that accepts WMV, converts among 1,000+ formats, batches multiple files under one shared profile, and supports NVIDIA, AMD, and Intel GPU acceleration up to 50x. The 50x figure is a capability ceiling rather than a guaranteed speed; actual throughput follows the source, hardware, and chosen settings.
That combination fits private archives and repeated jobs because it reduces upload exposure and avoids setting each file separately. It is not ideal for a locked-down computer or a one-off disposable file.
A Four-Step Local Batch Workflow
- Install UniFab on a supported Windows or macOS computer and open Video Converter.
- Add the WMV files, then choose MP3 and one shared audio profile.
- Trim a file only when you need a segment, rather than editing every item by default.
- Start the queue and verify a representative short, long, and problem file before clearing the originals.
Check more than the first output. One legacy file can still have a codec or end-of-track problem after the queue completes.
Fit, Limits, and Price Context
As of September 2026, UniFab lists Video Converter at $0, a status in effect since December 2024. It still requires installation and Windows or macOS. Stop increasing bitrate once it exceeds the source's useful detail; diagnose the WMV itself when audio is absent, and choose local batch processing when file sensitivity or repeated work outweighs browser convenience.
FAQ: WMV Playback, Missing Audio, and Format Choices
WMV files that will not open, play without audio, or need video preserved require different fixes: test decoder support, confirm that an audio track exists, or convert to MP4 instead of MP3. The answers below separate those cases so each can stand on its own.
What Can Open an Old WMV File If the Default Player Fails?
Try a player or converter with a decoder that supports the WMV profile and its audio track. Microsoft’s WMV9 documentation shows that decoder support is profile-specific, while Audacity’s manual notes that optional FFmpeg support can import WMA and audio from many video files. If only one older player opens the file, use that behavior as evidence of a compatibility gap and preserve the original.
Why Does a WMV File Play Video but No Sound?
The file may contain an audio codec your current player does not decode, the player may have selected the wrong track, or the source may genuinely be silent. One Reddit user in r/PleX described the symptom as, “My new Plex installation stopped playing the audio for my WMV formatted files. Other WMV files seemed to have similar problems, but the AVI files worked normally.” Test the same WMV in a decoder-capable player before converting; if every player is silent, treat the source track as the problem.
Can Conversion Restore Audio That Is Missing from the Source?
No. Conversion can decode and re-encode an existing track, but it cannot recreate audio that was never stored or that has been removed from a damaged file. An old family recording makes the distinction painful: one Reddit user in r/VideoEditing asked about a 2003 WMV where “it only plays the video, the audio is missing.” Keep that original untouched, test another capable player, and look for a second copy before trying repeated conversions.
Can I Convert WMV to MP4 Instead of MP3?
Yes, but the purpose changes. MP4 keeps video and audio in a broadly supported video file, while MP3 keeps audio only. Choose MP4 when the picture, captions, or visual timing matter; choose MP3 when you want a soundtrack for listening. Do not expect an MP3 conversion to preserve any visual information.
Can Windows Media Player Save a WMV File as MP3?
Windows Media Player is primarily a playback and library application, so it may open a WMV without offering a dedicated audio-export command. If its menus do not provide an MP3 output, use the online three-step workflow for a suitable one-off file or a local converter for private and batch work. Playback success alone does not prove that the app can perform the conversion.