Large MKV recordings often exceed browser limits when an OBS or camera file must reach Premiere Pro, Final Cut Pro, or QuickTime. To convert MKV to MOV without uploading, inspect the source, then remux compatible codecs or re-encode to an editor-friendly MOV. Test a short sample before the full file.
I treat MKV-to-MOV work as a compatibility decision, not a filename change. For large private recordings, I favor a local sample-first workflow because it exposes codec and track problems before the full file is processed. The rest of this guide applies that rule to remuxing, re-encoding, and editor validation.
How to Convert MKV to MOV Without Breaking Quality
The reliable way to convert MKV to MOV is to inspect the source first, choose remuxing when the existing streams are compatible, and re-encode only when the editor needs different codecs. Convert a short sample before processing the full file, then check playback, tracks, synchronization, frame rate, and color in the resulting MOV.
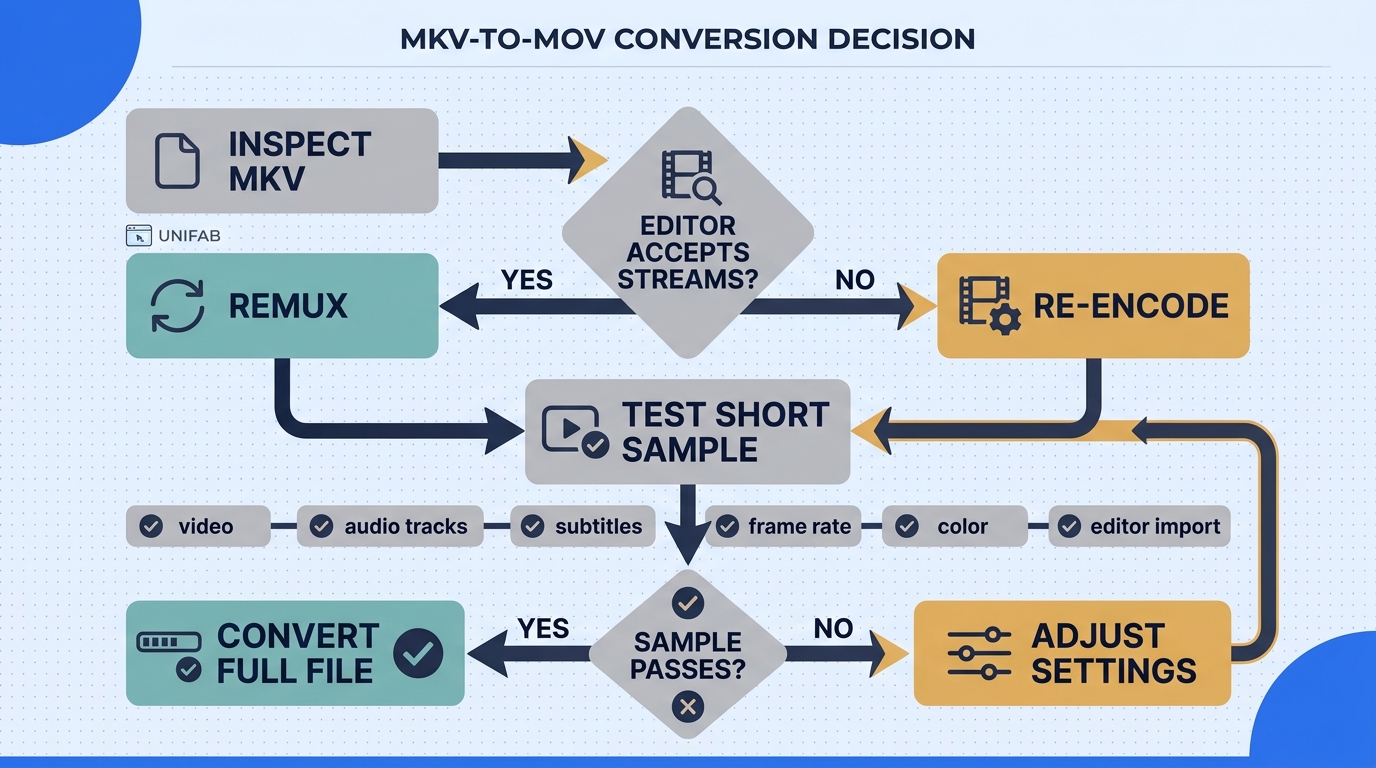
The practical sequence is:
- Inspect the MKV and the target editor's accepted codecs.
- Remux compatible streams, or choose a compatible video and audio encode.
- Convert a representative short sample.
- Convert the full file and validate the MOV before archiving the source.
Before You Start: Check the Codec, Tracks, and Target Editor
Keep the original MKV untouched and make sure the destination drive has room for the output. Then record the video codec, audio codec, frame rate, resolution, HDR or color tags, subtitles, chapters, and every audio track. Finally, check the target editor's documentation for the MOV codecs it accepts; MOV is a container, not a guarantee that every stream inside it will import.
This matters when an MKV contains more than one stream. An r/premiere post describes an MKV containing “a movie, subtitles, and chapter markers” that had to be converted before editing. Treat those tracks as part of the job, not as optional metadata. If the editor only needs one language or one audio mix, decide that before conversion.
Step 1: Decide Whether to Remux or Re-encode
Remuxing repackages the existing video and audio streams inside a MOV container. I would remux first when the target editor accepts the existing streams because it avoids another compression pass. Re-encoding decodes and recompresses the streams into formats the editor can handle; it takes longer and can change detail, color, HDR metadata, or frame timing.
A generic preset should not be treated as a promise of “no quality loss.” The defensible rule is narrower: remux when the streams are compatible, and re-encode only for a specific compatibility reason. If the editor accepts MP4 instead, the same container-versus-codec logic applies in this MKV to MP4 conversion guide.
Step 2: Choose MOV-Compatible Video and Audio Settings
Match the output to the application, not to a universal internet preset. Preserve the source resolution and frame rate when the editor can use them. If you must encode, choose the video codec, bitrate (the data rate that affects file size and compression), color handling, and audio format documented for that workflow. Select the intended subtitle and audio streams explicitly, and decide whether subtitles should remain separate or be burned into the picture.
Variable-frame-rate footage deserves special attention. A constant-frame-rate source can become variable after a rewrap or encode, which may cause drift when you sync audio or cut long recordings. Note the source setting, then inspect the output rather than assuming the container change preserved it.
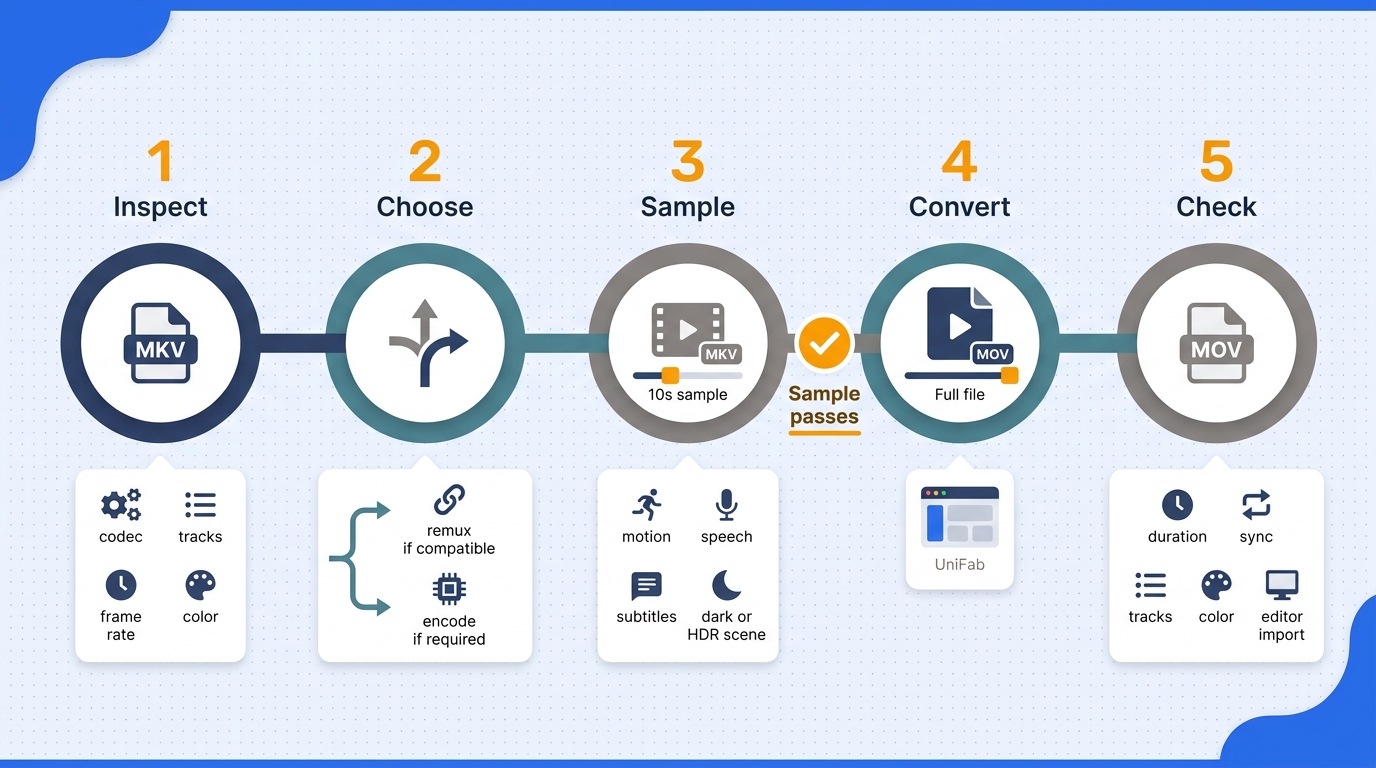
Step 3: Convert a Short Sample First
Use a short section that contains motion, speech, dark areas, subtitles, and any difficult color or HDR material. The sample should answer five questions quickly: does video appear, do all required audio tracks play, are subtitles present, is the frame rate still suitable, and does the editor import the MOV without a warning?
This small test is more useful than trusting a “high quality” label. It catches an audio-only result or a color shift before a large conversion consumes hours and storage. Keep the sample settings identical to the planned full-file job.
Step 4: Convert the Full File and Validate the MOV
Once the sample passes, run the full conversion locally. Before deleting or moving the MKV, open the MOV in a second player and in the target editor, then confirm:
- Duration and start/end points match the source.
- Video, every required audio track, and subtitles are present.
- Lip-sync and long-form audio remain aligned.
- Frame rate, resolution, color, and HDR behavior match the intended workflow.
- The editor can scrub, place cuts, and export a short timeline.
The final editor check is the important one. A file can play in a general media player yet fail when a video editor expects a particular codec, frame-rate mode, or audio layout.
Choosing a Local MKV to MOV Converter for Large Files
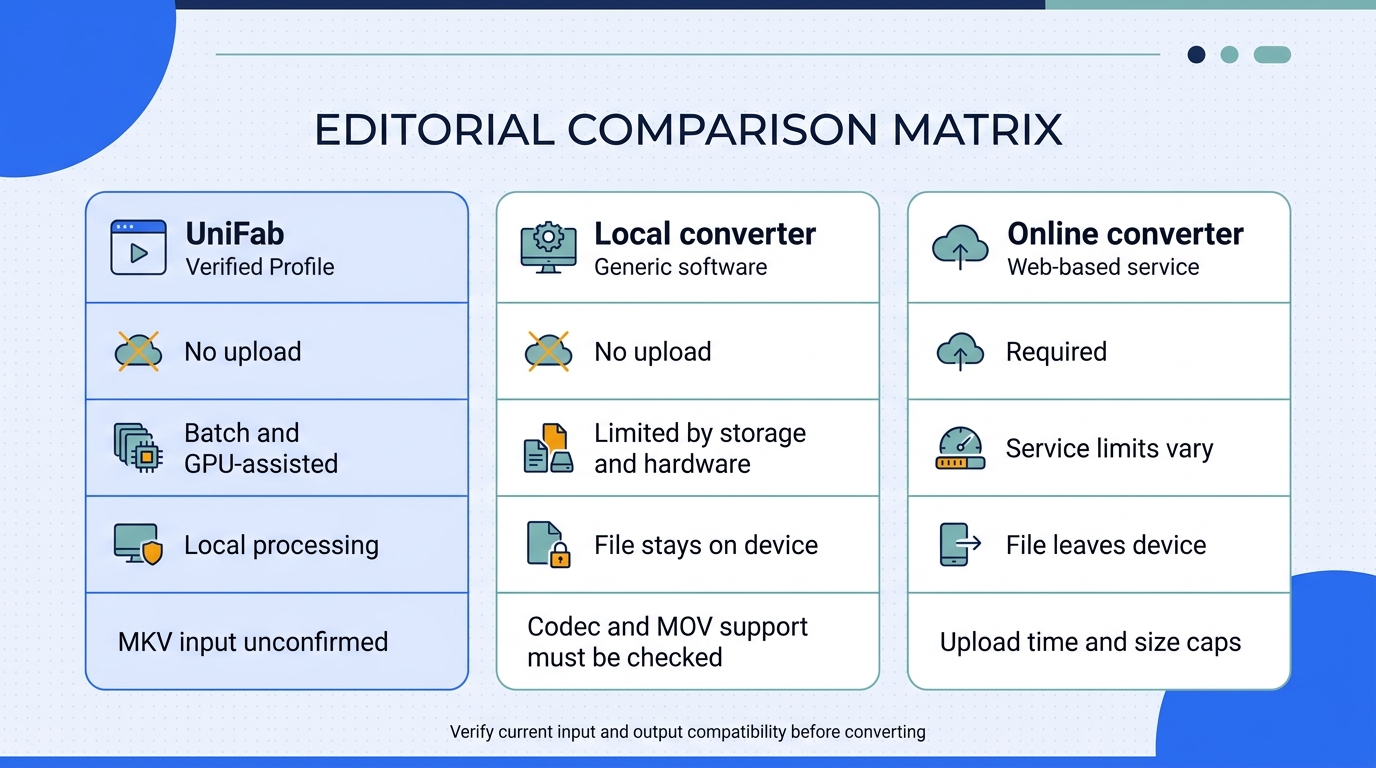
A local MKV to MOV converter is a better fit for large or private files because it avoids browser upload limits. Codec support remains the main constraint, so confirm accepted inputs and MOV codecs before choosing a tool.
When Local Processing Beats a Browser Upload
Local processing suits very large OBS recordings, private footage, or repeated samples. Its ceiling is disk space and hardware, not an upload cap. Process only media you own or are authorized to use.
What UniFab Video Converter Can Verify Today
UniFab Video Converter is a Windows and macOS desktop app available at $0 that processes accepted files locally, supports 4K output, batch jobs, 1,000+ output formats, no-watermark exports, and GPU acceleration on NVIDIA, AMD, and Intel hardware up to 50×; its supplied input list does not include MKV, so direct MKV ingestion is unconfirmed.
Confirm MKV Input Compatibility Before You Start
I would not choose a local converter on GPU claims alone; MKV input and the editor's required MOV codecs come first. Treat UniFab as a conditional local option only if its current app accepts the source and produces the required output.
MKV-to-MOV Conversion FAQ
Start with the output streams and the target editor when an MKV-to-MOV conversion fails. These checks cover missing video, dropped tracks, changed timing, and confusion between a file extension and a real container conversion.
Why does the MOV file have audio but no video?
The video codec may not be supported by the player or editor, or the encode may have failed while audio completed. An r/shutterencoder troubleshooting post documents an audio-only MOV result: “I'm trying to convert MKV file to MP4 ... I just can hear the audio but the video, there's none.” Open the MOV in a second player, inspect its video stream, and reconvert with a codec the target editor documents.
How can I preserve subtitles, chapters, and multiple audio tracks?
MOV support for embedded tracks and metadata varies by converter and editor. Select the required streams before starting, then verify them after import rather than assuming the container carried everything across. If the editor cannot carry a subtitle track, keep the subtitle file separately or burn it in only when that is the intended delivery format.
Why did the frame rate, HDR, or color change after conversion?
Remuxing normally avoids a new compression pass, while re-encoding can change frame timing, color tags, or HDR metadata. An r/shutterencoder frame-rate thread documents a constant-to-variable frame-rate change during rewrap. Compare the source and output properties, and use the editor's documented color and frame-rate settings.
Can I convert a very large MKV file without uploading it?
Yes. A local workflow can process a very large MKV file if the destination has enough working space and the hardware can complete the encode. Keep the source until the MOV passes playback and editor checks. Online tools may be convenient for small clips, but an upload limit is the wrong constraint for a large recording.
Does renaming .mkv to .mov convert the file?
No. Renaming changes the extension only; it does not change the Matroska container, codecs, tracks, or metadata. The result may look like a MOV filename while remaining unreadable to the target editor. Use a real remux or re-encode workflow, then inspect the output properties.