If an editor refuses your M4A, converting it to WAV creates a larger, broadly compatible PCM file. It cannot restore detail lost from an AAC recording. The conversion changes the working format so editing, playback, or delivery software can handle the audio more reliably.
People often reach this search after a recording app, podcast workflow, or video editor rejects a file that plays normally elsewhere. I would not start with a converter at all; I would first identify whether the M4A contains AAC or ALAC. That distinction sets honest quality expectations and prevents needless settings changes. This guide moves from that decision to a short browser path, then to controlled desktop workflows for Mac and Windows.
M4A vs WAV: What conversion changes and what it cannot fix
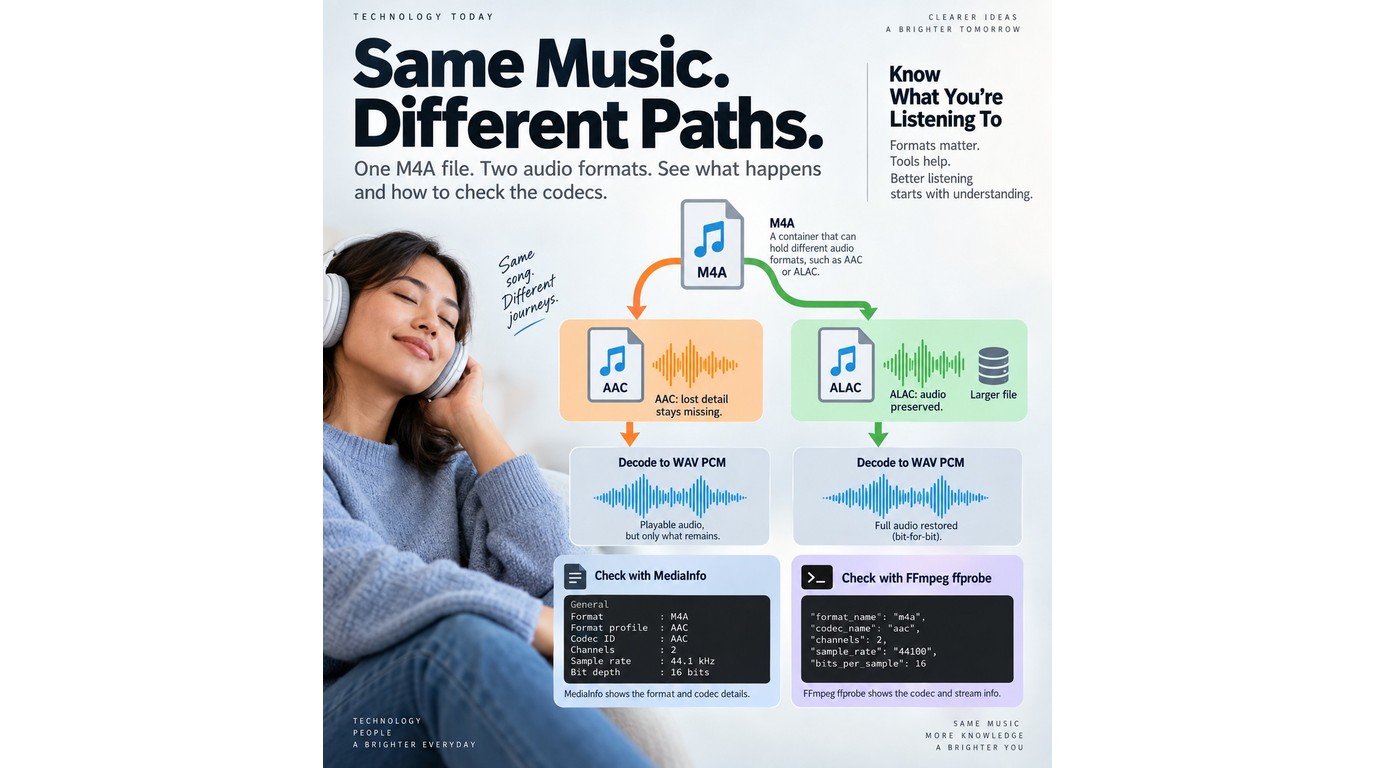
Converting M4A to WAV improves compatibility, not the fidelity of a lossy source. WAV is the better working format when an editor, archive process, or delivery system expects uncompressed PCM, while M4A is usually better for compact storage and sharing.
As one Reddit user in r/podcasting asked, “m4a is already a compressed format wouldn't their be quality loss with every opening, editing and saving?” The useful answer starts inside the M4A container, because the filename alone does not identify the audio codec.
| Dimension | M4A | WAV |
| Container and codec | AAC or ALAC | Usually uncompressed PCM |
| File size | Smaller with AAC | Larger |
| AAC conversion result | Compressed source detail | Discarded detail stays missing |
| Typical use | Storage and sharing | Editing and compatibility |
Apple Support and the Audacity Manual, September 2026.
The practical upshot is simple: choose WAV to solve a workflow problem, not to manufacture quality that the source no longer contains.
M4A is a container, not one guaranteed codec
An M4A file can contain AAC, which uses lossy compression, or ALAC, which preserves the original audio without lossy compression. Decoding AAC into PCM stops another lossy stage during editing, but it cannot reconstruct frequencies or detail discarded by the original encoder. Decoding ALAC to WAV can preserve the audio data while changing the container and storage footprint.
My editorial rule is to inspect the codec before judging the conversion. A tool such as MediaInfo, ffprobe, or an editor's file-information panel can tell you whether the stream is AAC or ALAC.
Why WAV files are larger
WAV commonly stores PCM samples without perceptual compression, so it uses far more space than an AAC-based M4A. That size buys predictable decoding and broad editing compatibility. It does not automatically buy better sound.
This makes WAV suitable for an active project, an interchange file, or a system that rejects M4A. Keep the compact original when storage and sharing matter more than editing access.
The settings that matter before export
Match the source sample rate and channel count unless the destination has a written requirement. Choose bit depth for the editing or delivery workflow, not as a supposed repair setting. Raising sample rate or bit depth during conversion creates more data, but it does not add source detail.
The most important check is downstream behavior. If speech becomes faster, channels disappear, or tracks drift out of alignment, the job is not finished even when the WAV opens.
M4A to WAV converter options, including UniFab Video Converter
For one non-sensitive file, an online converter is shortest: upload the M4A, choose WAV, convert, and download. Choose local processing for private audio, large files, or repeat queues.
Rights and privacy note: Convert only audio you own or are authorized to process, and follow each tool's terms. Before uploading private audio, read the service's published privacy and file-retention policy.
The short browser path
An online converter suits one non-sensitive file that fits the service's upload limit. If cost is decisive, use a free option and follow these steps:
- Make a copy of the original M4A.
- Select or upload that copy in the converter.
- Choose WAV as the output format.
- Keep the source sample rate and channels when those controls are available.
- Convert, download, and play the entire WAV before deleting anything.
Where UniFab fits for local batches
UniFab Video Converter is a permanently free local desktop app for Windows and macOS with batch processing, 1,000+ format conversions, watermark-free output, and NVIDIA, AMD, and Intel GPU acceleration up to 50×. Its published input list names MOV, MP4, AVI, MPEG, WMV, F4V, MPG, TS, and FLV, not M4A; WAV is not separately named in the broad output claim.
Confirm the current selectors accept M4A input and WAV output before using it for this job. My take: UniFab fits mixed-media local batches, not Chromebook-only work.
Desktop M4A-to-WAV workflows: Audacity, FFmpeg, and VLC
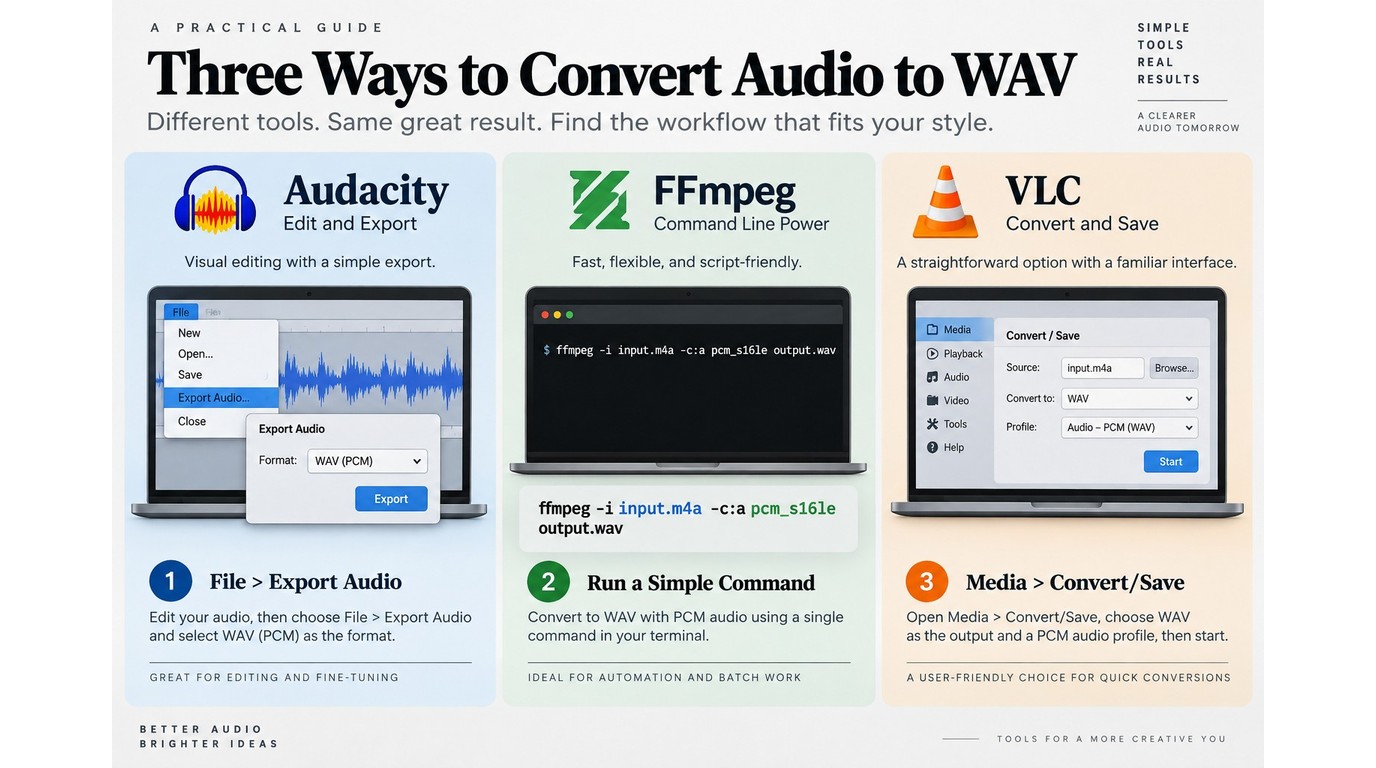
Choose Audacity for visual editing, FFmpeg for repeatable batches, and VLC for an occasional one-off conversion. In all three, retain the source and match its sample rate and channels unless your destination requires something else.
Content reminder: Use these workflows for recordings and audio you own or have permission to convert. Follow the software license and any service terms attached to the source material.
Audacity: import, choose the project rate, and export WAV
Audacity suits you when conversion is part of an editing task. Its main friction point is M4A import: an AAC-based file may require Audacity's optional FFmpeg library.
- Open Audacity and choose File > Import > Audio.
- Select the M4A file and confirm that the waveform and duration look correct.
- If Audacity shows an FFmpeg-library error, install the library using Audacity's setup instructions, restart the app, and import again.
- Set the project sample rate to match the source or your delivery specification.
- Choose File > Export Audio, select WAV and the required PCM encoding, then save.
- Reopen the WAV and check its start, middle, end, and channel layout.
The FFmpeg dependency is not a minor footnote. As one Reddit user in r/audacity quoted from the error dialog, “Without the optional FFmpeg library, Audacity cannot open this type of file.” If the library remains unavailable, convert with FFmpeg directly instead of repeatedly changing Audacity's export settings.
Use it for: waveform editing, trimming, level work, and a visual export check. Not ideal: unattended conversion of a very large folder.
FFmpeg: a repeatable command-line route
FFmpeg can suit repeat jobs because commands can document and reproduce the conversion settings. It has a steeper setup cost, but it avoids clicking through the same dialog for every file.
First inspect the stream:
ffprobe -v error -show_entries stream=codec_name,sample_rate,channels -of default=noprint_wrappers=1 input.m4a
Then decode it to a standard PCM WAV:
ffmpeg -i input.m4a -c:a pcm_s16le output.wav
Use pcm_s24le only when the destination calls for 24-bit PCM. Add an explicit -ar sample rate or -ac channel count only when you need a deliberate conversion; otherwise, avoid changing them merely because the controls exist.
For a folder, put the command in a shell loop or batch script and send results to a separate output directory. Test one file first. That small check catches naming collisions and an incorrect output policy before it affects the queue.
Use it for: repeatable batches and technical workflows. Not ideal: readers who want a visual editor or are uncomfortable with a terminal.
VLC: a practical fallback for one-off files
VLC is reasonable when it is already installed and you need one WAV without editing. The conversion controls are less direct than Audacity's export screen, so it is a fallback rather than my first recommendation for a library.
- Choose Media > Convert/Save and add the M4A file.
- Select Convert/Save again to open the output settings.
- Choose or create an audio profile that uses WAV encapsulation and PCM audio.
- Set a destination filename ending in
.wav. - Start the conversion and wait for VLC to finish.
- Play the result and inspect its duration and channels.
Use it for: an occasional file on a computer that already has VLC. Not ideal: precise batch management or detailed audio editing.
Validate the exported WAV before replacing the source
Validation is part of conversion, not an optional cleanup step. Compare the WAV with the M4A for duration, channel count, sample rate, audible start and end points, and behavior in the target editor.
This matters because container and timing issues can survive a successful-looking export. One r/podcasting contributor wrote, “The tracks are no longer aligned, silences are of a different length.” Keep the original M4A until the WAV has passed the application that actually needs it.
FAQ: Mac, Windows, Chromebook, quality, and privacy
The operating system matters less than the source codec, target use, privacy level, and number of files. Mac and Windows offer local paths, while a Chromebook usually pushes the job toward a browser service unless Linux tools are enabled.
What is the simplest way to convert M4A to WAV on a Mac?
Apple Music is the shortest built-in route for compatible local files. Set Music > Settings > Files > Import Settings to WAV Encoder, select the track, then use File > Convert > Create WAV Version. This creates another file, so keep the original until the new version works in its destination.
Choose Audacity when you also need waveform editing. Choose FFmpeg when repeatability or a folder-sized job matters more than a graphical interface.
How do I convert M4A to WAV on Windows 11?
Audacity provides a visual local route, provided its optional FFmpeg library can import the M4A. FFmpeg suits a repeat queue because the command preserves the conversion settings, while VLC handles a quick one-off file if it is already installed.
Use the detailed steps above rather than stacking multiple conversions. Decoding once to WAV avoids an unnecessary extra lossy encode.
Can I convert M4A to WAV on a Chromebook?
Yes. A browser converter is the simplest Chromebook route for a non-sensitive file, because ChromeOS does not offer the same mainstream desktop audio tools by default.
For private or large recordings, move the job to a Mac or Windows computer and process it locally. A Linux-enabled Chromebook can run command-line tools, but that setup is better suited to readers already comfortable with Linux.
Should I keep the original M4A after creating a WAV file?
Yes, at least until the WAV has passed a full playback and application check. The source remains your reference if the conversion changes duration, channel layout, metadata, or compatibility in an unexpected way.
For AAC-based M4A, the original is also the smaller distribution copy. The larger WAV is usually a working file, not evidence of recovered fidelity.
Which WAV settings should match the source?
Match the sample rate and channel count unless the destination provides a different specification. Select bit depth for the editor or delivery requirement; increasing it cannot restore detail lost before conversion.
If timing or playback speed is wrong, compare the source and project sample rates first. If a channel is missing, inspect whether the source was mono, stereo, or multichannel before exporting again.
How can I convert a private or large audio library without uploading it?
Use a local desktop workflow and write outputs to a separate folder. FFmpeg fits a scripted queue, Audacity fits files that also need editing, and UniFab fits mixed-media local batches only when its current selectors accept M4A input and WAV output.
For a private or large collection, validate one copied file before starting the queue.