You exported a 720p clip at 1920×1080, yet faces and text still look soft. Converting 720p to 1080p enlarges the frame; it does not recover detail by itself. A standard resizer is enough for layout compatibility, while an AI video upscaler can rebuild perceived edges and texture, with results limited by the source.
That mismatch between a 1080p label and a soft picture is why this choice causes so much confusion. I treat the source defect, not the target resolution, as the deciding factor. Compression blocks, ringing, noise, and intentional pixel art each need different handling. The workflow below starts with diagnosis, then covers resizing, AI enhancement, method selection, and a clean YouTube export.
Will Upscaling 720p to 1080p Actually Improve Quality?
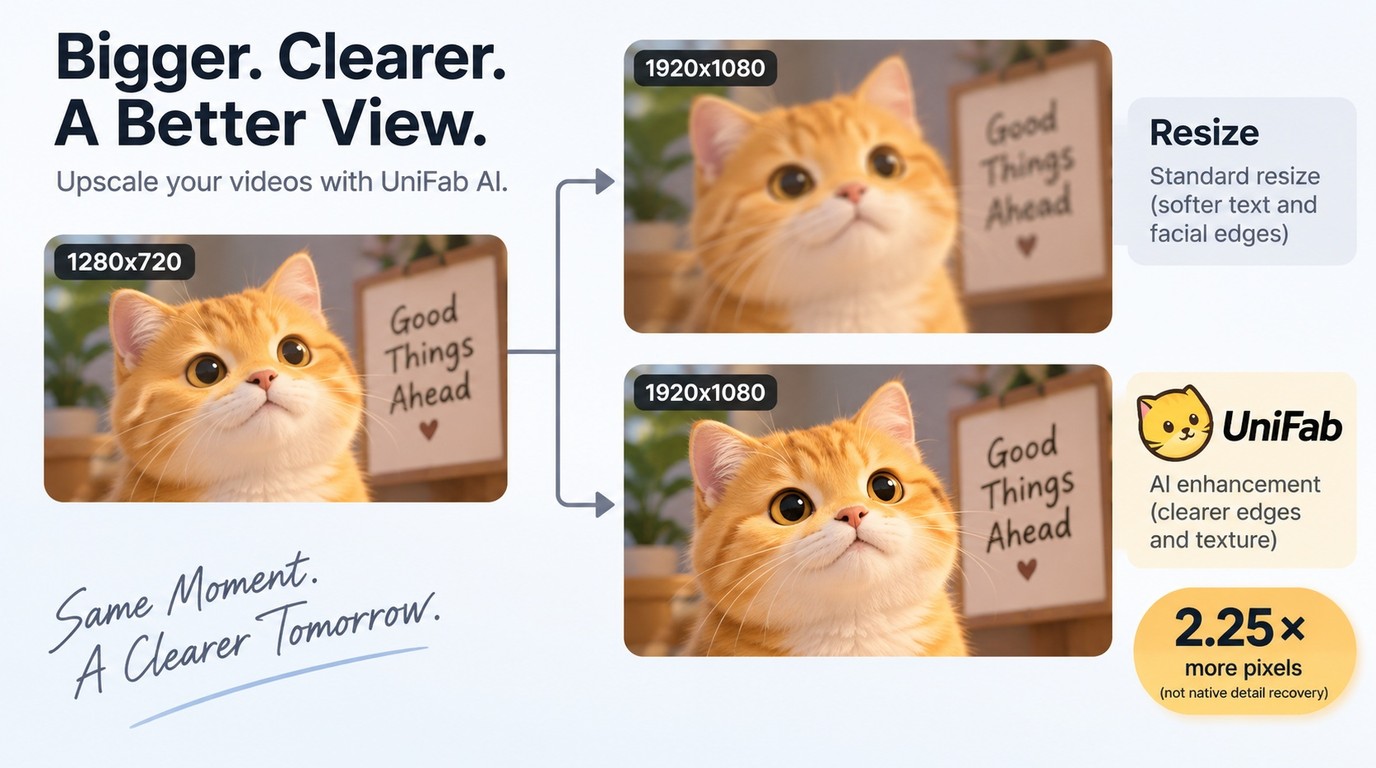
Converting 720p to 1080p always creates a larger pixel grid, but visible improvement is not guaranteed. Standard resizing interpolates extra pixels; AI video upscaling predicts edges and textures, so it can improve perceived clarity when the source contains usable visual patterns.
720p vs. 1080p: Pixels, Sharpness, and File Size
A 720p frame is 1280×720, or 921,600 pixels. A 1080p frame is 1920×1080, or 2,073,600 pixels, which is 2.25 times as many pixels. That arithmetic explains the larger canvas, not a 2.25-fold increase in captured detail. Resolution is the frame grid; this video resolution guide explains why bitrate, compression, display size, and viewing distance still shape what you see.
Ordinary interpolation is useful when an editor, display, or delivery form requires 1080p. It scales existing information into the larger grid, but soft eyelashes, unreadable signs, and smeared grass remain based on the same source. As one Quora contributor put it, “You won't lose quality, but you won't gain any either. Upscaling from 720 to 1080 means the computer is having to create new pixels.” A lossy re-encode can still remove quality, so the safer reading is that resizing alone does not add source detail.
AI enhancement can produce a cleaner impression, but its guesses must be judged against the footage. A Reddit user in r/HiggsfieldAI described an upscale where “The skin is plastic, lightning is off.” That is the boundary worth keeping in view: use AI to reduce a visible defect, not to chase a resolution label. Clean animation, noisy VHS, compressed gameplay, and a soft phone clip should not receive the same treatment.
How to Convert 720p to 1080p Step by Step
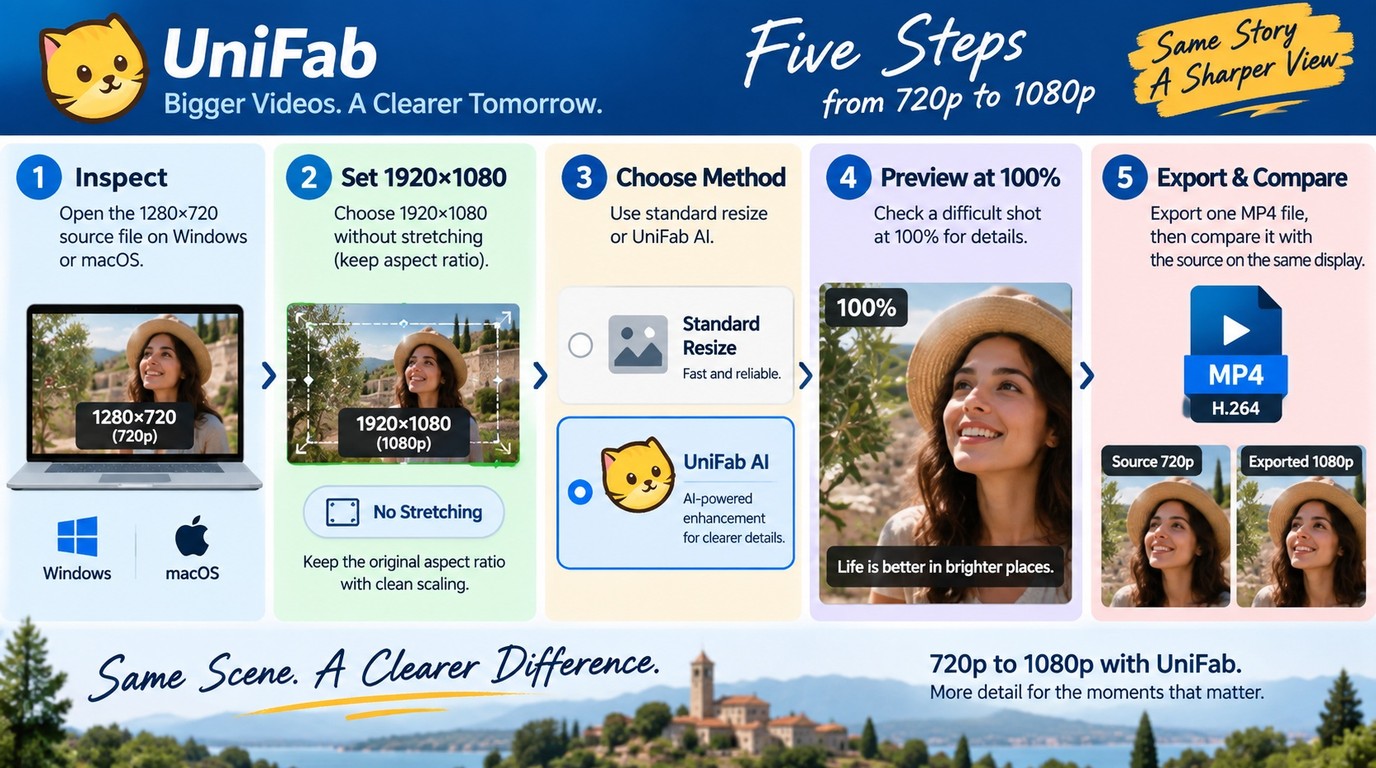
Start with the original 720p file, enough storage for a new export, and an editor or converter that lets you control resolution, frame rate, codec, and bitrate. Then work through this order:
- Inspect the source resolution, frame rate, aspect ratio, and visible defects.
- Set the output frame to 1920×1080 without stretching the image.
- Choose standard resizing for compatibility or AI for targeted enhancement.
- Preview a difficult section at 100% before processing the full video.
- Export once, then compare the result with the source on the same display.
1. Check the Source Before You Upscale
Diagnosis prevents the most common mistake: treating every flaw as a resolution problem. Open the file properties and confirm that the source is truly 1280×720. Note its frame rate, aspect ratio, codec, and scan type. Then watch a short section with faces, text, motion, shadows, and fine patterns.
Separate defects before choosing a tool. Compression blocks need different handling from camera blur; noise is different from missing focus; interlaced combing should be corrected before enlargement. If a title card is sharp but faces are soft, the issue may sit in the original focus or compression rather than the pixel dimensions. The practical rule is to name the defect before changing the frame size.
2. Set 1920×1080 and Choose Resizing or AI
Use 1920×1080 for a standard 16:9 Full HD output and preserve the source aspect ratio. Do not stretch a 4:3 clip to fill 16:9; pillarboxing or a deliberate crop preserves geometry. Keep the original frame rate unless motion conversion is a separate goal.
Choose a conventional scaling filter when the file already looks clean and you mainly need a compatible 1080p container. Choose AI video upscaling when edge definition, line art, texture, or compression damage needs targeted work. Keep enhancement restrained. Excess sharpening draws halos around text and faces, while an unsuitable model can replace fine texture with waxy surfaces.
3. Preview, Export Once, and Compare at 100%
A short preview is the most valuable checkpoint in the workflow. Select a section that includes the hardest material: skin, hair, foliage, subtitles, animation lines, or fast motion. Compare the source and preview at 100% scale, then check them at the actual viewing size. If the result looks sharper only because contrast was pushed, reduce the enhancement.
Export from the best available source directly to the final delivery file. MP4 with H.264 is a practical compatibility choice, while a higher-quality intermediate is useful when more editing remains. Avoid sending the clip through several converters because each lossy pass can add blocking, banding, or softened edges. Keep the source file after export; the upscale is a derivative, not a replacement master.
Free, Online, and AI Upscalers: Which Method Fits?
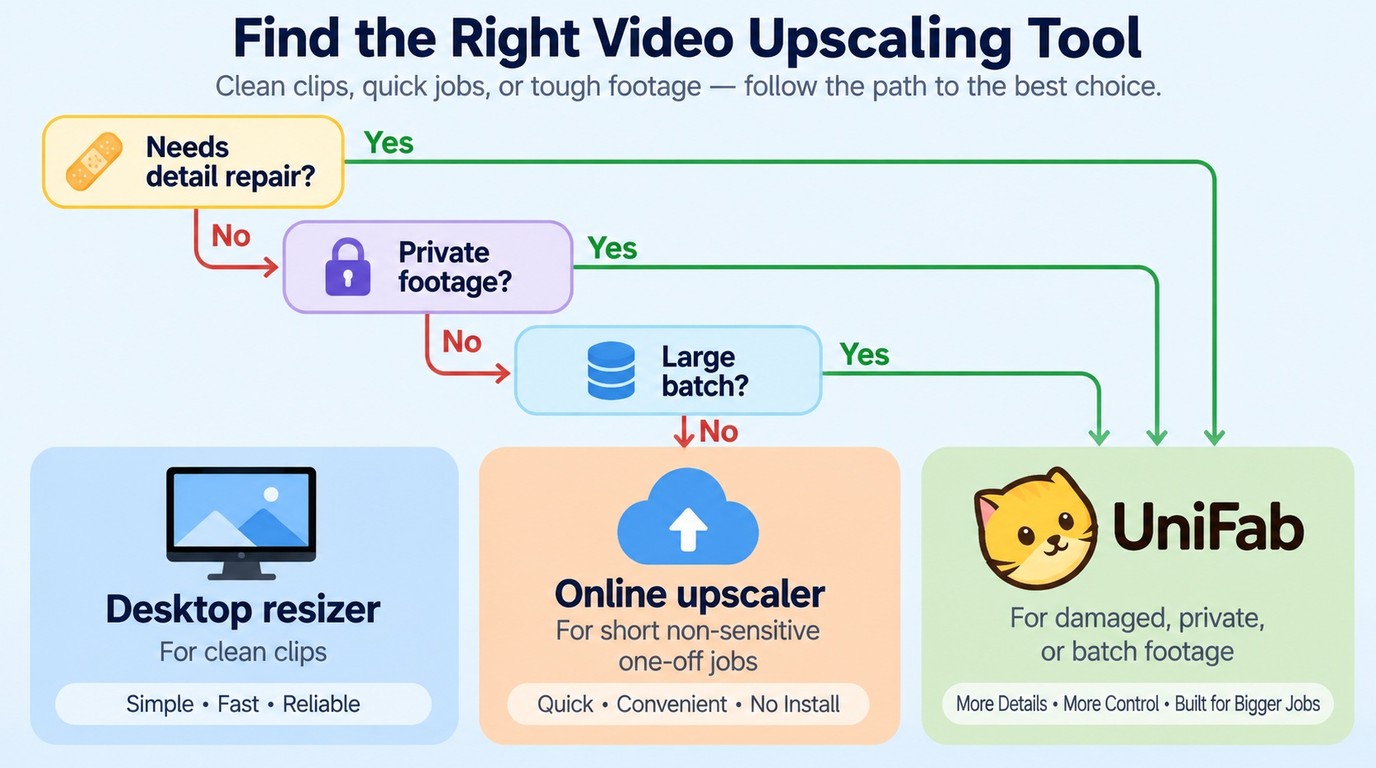
A free online converter is enough for a short, non-sensitive clip that needs new dimensions rather than detail repair. A local AI upscaler fits damaged footage, private archives, repeated jobs, and batches where model choice and preview control matter.
Content and privacy note: Upload only footage you own or are authorized to process. Before using an online service, review its terms, upload policy, and data-retention rules.
| Method | Best fit | Main tradeoff | File handling |
| Basic desktop resizer | Clean clips needing 1080p dimensions | No detail reconstruction | Stays on device |
| Online upscaler | Short, non-sensitive, occasional jobs | Upload and size limits | Sent to cloud |
| Desktop AI upscaler | Repair, batches, private archives | More processing time | Stays on device |
The practical split is simple. Use a basic resizer when the 720p picture is already acceptable and the destination expects 1080p. An online tool reduces setup for a one-off clip, and this online upscaling walkthrough shows the browser workflow. For family footage, client work, or any file you would not email to a stranger, local processing is the more controlled path.
Batch size changes the decision as much as image quality. As one Reddit user in r/VideoEditing put it, “I have hundreds of old videos that were recorded in 720p / 1080p. I would like to upscale all of them to 4k and back them up to YouTube. I’ve tried this in the past and I have to say 1 video took a lot of work.” For that workload, presets, queues, and local storage matter more than avoiding an installation.
How UniFab's AI Models Match Different 720p Sources
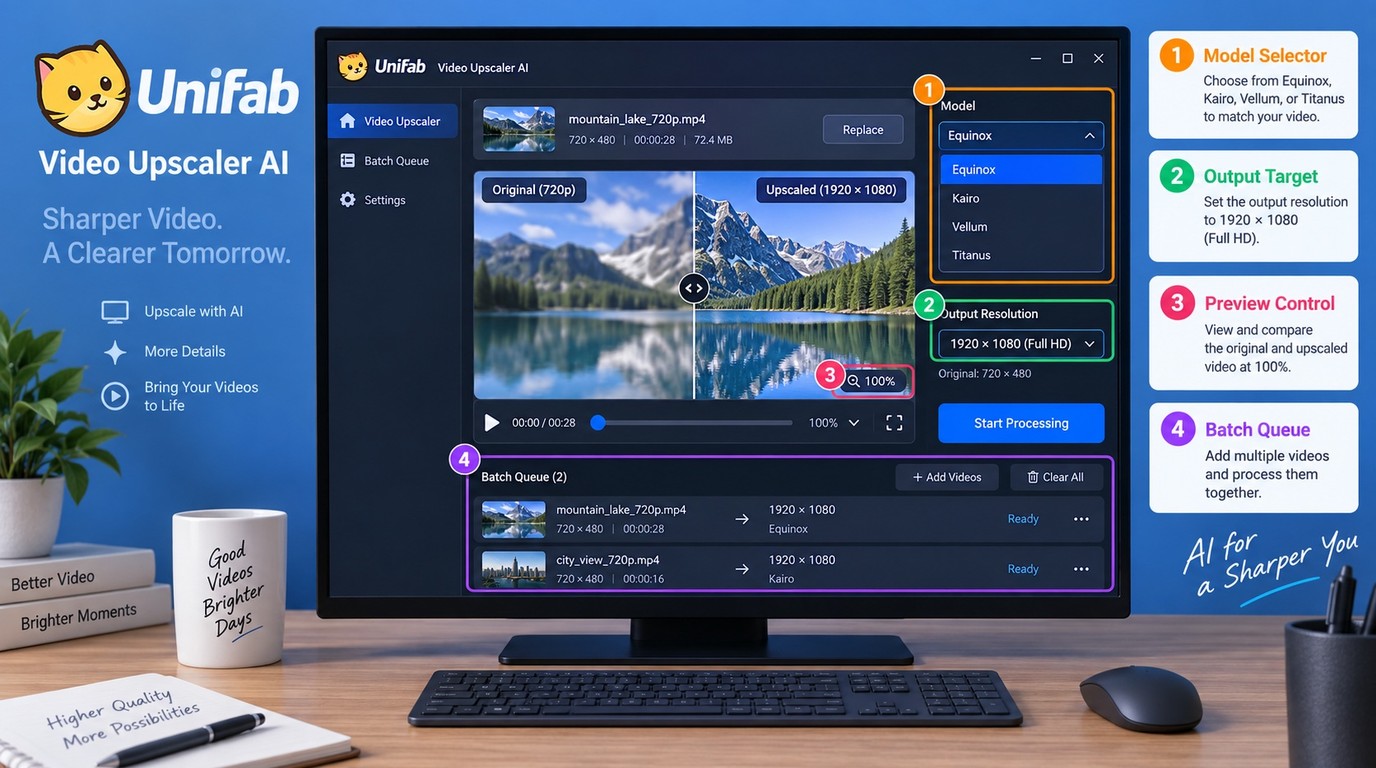
Choose Equinox for general footage, Kairo for anime, Vellum for texture-heavy material, and Titanus for film or television. The model should follow the source structure; a higher output setting cannot correct a model that smooths the wrong details.
| 720p source | UniFab model | Decision note |
| General footage | Equinox | General-purpose starting point |
| Anime | Kairo | Preserve line art and style |
| Texture-heavy footage | Vellum | Prioritize surface texture |
| Film and television | Titanus | Up to 3× faster than prior generation |
UniFab Video Upscaler AI runs locally on Windows and macOS, supports batch processing, writes MP4 or MKV, and offers output targets up to 16K with GPU acceleration specified at up to 50×. For a 720p-to-1080p job, the relevant advantage is not the ceiling; it is matching the model to the picture before committing the batch.
The limits are concrete. AI processing takes time and depends on the available graphics hardware, while a poor model choice can over-smooth faces or alter texture. Preview the hardest shot with two plausible models, then queue the full file after one wins clearly. The same official listing prices Video Upscaler AI at $99.99 per year or $129.99 for a lifetime license, and each function can be processed three times without a watermark before purchase.
Export Settings That Keep 1080p Sharp on YouTube
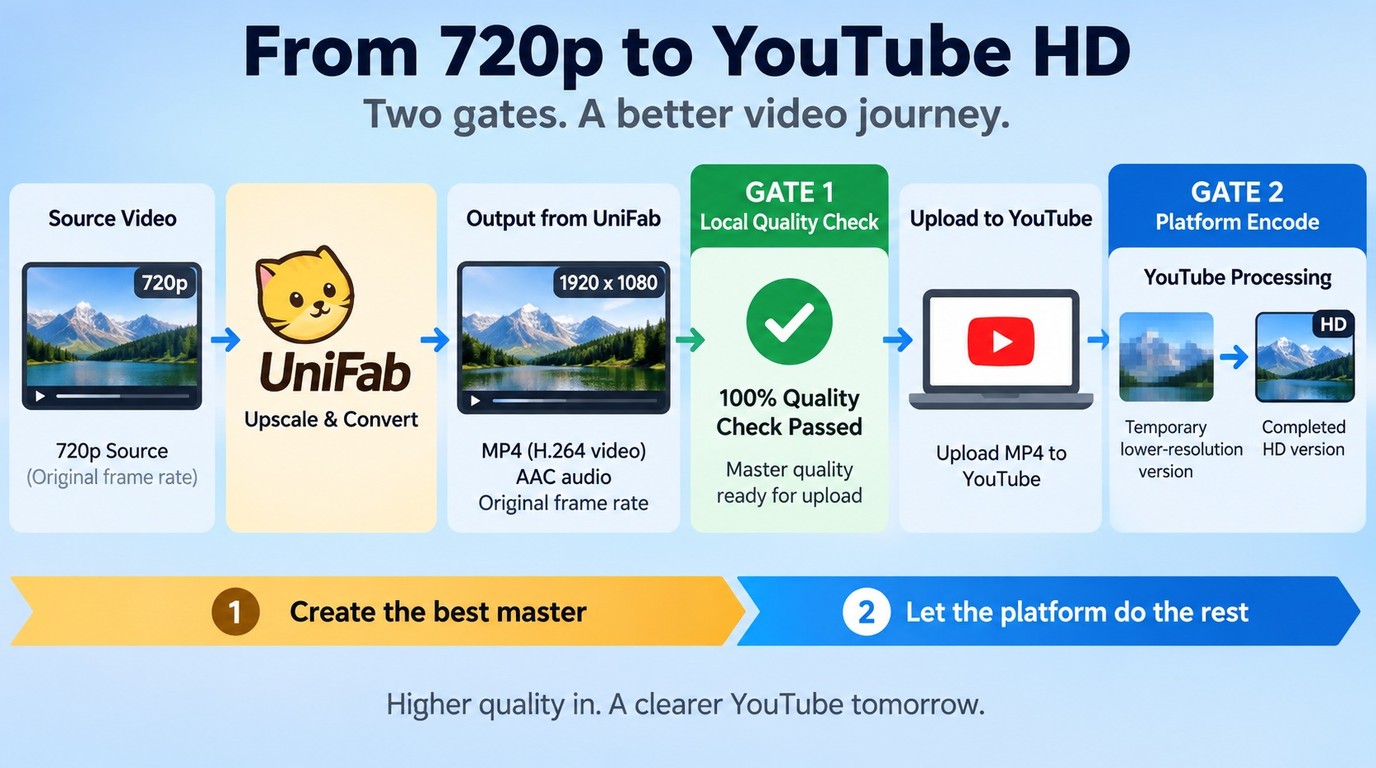
For YouTube, export once in a compatible format, keep the source frame rate, and give the encoder enough bitrate to avoid adding visible blocks or banding. Uploading a larger frame cannot compensate for a damaged source, and the first version you see online may be a lower-resolution encode while HD processing continues.
Match Codec, Bitrate, and Frame Rate to the Source
Use MP4 with H.264 video and AAC audio for broad compatibility. Preserve the original frame rate instead of turning a normal clip into higher-frame-rate video without a motion reason. Keep progressive scan for web delivery, maintain the original aspect ratio, and avoid black bars baked into the picture when the player can add them correctly.
Set bitrate by visual complexity, not by resolution alone. Talking-head footage with a plain wall compresses more easily than gameplay, confetti, foliage, smoke, or camera noise. Review the exported file locally before upload. If moving edges break into blocks, raise the bitrate or reduce unnecessary sharpening; if the local file is clean but the upload is soft, wait until YouTube finishes its higher-resolution processing before changing the master.
Treat platform compression as a second quality gate. The upscaler decides what enters the master, and YouTube's encoder decides what survives delivery. Re-uploading repeated revisions can waste time without addressing the source of the softness.
When a 4K Export Helps, and When It Only Gets Larger
A 4K export makes sense when the delivery specification requires it, when a later edit needs crop room, or when the project must share a 4K timeline. It does not turn a 720p capture into native 4K detail. It adds more predicted pixels, a larger file, and a longer processing path.
Processing cost should be judged against the visible gain. A Reddit user in r/comfyui wrote, “For upscaling, I don't want to use SeedVR2 since it takes hours to just upscale 5 second clip from 720p to 1080p. The Nvidia RTX is very fast but it doesn't make much of a difference.” That result is not universal, but the decision lesson is sound: preview the delivery resolution you actually need, then stop when a higher target no longer improves the viewed image.
720p to 1080p FAQ
Three boundaries matter before you upscale: where the file is processed, whether the source ever captured the detail you need, and whether the problem is visual at all. Resolution enhancement cannot replace privacy controls, original evidence, or separate audio work.
Is It Safe to Upload Private Video to an Online Upscaler?
Cloud processing creates a copy outside your device, so private footage needs a stricter decision than a public social clip. Check the service's terms, retention period, deletion controls, account security, and whether submitted files are used for model training. Upload only material you own or have permission to process. For family archives, client footage, or confidential recordings, a local desktop workflow keeps the media on your own storage and removes the upload step.
Can Upscaling Recover Faces or Text in Security Footage?
Upscaling can enlarge shapes, reduce some noise, and make existing edges easier to inspect. It cannot prove facial features, license characters, or objects that the camera never recorded. AI-generated detail is an estimate, not original evidence. Preserve the untouched source, document every processing step, and keep the enhanced copy separate. For legal, insurance, or investigative use, qualified forensic review should take priority over a consumer CCTV video enhancer.
Does Converting 720p to 1080p Improve Audio Quality?
No. Video resolution changes the image dimensions, not the audio track. If speech is quiet, noisy, or distorted, handle it as a separate task with level correction, noise reduction, or an appropriate video audio enhancer. Keep an untouched copy before processing because aggressive noise removal can also remove consonants, room cues, or music detail. A cleaner picture and cleaner sound require two distinct decisions.