6 Ways to Deinterlace Video for Clean Progressive Output
- Updated on 2026-07-20
- 8630
Table Of Content
Deinterlacing converts alternating odd and even video fields into complete progressive frames. It is useful when motion reveals comb-like edges, but the source should be inspected first because telecined, mixed, or already progressive footage needs a different treatment.
What Does Deinterlace Mean?
To convert interlaced video, software combines or estimates information from alternating fields so each output frame can be displayed progressively. The goal is clean motion on current screens without unnecessary softness, duplicated frames, or incorrect cadence.
Interlaced footage records odd and even scan lines at slightly different moments. Progressive footage stores a complete frame at each moment. For the deeper technical distinction, see interlaced vs. progressive video.
Why Deinterlacing Is Necessary
Progressive video output prevents alternating fields from appearing as jagged edges during motion. It can also reduce flicker and field jitter when older broadcasts, camcorder clips, VHS captures, or 1080i recordings are viewed on progressive displays.
- Motion clarity: Correct field handling reduces combing around moving subjects and camera pans.
- Display compatibility: Progressive frames match the way LCD and OLED screens present video.
- Editing stability: A correctly converted source is easier to resize, encode, and combine with progressive footage.
1080i and 1080p can share the same pixel dimensions, but they store motion differently. The focused comparison is available in 1080i vs 1080p.
Check the Source Before Filtering
A decomb filter should respond to actual combing, not run by default on every file. The editorial rule is simple: diagnose a motion-heavy sample first, then choose the least aggressive process that produces stable progressive frames.
- Inspect motion frame by frame. Pause on a pan, hand movement, or moving text and look for horizontal teeth along edges.
- Read metadata cautiously. An interlaced flag is useful, but previous transcoding may leave the flag wrong or strip it entirely.
- Check for telecine. Repeating clean and combed frames may indicate a film cadence that should be restored rather than treated as ordinary interlacing.
- Watch for mixed footage. Edited programs can contain progressive graphics, telecined segments, and interlaced video in the same file.
- Confirm field order. Top-field-first (TFF) and bottom-field-first (BFF) describe which field comes first. A wrong choice can make motion appear to step backward and forward.
What Is AI Deinterlacing?
AI deinterlacing analyzes neighboring fields and motion patterns to estimate a stable progressive frame. Compared with fixed interpolation, an AI deinterlace workflow can preserve edges more effectively on difficult movement, although the result still depends on source noise, cadence, and field order.
How AI Deinterlacing Works
AI deinterlacing follows the same broad goal as a traditional filter, but it uses learned spatial and temporal patterns to decide how edges and moving objects should appear in each progressive frame.
- Field inspection: The software separates and compares the alternating line fields.
- Motion analysis: It estimates how objects and camera movement change between fields.
- Line estimation: It fills the missing line positions while trying to retain edges and texture.
- Frame assembly: It produces either one progressive frame per source frame or one per source field, depending on the selected cadence.
- Artifact check: A preview should be checked for residual combing, ghosting, halos, or softened detail.
6 Deinterlacing Methods for Different Sources
Deinterlacing software should be selected by source condition and output goal, not by a universal ranking. The six options below cover automated conversion, restoration control, timeline editing, free batch encoding, color workflows, and basic format conversion.
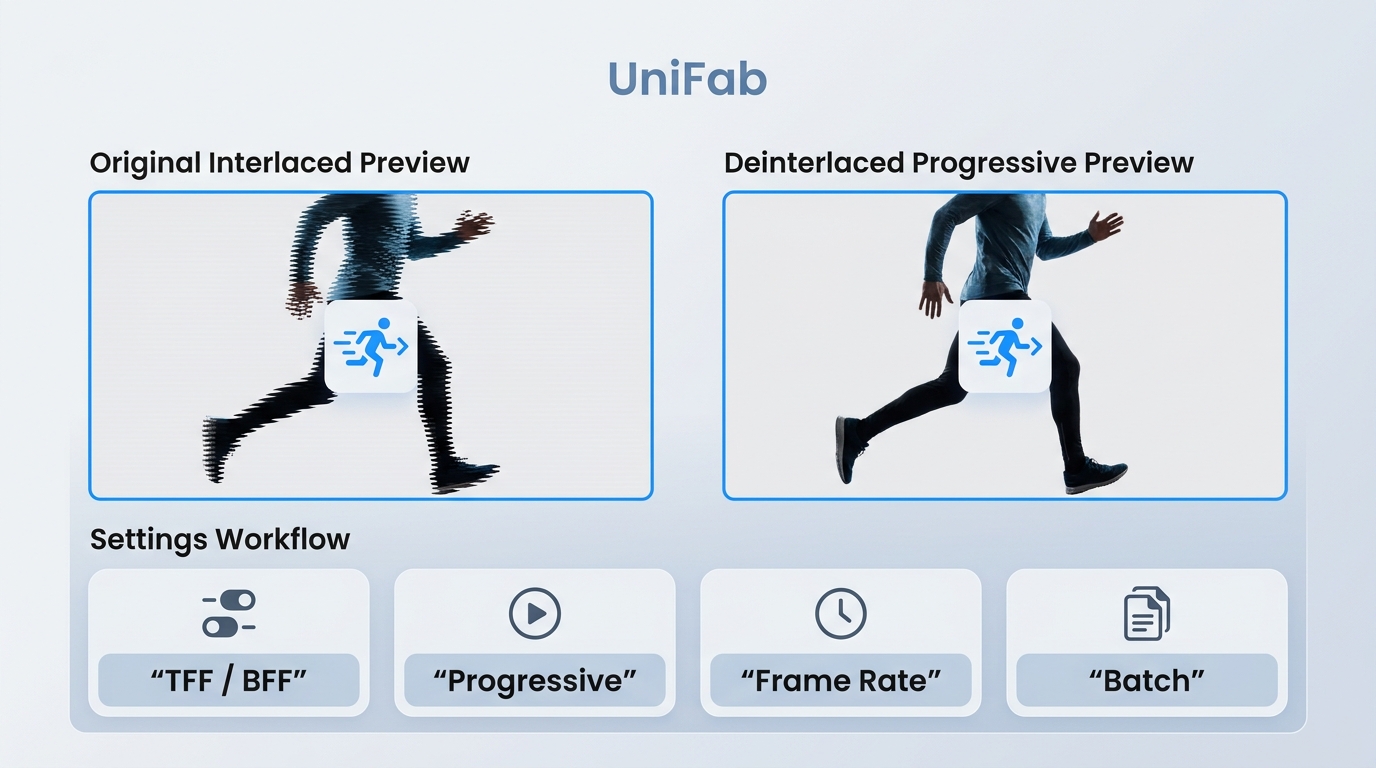
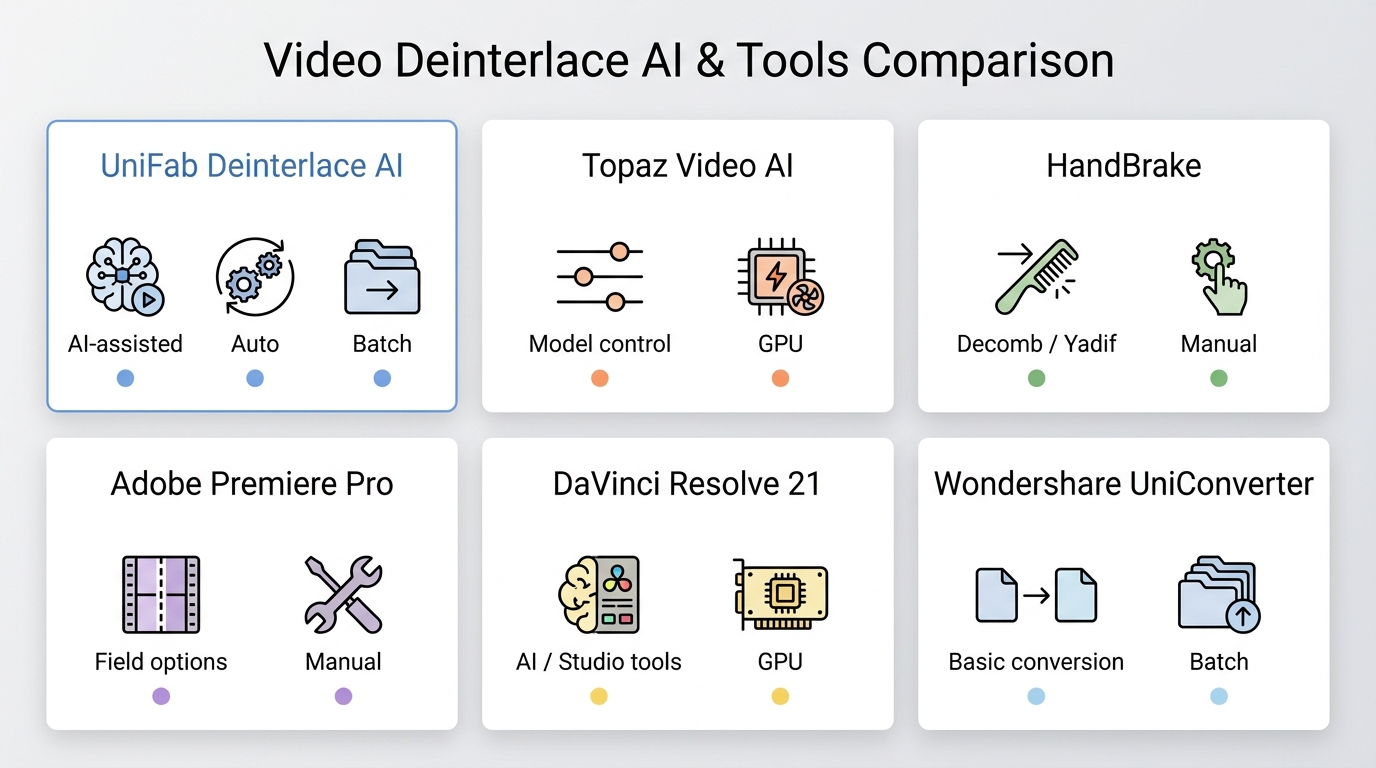
1. UniFab Deinterlace AI for Simple Processing
UniFab Deinterlace AI is a Windows and Mac option for automated progressive conversion with export controls and batch processing. It supports MP4 and MKV output up to 4K, uses NVIDIA CUDA acceleration where available, and processes files locally.
It suits users who want to deinterlace MP4 video or other supported files without scripting filters. It is less suitable for users who need a full editing timeline or granular command-line control over cadence and field logic.
30-day Free Trial for full feature, without watermark!
Launch UniFab and select the Deinterlacer module. Click Add Video to import your interlaced file.
(Optional) Adjust codec, resolution, or frame-rate settings. Click Start -- the AI analyzes fields, estimates motion, and outputs a progressive file.
An MP4 extension does not identify scan type; MP4 is a container and can hold interlaced or progressive video. Processing time varies with source resolution, selected settings, frame-rate output, GPU capability, and queue size.
2. Topaz Video AI for Restoration Control
Topaz Video AI fits restoration work that benefits from manual source classification and model comparison. Its workflow distinguishes Interlaced input from Interlaced Progressive material that was previously transcoded.
Model choice should follow the footage. Dione DV can be considered for DV sources, Dione TV for television material, Dione Dehalo for Edge halos, and the Dione model intended for damaged inputs. Iris or Proteus may suit incorrectly transcoded or detail-sensitive material after a short comparison preview.
- Import the clip and identify whether the input is Interlaced or Interlaced Progressive.
- Confirm field order and choose a model that matches the source condition rather than selecting one model for every file.
- Preview the same motion-heavy range with two plausible models.
- Compare cadence, Edge stability, facial detail, and residual combing before export.
This method suits restoration users who want model-level control. It is less suitable when the priority is a quick batch conversion with minimal setup.
3. Adobe Premiere Pro for Editors
Adobe Premiere Pro is a practical fit when deinterlacing must remain inside an existing edit. The important decisions are the interpreted field order, sequence behavior, and progressive export, while exact control names can vary between releases.
- Import the clip and inspect its field-order interpretation.
- Place it in the intended sequence and check a moving section at full resolution.
- Apply the current field-processing option available in the installed release.
- Export a short progressive sample and verify motion direction, Edge detail, and cadence before rendering the full timeline.
Premiere suits editors who already need trimming, effects, audio, and delivery from one project. A dedicated converter is usually simpler for unattended folders of similar clips.
4. HandBrake for Free Batch Conversion
To deinterlace with HandBrake, choose the filter by source behavior. Comb Detect identifies frames that appear interlaced, Decomb treats detected combing, Yadif applies a conventional motion-aware process, and EEDI2 trades more processing for Edge-oriented interpolation.
- Load the source and open the Filters panel.
- Use Comb Detect with Decomb for mixed or uncertain material, then inspect light-motion areas because subtle combing can be missed.
- Use Yadif when consistent interlacing calls for direct field processing.
- Select bob-style output when preserving one progressive frame per field is important; expect 50p from 50-field material or 59.94p from 59.94-field material.
- Consider EEDI2 when diagonal edges need more careful interpolation and slower processing is acceptable.
- Set the output container, codec, resolution, and frame rate, then encode a short sample before adding files to the queue.
HandBrake suits free batch conversion and users who want visible filter choices. It is less suitable for restoration work that needs learned models, and an always-on filter can soften progressive footage.
5. DaVinci Resolve for Editing Workflows
The DaVinci Resolve deinterlace workflow belongs inside a broader edit, color, and delivery project. DaVinci Resolve 21 is a suitable option for users already organizing media and grading footage in the application.
- Import the source and inspect clip attributes for scan and field information.
- Use the deinterlacing control available in the installed Resolve 21 configuration.
- Check a motion-heavy section on the timeline for field reversal, combing, or temporal stutter.
- Export a progressive sample with the intended frame rate before delivering the complete project.
Resolve suits editors who need deinterlacing alongside color and finishing. It adds unnecessary project overhead when the job is limited to converting a folder of clips. Editors working on related motion issues can also use this DaVinci Resolve stabilization guide.
6. Wondershare UniConverter for Basic Conversion
Wondershare UniConverter remains a basic conversion option for users who want deinterlacing within a general file-conversion workflow. Its value here is convenience rather than transparent control over field order, cadence detection, or filter behavior.
- Add the interlaced source to the conversion workflow.
- Open the current video effect or enhancement controls and enable deinterlacing.
- Choose the output container, resolution, and destination.
- Convert a short motion sample and inspect it before processing the complete file.
It suits straightforward conversion when deeper field controls are not required. It is less suitable for mixed-cadence footage or users who need to see and adjust field-order decisions.
AI and Traditional Methods Compared
The practical difference is control versus automation. AI workflows can help with damaged or motion-heavy sources, while traditional filters remain useful for predictable footage, transparent cadence choices, and efficient batch conversion.
| Method | Source fit | Method type | Field-order control | Original-rate or bob output | Preview workflow | GPU needs | Batch support | Progressive output controls | Common failure mode | Suitable for | Less suitable for |
|---|---|---|---|---|---|---|---|---|---|---|---|
| UniFab Deinterlace AI | Interlaced files needing automated conversion | AI-assisted | Automatic with source confirmation | Set through output frame-rate choices | Short motion sample before export | CUDA acceleration where available | Yes | Format, codec, resolution, quality, frame rate | Soft detail if the source is diagnosed incorrectly | Simple Windows or Mac conversion and queues | Filter scripting or full timeline editing |
| Topaz Video AI | DV, television, damaged, or previously transcoded sources | AI model selection | Input classification and model-dependent control | Depends on chosen workflow | Compare models on the same range | GPU-focused | Yes | Progressive delivery with restoration settings | Wrong model can create unstable texture or halos | Restoration users who want model comparison | Fast setup with few decisions |
| Adobe Premiere Pro | Interlaced clips inside an edit | Timeline field processing | Clip interpretation and sequence settings | Managed through sequence and export cadence | Timeline and exported sample | Depends on project and effects | Project-based | Sequence, codec, resolution, frame rate | Wrong field interpretation can reverse motion | Existing Premiere editing workflows | Unattended folder conversion |
| HandBrake | Consistent, mixed, or lightly combed sources | Comb Detect, Decomb, Yadif, EEDI2 | Filter and preset choices | Original-rate or bob-style output | Encode and inspect a short sample | CPU-capable; hardware encoding is separate | Yes | Container, codec, resolution, frame rate | Light combing may be missed, or progressive detail softened | Free queues and explicit filter choice | AI-based restoration |
| DaVinci Resolve | Interlaced media inside editing and color work | Application deinterlacing control | Clip attributes and project behavior | Set through project and delivery cadence | Timeline plus delivery sample | Depends on media and project settings | Project-based | Delivery format, codec, resolution, frame rate | Incorrect clip interpretation can produce stutter | Resolve 21 editing and grading projects | Quick single-purpose conversion |
| Wondershare UniConverter | Basic interlaced files in a conversion workflow | General conversion control | Limited transparency | Output frame rate selected during conversion | Convert and inspect a sample | Depends on installed hardware support | Available | Container, resolution, destination, frame rate | Limited cadence insight on difficult sources | Simple format conversion | Field-order analysis and mixed footage |
What the Differences Mean in Practice
For VHS or DV, source condition and field order matter more than the software label. For 1080i sports or camera motion, cadence preservation and a motion sample deserve priority. For a simple MP4 conversion, clear progressive export settings and a repeatable queue may matter most.
- Automation helps when the source is difficult: AI can reduce manual filter comparison, but it still needs a source check and preview.
- Transparent controls help when cadence matters: Traditional tools make it easier to choose original-rate or bob-style output deliberately.
- Previewing is the decision point: Compare the same moving range for combing, backward-forward motion, ghosting, halos, and softened diagonals.
Which Method Fits Your Footage?
A suitable method follows the source: diagnose scan type and field order, decide whether motion cadence must be preserved, then choose software that exposes the controls required for that output. No single workflow fits clean broadcasts, mixed edits, DV tape, and damaged VHS equally well.
Choose AI for Difficult Motion and Restoration
AI deinterlacing is a strong fit for noisy edges, complex movement, damaged captures, or restoration work where simple interpolation leaves visible artifacts. Compare a short sample before combining deinterlacing with denoising or upscaling.
- For VHS or DV, stabilize the capture and confirm field order first.
- Deinterlace before resizing so later stages work from progressive frames.
- Apply denoising conservatively after cadence is correct, then upscale if the delivery requires it.
- Inspect moving faces, diagonal lines, subtitles, and camera pans rather than judging a still frame.
UniFab Deinterlace AI fits a simpler automated route, while Topaz fits users who want to compare restoration models. The deciding factor should be the preview result on the source, not a general software ranking.
Choose Traditional Filters for Speed and Control
Traditional filters suit predictable interlaced footage, free batch work, and users who want explicit control over detection and bob behavior. HandBrake is especially useful when a decomb filter or Yadif workflow matches the source.
- Use detection for mixed footage, but inspect subtle combing that automation may miss.
- Use a consistent deinterlacing filter when the full source is clearly interlaced.
- Use bob-style output when retaining one moment per field is important for smooth motion.
- Avoid filtering progressive segments because unnecessary interpolation can soften texture.
Set Progressive Output and Frame Rate
Progressive video output requires separate choices for cadence, pixel dimensions, codec, and container. Keeping the original frame rate creates one progressive frame per source frame; bob-style processing creates one progressive frame per field, such as 50p or 59.94p.
- Frame rate: Preserve the original rate for ordinary delivery, or preserve field-rate motion when fast movement benefits from the extra temporal samples.
- Resolution: Deinterlacing does not require resizing. Keep source dimensions unless a separate delivery or restoration goal calls for scaling.
- Container and codec: MP4 with H.264 or H.265 is a common delivery choice, not a requirement. UniFab also supports MKV.
- Quality check: Export a motion-heavy sample and compare it at normal speed and frame by frame before starting a long encode or batch.
Deinterlacing Questions
Can I deinterlace video on a Mac for free?
Yes. HandBrake runs on macOS and provides Comb Detect, Decomb, Yadif, and EEDI2 choices without a purchase. DaVinci Resolve can also fit an editing workflow. UniFab and other AI options suit users who prefer automated processing and additional export control.
Which method works for VHS or DV footage?
Start with the capture condition, field order, noise, and cadence. DV footage often needs correct TFF or BFF handling, while VHS may also need conservative denoising. Deinterlace first, inspect motion, then denoise and upscale only if the output goal calls for those stages.
Does deinterlacing change resolution or frame rate?
It does not have to change pixel dimensions. Frame rate depends on cadence: one output frame per source frame keeps the original rate, while one output frame per field creates 50p or 59.94p from corresponding field-rate sources.
Can I deinterlace and upscale in one pass?
Some AI workflows can combine the tasks, but difficult footage should be previewed against a staged process. A combined pass may be convenient; separate stages make it easier to identify whether softness, halos, or unstable detail came from deinterlacing or scaling.
Can deinterlacing damage progressive footage?
Yes. Applying a filter when no interlacing is present can soften fine detail, alter cadence, or create ghosting. Inspect motion frames and metadata together, and use conditional detection for mixed footage rather than assuming the entire file needs filtering.